Cross-platform software development poses a number of challenges to your application’s build process. How do you target multiple platforms without maintaining multiple platform-specific build scripts, projects, or makefiles? What if you need to build CUDA code as part of the process? CMake is an open-source, cross-platform family of tools designed to build, test and package software across different platforms. Many developers use CMake to control their software compilation process using simple platform- and compiler-independent configuration files. CMake generates native makefiles and workspaces that can be used in the compiler environment of your choice. The suite of CMake tools were created by Kitware in response to the need for a powerful, cross-platform build environment for open-source projects such as ITK and VTK.
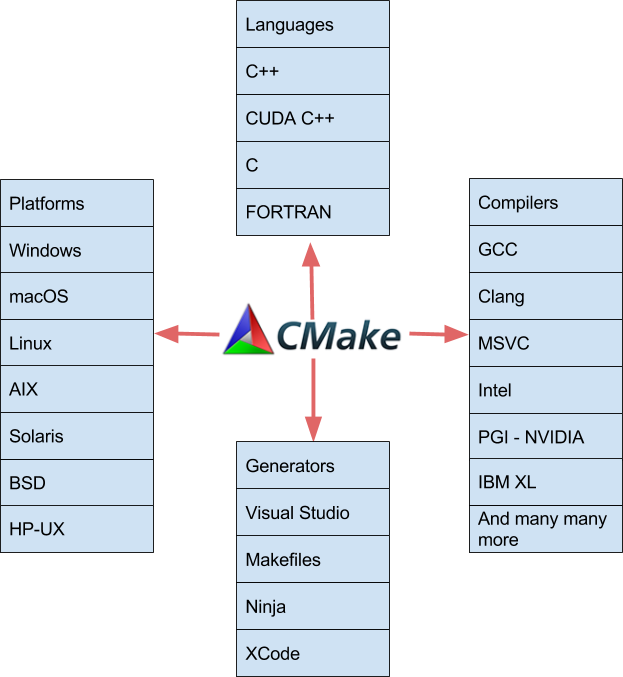
In this post I want to show you how easy it is to build CUDA applications using the features of CMake 3.8+ (3.9 for MSVC support). Since 2009, CMake (starting with 2.8.0) has provided the ability to compile CUDA code through custom commands such as cuda_add_executable, and cuda_add_library provided by the FindCUDA package. CMake 3.8 makes CUDA C++ an intrinsically supported language. CUDA now joins the wide range of languages, platforms, compilers, and IDEs that CMake supports, as Figure 1 shows.
A CUDA Example in CMake
Let’s start with an example of building CUDA with CMake. Listing 1 shows the CMake file for a CUDA example called “particles”. I have provided the full code for this example on Github.
cmake_minimum_required(VERSION 3.8 FATAL_ERROR)
project(cmake_and_cuda LANGUAGES CXX CUDA)

include(CTest)

add_library(particles STATIC
  randomize.cpp
  randomize.h
  particle.cu
  particle.h
  v3.cu
  v3.h
  )

# Request that particles be built with -std=c++11
# As this is a public compile feature anything that links to
# particles will also build with -std=c++11
target_compile_features(particles PUBLIC cxx_std_11)

# We need to explicitly state that we need all CUDA files in the
# particle library to be built with -dc as the member functions
# could be called by other libraries and executables
set_target_properties( particles
                       PROPERTIES CUDA_SEPARABLE_COMPILATION ON)

add_executable(particle_test test.cu)

set_property(TARGET particle_test
             PROPERTY CUDA_SEPARABLE_COMPILATION ON)
target_link_libraries(particle_test PRIVATE particles)

if(APPLE)
  # We need to add the path to the driver (libcuda.dylib) as an rpath,
  # so that the static cuda runtime can find it at runtime.
  set_property(TARGET particle_test
               PROPERTY
               BUILD_RPATH ${CMAKE_CUDA_IMPLICIT_LINK_DIRECTORIES})
endif()
Before I work through all the logic and features showcased by Listing 1, let’s skip ahead to building. If you are using Visual Studio you need to use CMake 3.9 and the Visual Studio CUDA build extensions (included with the CUDA Toolkit), otherwise you can use CMake 3.8 or higher with the Makefile generator (or the Ninja generator) with nvcc (the NVIDIA CUDA Compiler) and a C++ compiler in your PATH. (Alternatively, you can set the CUDACXX and CXX environment variables to the path to nvcc and your C++ compiler, respectively).


To configure the CMake project and generate a makefile, I used the command
cmake -DCMAKE_CUDA_FLAGS=”-arch=sm_30” .
Figure 1 shows the output. CMake automatically found and verified the C++ and CUDA compilers and generated a makefile project. Note that the argument -DCMAKE_CUDA_FLAGS="-arch=sm_30" passes -arch=sm_30 to nvcc, telling it to target the Kepler architecture (SM_30 or Compute Capability 3.0) GPU in my computer.
Next, Figure 1 shows how I invoked the build with the command make -j4. This runs make with multiple threads so it compiles the C++ and CUDA source files in parallel. For more information on how CMake determines where to find parallelism within a project read “CMake: Building with All Your Cores”. CMake also manages building and linking multiple languages into executables or shared libraries automatically.
Enabling CUDA
Let’s dig into the CMake code and work through the different components. As always, the first command in the root CMake file should be cmake_minimum_required, which asserts that the CMake version is new enough, and ensures that CMake can determine what backward compatibilities it needs to preserve when a user is running a newer CMake version than required.
Next, on line 2 is the project command which sets the project name (cmake_and_cuda) and defines the required languages (C++ and CUDA). This lets CMake identify and verify the compilers it needs, and cache the results. This results in generation of the common cache language flags that Figure 3 shows.
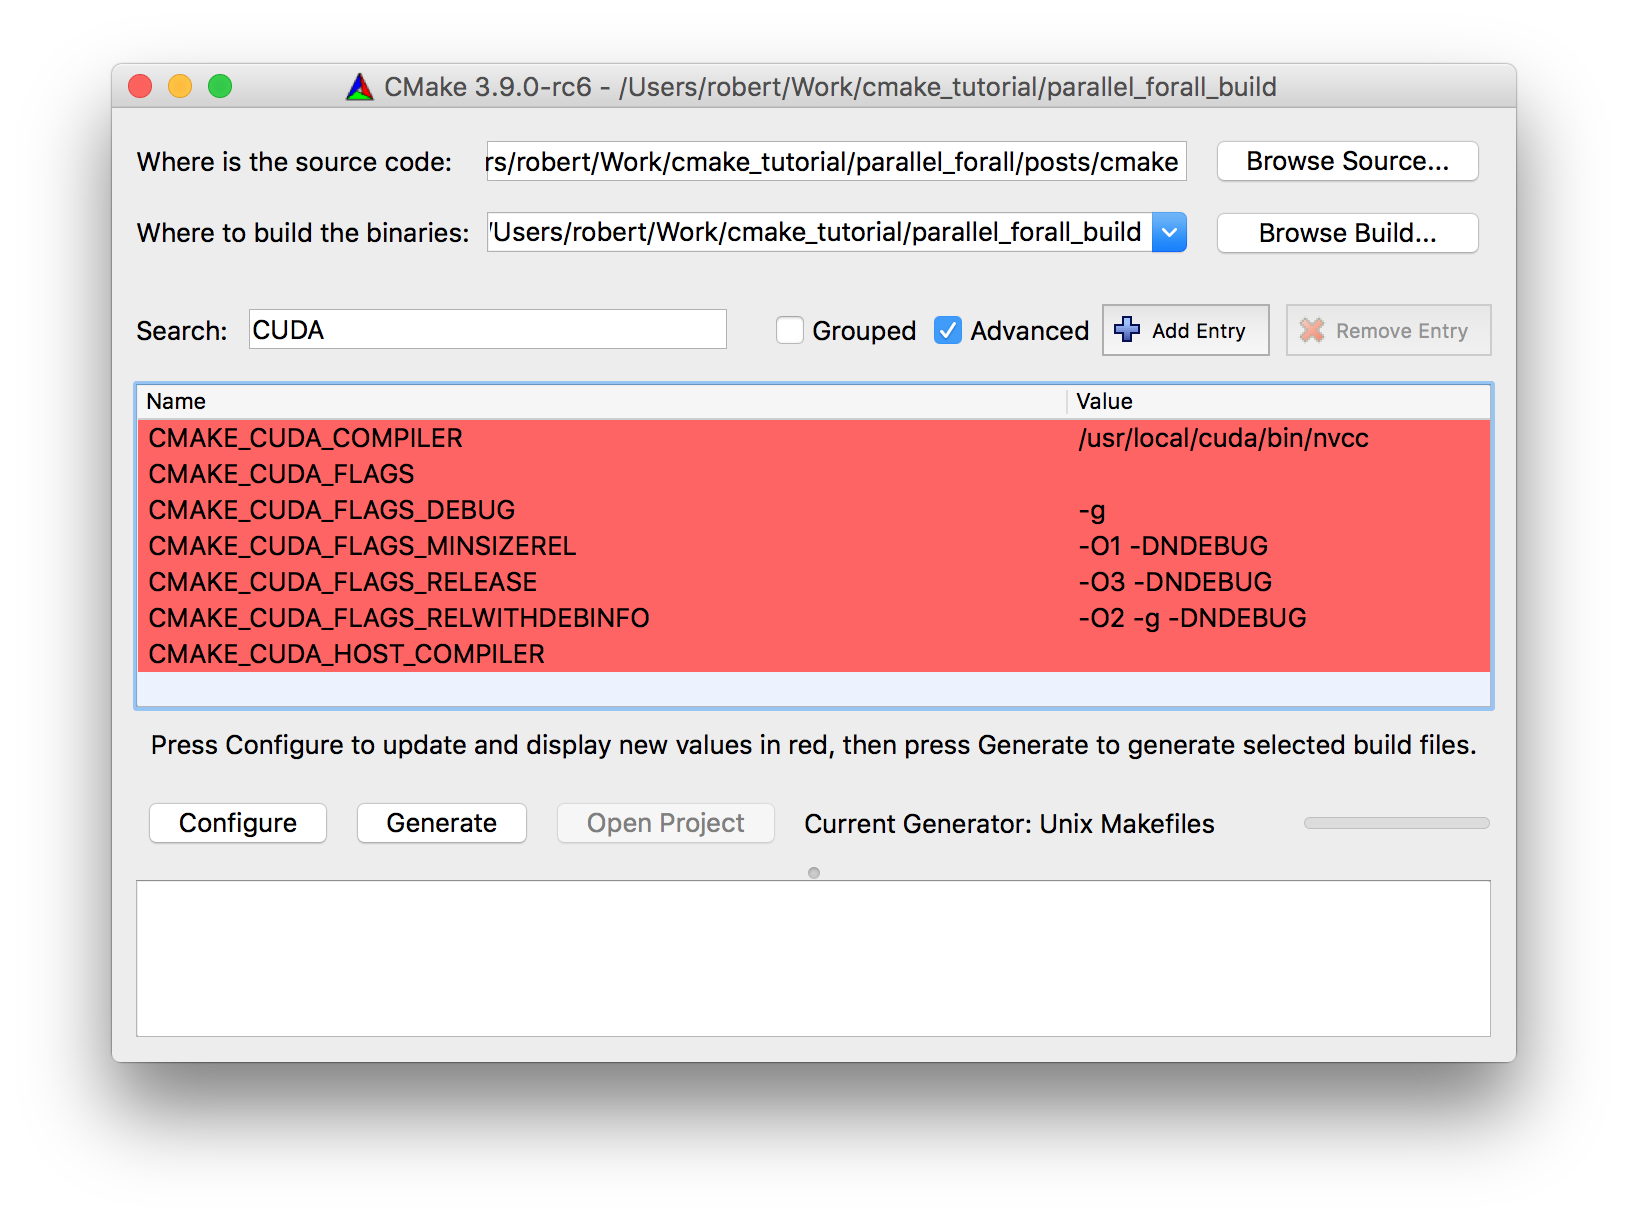
(Debug, Release, RelWithDebInfo, and MinSizeRel).
Now that CMake has determined what languages the project needs and has configured its internal infrastructure we can go ahead and write some real CMake code.
Building a Library with CMake
The first thing that everybody does when learning CMake is write a toy example like this one that generates a single executable. Let’s be a little more adventurous and also generate a static library that is used by an executable.
Usage requirements are at the core of modern CMake. Information such as include directories, compiler defines, and compiler options can be associated with targets so that this information propagates to consumers automatically through target_link_libraries. In previous versions of CMake, building CUDA code required commands such as cuda_add_library. Unfortunately, these commands are unable to participate in usage requirements, and therefore would fail to use propagated compiler flags or definitions. The intrinsic CUDA support now in CMake lets targets that use CUDA fully leverage modern CMake usage requirements and enables a unified CMake syntax for all languages.
C++ Language Level
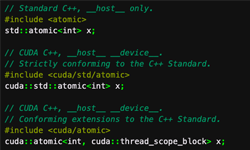
One of the first things you’ll want to configure in a project is the C++ language level (98, 11, 14, 17…) you will use. CMake 3.1 introduced the ability to set the C++ language level for an entire project or on a per-target basis. You can also control the C++ language level for CUDA compilation.
You can easily require a specific version of the CUDA compiler through either CMAKE_CUDA_STANDARD or the target_compile_features command. To make target_compile_features easier to use with CUDA, CMake uses the same set of C++ feature keywords for CUDA C++. The following code shows how to request C++ 11 support for the particles target, which means that any CUDA file used by the particles target will be compiled with CUDA C++ 11 enabled (--std=c++11 argument to nvcc).
# Request that particles be built with --std=c++11
# As this is a public compile feature anything that links to particles
# will also build with -std=c++11
target_compile_features(particles PUBLIC cxx_std_11)
Enabling Position-Independent Code
When working on large projects it is common to generate one or more shared libraries. Each object file that is part of a shared library usually needs to be compiled with position-independent code enabled, which is done by setting the fPIC compiler flag. Unfortunately fPIC isn’t consistently supported across all compilers, so CMake abstracts away the issue by automatically enabling position-independent code when building shared libraries. In the case of static libraries that will be linked into shared libraries, position-independent code needs to be explicitly enabled by setting the POSITION_INDEPENDENT_CODE target property as follows.
set_target_properties(particles PROPERTIES POSITION_INDEPENDENT_CODE ON)
CMake 3.8 supports the POSITION_INDEPENDENT_CODE property for CUDA compilation, and builds all host-side code as relocatable when requested. This is great news for projects that wish to use CUDA in cross-platform projects or inside shared libraries, or desire to support esoteric C++ compilers.
Separable Compilation
By default the CUDA compiler uses whole-program compilation. Effectively this means that all device functions and variables needed to be located inside a single file or compilation unit. Separate compilation and linking was introduced in CUDA 5.0 to allow components of a CUDA program to be compiled into separate objects. For this to work properly any library or executable that uses separable compilation has two linking phases. First it must do device linking for all the objects that contain CUDA device code, and then it must do the host side linking, including the results of the previous link phase.
Separable compilation not only allows projects to maintain a code structure where independent functions are kept in separate locations, it helps improve incremental build performance (a feature of all CMake based projects). Incremental builds allow recompilation and linking of only units that have been modified, which reduces build times. The primary drawback of sepable compilation is that certain function call optimizations are disabled for calls to functions that reside in a different compilation bit, since the compiler has no knowledge of the details of the function being called.
CMake now fundamentally understands the concepts of separate compilation and device linking. Implicitly, CMake defers device linking of CUDA code as long as possible, so if you are generating static libraries with relocatable CUDA code the device linking is deferred until the static library is linked to a shared library or an executable. This is a significant improvement because you can now compose your CUDA code into multiple static libraries, which was previously impossible with CMake. To control separable compilation in CMake, turn on the CUDA_SEPARABLE_COMPILATION property for the target as follows.
set_target_properties(particles PROPERTIES CUDA_SEPARABLE_COMPILATION ON)
PTX Generation
If you want to package PTX files for load-time JIT compilation instead of compiling CUDA code into a collection of libraries or executables, you can enable the CUDA_PTX_COMPILATION property as in the following example. This example compiles some .cu files to PTX and then specifies the installation location.
add_library(CudaPTX OBJECT kernelA.cu kernelB.cu)
set_property(TARGET CudaPTX PROPERTY CUDA_PTX_COMPILATION ON)

install(TARGETS CudaPTX
   OBJECTS DESTINATION bin/ptx
)
To make PTX generation possible, CMake was extended so that all OBJECT libraries are capable of being installed, exported, imported, and referenced in generator expressions. This also enables PTX files to be converted or processed by tools such as bin2c and then embedded as C-strings into a library or executable. Here’s a basic example of this.
CMake and CUDA go together like Peanut Butter and Jam
I hope this post has shown you how naturally CMake supports building CUDA applications. If you are an existing CMake user, try out CMake 3.9 and take advantage of the improved CUDA support. If you are not an existing CMake user, try out CMake 3.9 and experience for your self how great it is for building cross-platform projects that use CUDA.
You can download the latest CMake 3.9 binaries at https://cmake.org/download/, and you can find the official documentation at https://cmake.org/documentation/.