In an earlier post we showed how MATLAB® can support CUDA kernel prototyping and development by providing an environment for quick evaluation and visualization using the CUDAKernel object. In this post I will show you how to integrate an existing library of both host and device code implemented in C++ or another CUDA-accelerated language using MEX. With MEX you can extend and customize MATLAB, or use MATLAB as a test environment for your production code.
The MATLAB MEX compiler allows you to expose your libraries to the MATLAB environment as functions. You write your entry point in C, C++ or Fortran as a modified main() function which MATLAB invokes. MEX provides a framework for compiling this code, as well as an API for interacting with MATLAB and MATLAB data in your source code.
MATLAB’s Parallel Computing Toolbox™ provides constructs for compiling CUDA C and C++ with nvcc, and new APIs for accessing and using the gpuArray datatype which represents data stored on the GPU as a numeric array in the MATLAB workspace.
Feature Detection Example
I am going to use a feature detection example from MATLAB’s documentation for Computer Vision System Toolbox™. This uses tracked features to remove camera shake from an in-car road video. You will need MATLAB®, Parallel Computing Toolbox™, Image Processing Toolbox™ and Computer Vision System Toolbox™ to run the code. You can request a trial of these products at www.mathworks.com/trial. This example also depends on the OpenCV Computer Vision library, compiled with CUDA support.
Features are an essential prerequisite for many Computer Vision tasks; in this case, for instance, they might also be used to determine the motion of the car or to track other cars on the road.
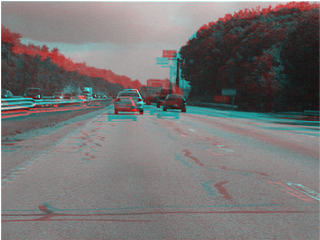
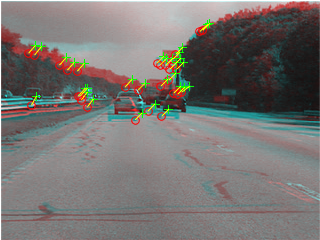
To set up the example environment, I am using the following MATLAB code to load the video and display the first two frames superimposed (Figure 1).
filename = 'shaky_car.avi';
hVideo = vision.VideoFileReader(filename, 'ImageColorSpace', 'Intensity');

imgA = im2uint8(step(hVideo)); % Read 1st frame into imgA as 8-bit image
imgB = im2uint8(step(hVideo)); % Read 2nd frame into imgB as 8-bit image

figure; imshowpair(imgA,imgB,'ColorChannels','red-cyan');
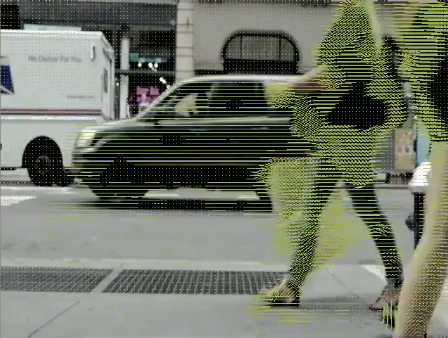
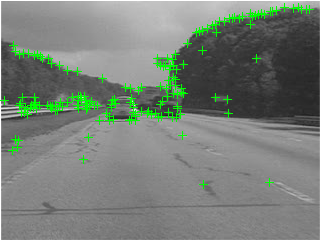
Next I detect feature points in each image using one of the built-in feature detection routines provided with Computer Vision System Toolbox™. These points have properties, such as good contrast, that make them candidates for being detected in multiple images. Figure 2 shows the detected points.
ptThresh = 0.1;
pointsA = detectFASTFeatures(imgA, 'MinContrast', ptThresh);
pointsB = detectFASTFeatures(imgB, 'MinContrast', ptThresh);

% Display the feature points detected in the first image:
figure; imshow(imgA); hold on;
plot(pointsA);
By looking at the neighborhood of pixels around each feature, I can extract feature “descriptors” that uniquely identify each point in a way invariant to the camera motion. I can then find matches between the features found in the two images. Computer Vision System Toolbox™ makes these steps easy to implement. Figure 3 shows the result.
% Extract feature descriptors
[featuresA, pointsA] = extractFeatures(imgA, pointsA, 'Method', 'FREAK');
[featuresB, pointsB] = extractFeatures(imgB, pointsB, 'Method', 'FREAK');
% Match
indexPairs = matchFeatures(featuresA, featuresB);
% Show the matched points
pointsA = pointsA(indexPairs(:, 1), :);
pointsB = pointsB(indexPairs(:, 2), :);
figure; showMatchedFeatures(imgA, imgB, pointsA, pointsB);
The next steps are to determine the motion of the camera and warp the images to provide a stabilized viewpoint.
Implementing a custom feature detector
Detecting features is sometimes a computational bottleneck in the code and I may want to accelerate it on the GPU using a CUDA-accelerated library of computer vision routines, such as OpenCV. OpenCV provides the ORB algorithm with its CUDA support, an alternative feature detector to FAST. I’ll write a MEX function to implement that algorithm.
I start by creating a new file for our CUDA C++ code. This needs to end in .cu in order for MEX to detect it as CUDA code.
edit detectORBFeatures.cu
Here is the code for my MEX function. I will go through pointing out the key components, and then explain how to compile and run it.
#include "mex.h"
#include "gpu/mxGPUArray.h"
#include "opencv2/gpu/gpu.hpp"

// Forward declare the utility functions
void iDetectFeatures(uint8_t const * const d_Image,
                     size_t M, size_t N,
                     cv::gpu::GpuMat & keypoints,
                     size_t & numPoints,
                     int const threshold);
void iCopyToMATLAB(cv::gpu::GpuMat const & keypoints,
                   float * const d_points);

// Entry point for the call from MATLAB. This is where execution will
// start when I run the MATLAB function detectORBFeatures.
void mexFunction(int nlhs, mxArray *plhs[],
                 int nrhs, mxArray const *prhs[])
{
  // Ensure MATLAB's GPU support is up and running
  mxInitGPU();

  // Validate the input
  if (nlhs > 1 || nrhs < 1) {
    mexErrMsgTxt("Expected 1 output and at least one input.");
  }

  // Convert the input image into a mxGPUArray so we can get at the
  // underlying data. This will copy the data to device memory if
  // it is not already there.
  mxGPUArray const * I = mxGPUCreateFromMxArray(prhs[0]);

  // Retrieve and validate arguments - here we have kept this to a
  // minimum - your MEX functions may handle a wider range of inputs
  // and perform more checks.

  // Check the image data is in a supported format
  size_t const * const dims_I = mxGPUGetDimensions(I);
  size_t const numDims = mxGPUGetNumberOfDimensions(I);
  if (numDims != 2 || mxGPUGetClassID(I) != mxUINT8_CLASS) {
    mexErrMsgTxt("Only grayscale images of type uint8 are supported.");
  }

  // Get the optional arguments
  size_t numPoints = 500; // Default number of features to find
  int threshold = 20;  // Default detection threshold
  if (nrhs >= 2) {
    numPoints = (size_t)mxGetScalar(prhs[1]);
  }
  if (nrhs >= 3) {
    threshold = (int)mxGetScalar(prhs[2]);
  }

  // Get a pointer to the device memory with the image data
  uint8_T const * d_I = (uint8_T const *)(mxGPUGetDataReadOnly(I));

  // Call the low-level detector
  cv::gpu::GpuMat keypoints; // Output from OpenCV ORB detector
  iDetectFeatures(d_I, dims_I[0], dims_I[1], keypoints, numPoints,
                  threshold);

  // Create the 2D mxGPUArray for the locations
  mwSize dims[] = {keypoints.cols, 2};
  mxGPUArray * mxGPUFeaturePoints = mxGPUCreateGPUArray(
    2, dims, mxSINGLE_CLASS, mxREAL, MX_GPU_DO_NOT_INITIALIZE);
  float * const d_mxPoints =
    (float *)mxGPUGetData(mxGPUFeaturePoints);

  // Copy the raw output into the mxGPUArray
  iCopyToMATLAB(keypoints, d_mxPoints);

  // Move the mxGPUArray to a mxArray
  plhs[0] = mxGPUCreateMxArrayOnGPU(mxGPUFeaturePoints);

  // Destroy the mxGPUArrays, which are just additional headers.
  // The device data is not going to be destroyed.
  mxGPUDestroyGPUArray(mxGPUFeaturePoints);
  mxGPUDestroyGPUArray(I);
}

void iDetectFeatures(uint8_t const * const d_Image,
                     size_t M, size_t N,
                     cv::gpu::GpuMat & keypoints,
                     size_t & numPoints,
                     int const threshold)
{
  // Wrap device data with a GpuMat
  cv::gpu::GpuMat const cv_image(cv::Size(M, N), CV_8UC1,
                                 (void *)d_Image);

  // Set up the detector
  cv::gpu::ORB_GPU featureDetector((int)numPoints);
  featureDetector.setFastParams(threshold);

  // Run the detector to get the features
  featureDetector(cv_image, cv::gpu::GpuMat(), keypoints);
}

void iCopyToMATLAB(cv::gpu::GpuMat const & keypoints,
                   float * const d_points)
{
  // Get pointers to the location data
  cv::gpu::GpuMat locations(keypoints,
    cv::Range(cv::gpu::ORB_GPU::X_ROW,
              cv::gpu::ORB_GPU::RESPONSE_ROW),
    cv::Range::all());

  // Offset coordinates by 1 to match MATLAB's 1-indexing
  cv::gpu::add(locations, 1.0f, locations);

  // Wrap the MATLAB-managed device memory with a GpuMat
  size_t numPoints = locations.cols;
  cv::gpu::GpuMat cv_points(cv::Size(2, numPoints),
                            CV_32FC1, (void *)d_points);

  // Copy across using OpenCV. (We could also have used cudaMemcpy.)
  locations.copyTo(cv_points);

  // Copy to the MATLAB-managed device memory.
  // I switch the X and Y coordinates because OpenCV images are
  // stored transposed with respect to MATLAB images.
  size_t numBytesToCopy = numPoints*sizeof(float);
  cudaMemcpy(d_points, locations.ptr(1),
             numBytesToCopy, cudaMemcpyDeviceToDevice);
  cudaMemcpy(d_points + locations.cols, locations.ptr(0),
             numBytesToCopy, cudaMemcpyDeviceToDevice);
}
Defining a mexFunction
Your function must be called mexFunction and have the following signature.
void mexFunction(int nlhs, mxArray *plhs[],
                 int nrhs, mxArray const *prhs[])
The parameters refer to the left-hand side and right-hand side arguments of the MATLAB statement that called this function. nlhs and nrhs are the number of left-hand and right-hand arguments, and plhs and prhs contain the data. mxArray is the base datatype that encapsulates all MATLAB variables. When I call my new MEX function from MATLAB as follows,
points = detectORBFeatures(imgA, numPoints, threshold);
I will have nlhs = 1, nrhs = 3, plhs[0] = points, prhs[0] = imgA, prhs[1] = numPoints, and prhs[2] = threshold.
Initializing the GPU and validating inputs
The first thing you should always do in a GPU MEX function is call mxInitGPU. This ensures that MATLAB loads its GPU libraries and selects a GPU. It should also throw an error (and cause your MEX function to return to MATLAB) if there is no compatible GPU available. I then check that the user has passed in the right arguments and throw appropriate error messages if they have not.
mxInitGPU();
if (nlhs > 1 || nrhs < 1) {
    mexErrMsgTxt("Expected 1 output and at least one input.");
}
I need to expose the input image as a mxGPUArray in order to access the device-side data. I do this using the API function mxGPUCreateFromMxArray which also copies the data across to the GPU if the input is not already a gpuArray.
mxGPUArray const * I = mxGPUCreateFromMxArray(prhs[0]);
I should do some basic validation on the input image, making sure it is 2D 8-bit data. Of course I could write code to handle a variety of types, with a consequent increase in complexity. Note the API functions for getting the size and type of the data. They generally match the standard MEX C API, but with the prefix mxGPU instead of just mx.
size_t const * const dims_I = mxGPUGetDimensions(I);
size_t const numDims = mxGPUGetNumberOfDimensions(I);
if (numDims != 2 || mxGPUGetClassID(I) != mxUINT8_CLASS) {
    mexMsgTxt("Only grayscale images of type uint8 are supported.");
}
I retrieve the other inputs using mxGetScalar, which returns any data representable by a scalar double value as a double, or errors. Generally you should keep scalars and small arrays that represent sizes or settings on the CPU, since the data transfer time is not offset by any performance gains.
Implementing the algorithm
I can now get hold of the GPU data as an address in device memory, to process it with the library’s tools.
uint8_T const * d_I = (uint8_T const *)(mxGPUGetDataReadOnly(I));
Running the detector is very specific to this problem, so I’ve set it aside in a local utility function iDetectFeatures. In it, I wrap my GPU data with OpenCV’s GpuMat datatype, initialise the ORB detector, set its parameters, and then run it on the wrapped data.
cv::gpu::GpuMat const cv_image(cv::Size(M, N), CV_8UC1, (void *)d_Image);
cv::gpu::ORB_GPU featureDetector((int)numPoints);
featureDetector.setFastParams(threshold);
featureDetector(cv_image, cv::gpu::GpuMat(), keypoints);
Retrieving data back to MATLAB
I’ve decided to return the locations of the detected features as GPU data. This gives me the flexibility to keep the computation on the device for as long as possible in case I want to do further processing on the result. Actually accessing the data returned by OpenCV is again quite specific to this example, so I have put that functionality in another utility function, iCopyToMATLAB. Before I call it, I create the output gpuArray to hold the results.
mwSize dims[] = {keypoints.cols, 2};
mxGPUArray * mxGPUFeaturePoints = mxGPUCreateGPUArray(
  2, dims, mxSINGLE_CLASS, mxREAL, MX_GPU_DO_NOT_INITIALIZE);
mxGPUCreateGPUArray is the function to create new gpuArrays, and the contents can either be left uninitialized (as here), or filled with zeros using MX_GPU_INITIALIZE_VALUES as the last argument. I then get another device pointer which iCopyToMATLAB uses for copying the results from OpenCV into the space just allocated.
float * const d_mxPoints = (float *)mxGPUGetData(mxGPUFeaturePoints);
iCopyToMATLAB(keypoints, d_mxPoints);
To return the result to MATLAB, I need to assign the output into the plhs array, but this requires converting back from a mxGPUArray to a mxArray using mxGPUCreateMxArrayOnGPU. The lingering mxGPUArrays are then destroyed – this only destroys header information, not the underlying device data.
plhs[0] = mxGPUCreateMxArrayOnGPU(mxGPUFeaturePoints);
mxGPUDestroyGPUArray(mxGPUFeaturePoints);
mxGPUDestroyGPUArray(I);
Compiling the MEX function
For CPU MEX functions compilation is usually little more than calling the function mex on your source code. For GPU MEX there are two extra things to do. Firstly, you need to copy the GPU mex options file from your MATLAB installation folder into the directory with your source. You can do this in MATLAB code as follows:
myArch = computer('arch');
pathToOpts = fullfile(matlabroot, ...
                      'toolbox', 'distcomp', 'gpu', ...
                      'extern', 'src', 'mex', myArch, ...
                      ['mex_CUDA_' myArch '.xml']);
copyfile(pathToOpts, '.');
Secondly, to make sure that MEX uses 64-bit types, you must also pass the option -largeArrayDims to mex.
mex compiles and links your code into a shared library which MATLAB reads if you call a function of the same name (without the file extension). So for instance,
mex -largeArrayDims myMexFunction.cu
will output a file (on Windows) called myMexFunction.mexw64 which you can run by typing myMexFunction into the command window.
mex takes many of the same options as a typical command-line C compiler and linker. For this example, for instance, I need to link in the OpenCV libraries that provide the feature detector and accompanying utilities. I do this using the following command.
mex -largeArrayDims -lopencv_core -lopencv_gpu detectORBFeatures.cu
Building with 'nvcc'.
MEX completed successfully.
For more details on the inputs to mex and other options such as compiling with debug symbols, see the documentation.
Comparing the output
With my mex function written and compiled I can now call detectORBFeatures in place of detectFASTFeatures in the above example.
thresh = 20;
numPoints = 400;
pointsA = detectORBFeatures(imgA, numPoints, thresh);
pointsB = detectORBFeatures(imgB, numPoints, thresh);
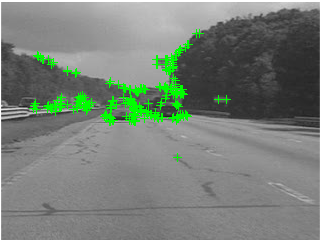
Figure 4 shows the points detected in the first image by the custom function. The ORB algorithm finds a different set of candidates for tracking than FAST, and I am hoping this will give me more matches between images and so more robust estimates of camera motion.
figure; imshow(imgA); hold on;
plot(pointsA(:,1), ...
     pointsA(:,2), 'g+');
To match these features without further customizations, I need to call gather on the points passed to extractFeatures, which doesn’t support gpuArray input. This will copy the data back to the CPU. The other functions handle gpuArray data with no changes.
% Extract feature descriptors
[ftsA, ptsA] = extractFeatures(imgA, gather(ptsA), 'Method', 'FREAK');
[ftsB, ptsB] = extractFeatures(imgB, gather(ptsB), 'Method', 'FREAK');
% Match
indexPairs = matchFeatures(ftsA, ftsB);
% Show the matched points
ptsA = ptsA(indexPairs(:, 1), :);
ptsB = ptsB(indexPairs(:, 2), :);
figure; showMatchedFeatures(imgA, imgB, pointsA, pointsB);
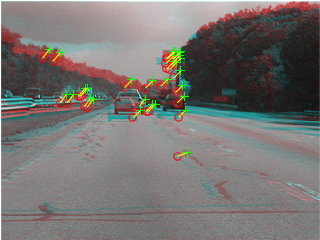
Using the ORB detector actually resulted in fewer matches than before (compare Figure 5 to Figure 3), although the video stabilization results may be equally good. In practice I would go on to determine whether making this change meets all my requirements for performance and accuracy.
Evaluating performance
There are many reasons to implement your own custom MATLAB functions; one of them may be to improve performance over built-in MATLAB code. The best way to measure the performance of individual calls is to use the timeit and gputimeit functions. When I compare my new detector against the MATLAB built-in this way, I find that I’m not getting much benefit for these images.
tCpu = timeit(@()detectFASTFeatures(imgA));
tGpu = gputimeit(@()gather(detectORBFeatures(gpuArray(imgA))));
disp(['CPU took ', num2str(tCpu), 's, GPU took ', num2str(tGpu), 's']);
disp(['Slowdown of ', num2str(tGpu/tCpu), 'x']);
CPU took 0.0031642s, GPU took 0.0087352s
Slowdown of 2.7607x
However, with larger images I see the benefit of a GPU-accelerated detector.
largeImage = imresize(imgA, [3840 2160]); % Scale up to 4K resolution
tCpu = timeit(@()detectFASTFeatures(largeImage));
tGpu = gputimeit(@()gather(detectORBFeatures(gpuArray(largeImage))));
disp(['CPU took ', num2str(tCpu), 's, GPU took ', num2str(tGpu), 's']);
disp(['Speedup of ', num2str(tCpu/tGpu), 'x']);
CPU took 0.099256s, GPU took 0.024602s
Speedup of 4.0344x
Note that I have explicitly included transferring all the data to the GPU, and the results back to the CPU. If I were doing a series of operations on the GPU, such as some of the many GPU-accelerated image processing functions in Image Processing Toolbox™, there would be even more benefit.
Advanced MEX function development
This MEX function needs further work to take it beyond a simple example. For robustness I would add more validation that the input is in an appropriate form. For flexibility, I may want to handle a variety of image formats, and allow more of the ORB detector parameters to be controlled from MATLAB. I may want to accept parameters as name-value pairs (as detectFASTFeatures does) rather than a fixed-order list.
Once the input processing reaches a certain level of complexity, the best solution is to create a wrapper in MATLAB code. This opens up access to MATLAB’s input processing and validation tools such as narginchk, validateattributes and the input parser. It also makes it possible to specify help text for the function (in comments at the top of the file) that users can access by typing help detectORBFeatures.
Conclusion
For most problems, MATLAB’s existing integration with CUDA already provides enough acceleration without the need for specialist knowledge of CUDA C/C++ or parallel algorithm development. In a future blog post we will show you more of what you can do without the need to leave the MATLAB language. MEX, as an advanced extension, gives the flexibility of integrating existing CUDA libraries and custom algorithms seamlessly with MATLAB.