Integrating GPU-accelerated libraries into existing software stacks can be challenging, in particular, for applications that are written in high-level scripting languages. Although CUDA-bindings already exist for many programming languages, they have different APIs and vary in functionality. Some are simple wrappers around the CUDA Runtime, others provide higher-level abstractions.
In this blog, I present grCUDA, an open-source solution that simplifies the integration of CUDA into script languages of the Oracle GraalVM, such as Python, JavaScript, R, and Ruby. This multi-language support, called polyglot, allows developers to select the best language for a task. While GraalVM can be regarded as the “one VM to rule them all“, grCUDA is the “one GPU binding to rule them all“. Developers can efficiently share data between GPUs and GraalVM languages (R, Python, JavaScript) with grCUDA and launch GPU kernels.
As a motivating use case let us consider a fictional company Acme, Inc. This company is offering a business management solution that provides CRM, inventor, and supply-chain management to international enterprises. As a large organically grown software product, this platform employs components written in different languages, such as Java for the business logic, JavaScript for the front-end, and R for the statistical and modelling functionality, all of which are tightly integrated inside the GraalVM ecosystem. As a business management platform, however, machine and deep learning workloads are getting more and more important to Acme’s customers who want to run GPU-accelerated data analytics, recommender systems, or NLP workloads. grCUDA provides a framework that allows Acme Inc to seamlessly incorporate CUDA kernels and CUDA-accelerated libraries, such as RAPIDS and cuDNN, into their business management suite, offering the highly requested functionality to their customers in a timely manner.
In this blog, I will show how you can access GPU-visible memory from your script and how to launch GPU kernels. Finally, we will study two examples that, in spirit of the Ame Inc company, use grCUDA to accelerate an R script and Node.js web application.
grCUDA
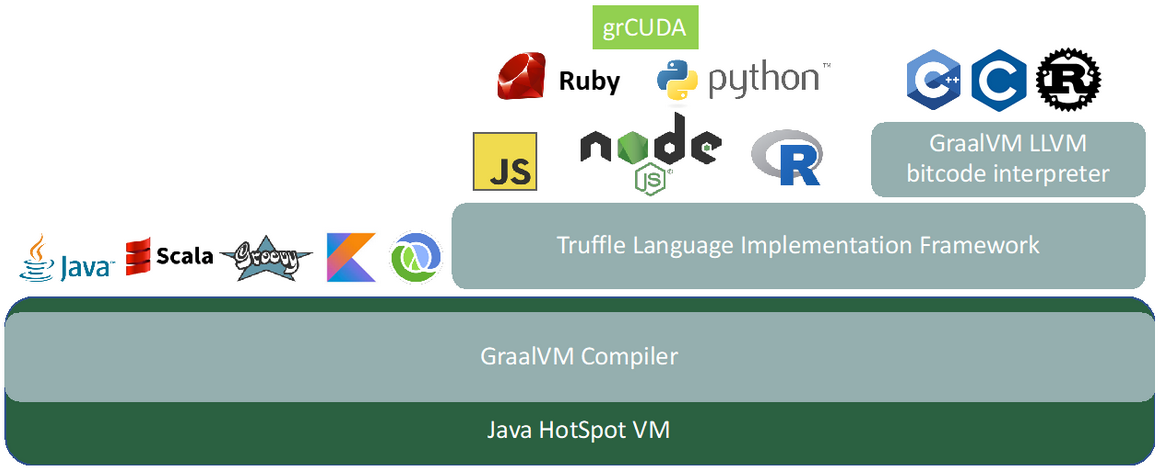
grCUDA is an expression-oriented language and is, like the other GraalVM languages, implemented in the Truffle Language Implementation Framework. Figure 1 shows the architecture of grCUDA in the GraalVM stack. We will be using the built-in functions of grCUDA. The pattern will always be the same: we will write a grCUDA expression that returns the function as a callable object back to the GraalVM language and then invoke these functions. We use the polyglot interface of GraalVM to evaluate the grCUDA expressions as shown below:
# Python
import polyglot
result  = polyglot.eval(language=’grcuda’, string=’grCUDA expression’)

// JavaScript
let result  = Polyglot.eval(’grcuda’, ’grCUDA expression’)

# R
result <- eval.polyglot(’grcuda’, ’grCUDA expression’)

# Ruby
result = Polyglot.eval(”grcuda”, ”grCUDA expression”)
Listing 1: Evaluation of grCUDA expression from different GraalVM languages
Device Array
A Device Array is a wrapper around GPU-accessible memory which grCUDA exposes as multi-dimensional array to the GraalVM host language. The initial version of grCUDA a device array is backed by CUDA Unified Memory. Unified memory can be accessed by both host and device. You can find more details in the Developer Blog on Unified Memory.
JavaScript Code:
// get DeviceArray constructor function
const DeviceArray = Polyglot.eval(’grcuda’, ’DeviceArray’)

// create 1D array: 1000000 int32-elements
const arr = DeviceArray(’int’, 1000000)

// create 2D array: 1000 x 100 float32-elements in row-major order
const matrix = DeviceArray(’float’, 1000, 100)

// fill array
for (let i = 0; i < length(arr); ++i) {
  arr[i] = i
}
// fill matrix
for (let i = 0; i < length(matrix); ++i) {
  for (let j = 0; j < length(matrix[0]); ++i) {
    arr[i][j] = i + j
Listing 2: Allocating and accessing device arrays from JavaScript
In Listing 1, arr is a one-dimensional array that can hold one million signed 32-bit integers. matrix is a two-dimensional 1000×100 array whose elements are stored in row-major order. We can access both device arrays like ordinary JavaScript arrays using the [] operator. Since JavaScript does not support multi-dimensional arrays directly, grCUDA exposes them as arrays of arrays.
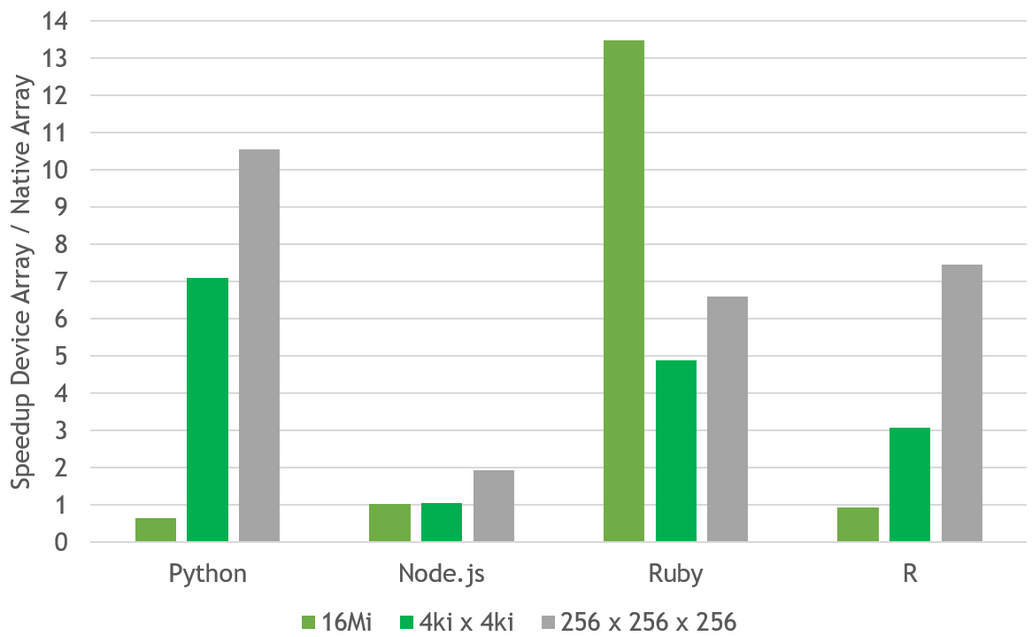
grCUDA maintains consistent semantics for device arrays across languages. This means that the behavior for element access slightly deviates from that of arrays native in the respective GraalVM languages. For example, device arrays are typed and, unlike in JavaScript, bounded. grCUDA performs type and bound checks for every access and applies permitted type coercions. The important point here is that these checks come at negligible cost because grCUDA leverages the GraalVM Compiler, which is able to perform runtime specialization using profiling information and can hoist checks out of loops. In many cases, the array access is even faster than for arrays native in the GraalVM language as the performance measurements in Figure 2 shows.
Launching GPU Kernels
grCUDA can launch GPU kernels from existing CUDA code, e.g., from compiled PTX or cubin files. Launching kernels is a two-step process. First, we bind a kernel form the binary to a callable object, using the bindkernel built-in function of grCUDA. Then we launch the kernel by invoking the callable. In the following, we show how launch an existing CUDA kernel from a Python script that is executed by the GraalVM Python interpreter. Consider to following simple CUDA kernel that performs an element-wise scale-and-add operation, also known as SAXPY, on a vector.
extern ”C” __global__
void saxpy(int n, float alpha, float *x, float *y) {
  int i = blockIdx.x * blockDim.x + threadIdx.x;
  if (i < n) {
    y[i] = alpha * x[i] + y[i];
  }
}
Listing 3: Simple CUDA Kernel that performs an element-wise scale-and-add operation
The CUDA kernel is compiled using the nvcc CUDA compiler into a PTX binary:
nvcc -ptx saxpy.cu
The nvcc compiler by default mangles the symbols according to the C++ rules, which means that the mangled identifier (e.g., _Z5saxpyifPfS_ for this kernel) must be specified as the name of the symbol in the subsequent bindkernel. The “extern “C”“ declaration prevents name mangling.
Next, we write a short Python script that binds the kernel, creates two arrays and launches the kernel.
import polyglot

# bind kernel from PTX file to callable
bindkernel = polyglot.eval(language='grcuda', string='bindkernel')
kernel = bindkernel('saxpy.ptx', 'saxpy', 'sint32, float, pointer, pointer')

# create and initialize two device arrays
devicearray = polyglot.eval(language='grcuda', string='DeviceArray')
n = 1_000_000
arr_x = devicearray('float', n)
arr_y = devicearray('float', n)

for i in range(n):
    arr_x[i] = i
    arr_y[i] = 1

# launch kernel
kernel(80, 128)(n, 2, arr_x, arr_y)

first10 = ', '.join(map(lambda x: str(x), arr_y[0:10]))
print(first10, '...')
Listing 4: GraalVM Python script that binds the symbol of compiled kernel to a callable object and launches the kernel.
First, we obtain the bindkernel function from grCUDA. We then invoke the function, pass the name of the PTX file and give it the name of the kernel. The last argument ‘sint32, float, pointer, pointer‘ is the signature of the kernel. It specifies the types of the arguments that the kernel function expects. The signature is needed to bridge between dynamically typed GraalVM languages and statically typed CUDA code. GraalVM will coerce a value from a source language type to the type required by the signature if permitted by the coercion rules. grCUDA supports the simple types from the Truffle Native Function Interface (NFI). Note that a device memory pointer, e.g., float *x, in the CUDA code, maps to the untyped pointer type pointer in the signature string. Typically, device array objects are provided for such pointer arguments. grCUDA extracts the underlying pointer of the array and provides it as an argument to the kernel.
Next, we create two device arrays and fill them from Python for-loop. Finally, we launch the kernel in line:
kernel(80, 128)(n, 2, arr_x, arr_y)
The kernel executable can be regarded as a function with two arguments lists. The first argument list contains the kernel configuration that corresponds to the argument inside <<< … >>> in CUDA.
The second argument list contains the actual arguments that are passed to the kernel. grCUDA will automatically unbox the memory pointers from the arr_x and arr_y device arrays passed to the kernel. For comparison, the equivalent kernel launch statement in CUDA is:
saxpy<<<80, 128>>>(n, 2, arr_x, arr_y); // arr_x and arr_y are float * device pointers.
We obtain the following output when we run the script in the Python interpreter of GraalVM.
$ graalpython --polyglot --jvm saxpy.py
1.0, 3.0, 5.0, 7.0, 9.0, 11.0, 13.0, 15.0, 17.0, 19.0 ...
Runtime Kernel Compilation
grCUDA can also compile CUDA kernel at runtime. It leverages NVRTC Runtime Compilation to create kernel from a source-code string. In order to use NVRTC in grCUDA, simply use the buildkernel function instead bindkernel and provide the kernel source as a string instead of the name of the binary file as we did above.
The corresponding code in Python snippet is:
# kernel source code in CUDA C
kernel_source = """__global__
void saxpy(int n, float alpha, float *x, float *y) {
  int i = blockIdx.x * blockDim.x + threadIdx.x;
  if (i < n) {
    y[i] = alpha * x[i] + y[i];
  }
}
"""

# build kernel from source and create callable
buildkernel = polyglot.eval(language='grcuda', string='buildkernel')
kernel = buildkernel(kernel_source, 'saxpy', 'sint32, float, pointer, pointer')
Listing 5: Runtime compilation of CUDA Kernels
Note that “extern “C”” declaration is not needed as grCUDA can retrieve the mangled kernel name from NVRTC directly.
Examples
We are going to discuss two examples that illustrate how to call a GPU-accelerated library from R and how to use grCUDA from an Express.js web application.
Example: RAPIDS cuML from R
This example illustrates how grCUDA can call functions of RAPIDS cuML from an R script. Even though cuML does not currently offer an R binding, grCUDA makes the native library accessible to GraalVM languages. The following R snippet applies DBSCAN [Ester et al. 1996], a density-based clustering algorithm on a two-dimensional dataset and identifies clusters as well as outlier points.
# install.packages('seriation')
library(seriation)
library(ggplot2)
data('Chameleon')

n_rows <- nrow(chameleon_ds4)
n_cols <- ncol(chameleon_ds4)
device_array <- eval.polyglot('grcuda', 'DeviceArray')

data <- device_array('double', n_rows, n_cols)
for (r in 1:n_rows) {
  for (c in 1:n_cols) {
    data[r, c] <- chameleon_ds4[r, c]
  }
}

labels <- device_array('int', n_rows)

# obtain cuML DBSCAN callable as a pre-registered function in grCUDA
dbscan_fit <- eval.polyglot('grcuda', 'ML::cumlDpDbscanFit')
eps <- 5             # max distance between points to be connected
min_samples <- 15    # min number of points in a cluster
max_bytes_per_batch <- 0
verbosity <- 0

dbscan_fit(data, n_rows, n_cols, eps, min_samples, labels,
           max_bytes_per_batch, verbosity)
chameleon_ds4$label <- labels[1:n_rows]

print(
  ggplot(chameleon_ds4, aes(x,y, color=factor(label))) + geom_point() +
    scale_colour_viridis_d(
      name='Cluster',
      labels=c('outlier', '0', '1', '2', '3', '4', '5')))
Listing 6: R script invokes DBSCAN from RAPIDS cuML.
In the example, we use the ‘CHAMELEON’ dataset from the seriation package. This is a synthetic two-dimensional dataset that was used to evaluate the clustering algorithms. The dataset is available in the R data frame chameleon_ds4. It contains 8,000 data points (rows) and two columns. In the first step, we copy it into a two-dimensional device array data. We allocate a suitably sized device array and copy the elements from the data frame. We create a second device array, called labels, into which DBSCAN will write the cluster index for each of the 8,000 points.
Next, we obtain the fit function from RAPIDS cuML through grCUDA. Several functions from RAPIDS are registered in grCUDA in the ML namespace. We are working to eventually expose all algorithms from cuML. We obtain the callable object and store it in dbscan_fit. When the function is invoked, we specify the two device arrays and a number of hyper parameters.
We add the label device vector as a column to the data frame. The slice expression labels[1:n_rows] copies into an R integer vector, which is then added as a column to the data frame.
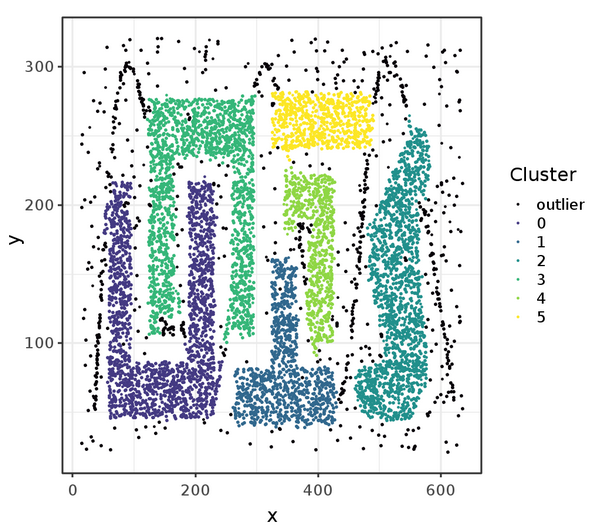
Finally, we display the points with cluster assignment with ggplot. The resulting plot is shown in Figure 3. The black points represent outliers that were not associated with any cluster by DBSCAN.
Example: CUDA from a Node.JS/Express Web Application
GPU acceleration can be added with a few lines of code. This example illustrates with a Node.JS web application that is written in Express.js. The application computes the Mandelbrot Set as ASCII art — the same way it was shown in the first published picture by [Brooks and Matelski 1978]. Here, we are accelerating the computation with a GPU. The crucial point in this example is that the whole web application can be written in less than 50 lines of JavaScript code, including 17 lines for the CUDA kernel source code. The full Node.js source is shown in Listing 7.
const express = require('express')
const app = express()

const kernelSrc = `
__global__
void mandelbrot(int *img, int width_pixel, int height_pixel,
                float w, float h, float x0, float y0, int max_iter) {
  const int x = blockIdx.x * blockDim.x + threadIdx.x;
  const int y = blockIdx.y * blockDim.y + threadIdx.y;
  float c_re = (w / width_pixel) * (x - width_pixel / 2) + x0;
  float c_im = (h / height_pixel) * (height_pixel / 2 - y) + y0;
  float z_re = 0, z_im = 0;
  int iter = 0;
  while ((z_re * z_re + z_im * z_im <= 4) && (iter < max_iter)) {
    float z_re_new = z_re * z_re - z_im * z_im + c_re;
    z_im = 2 * z_re * z_im + c_im;
    z_re = z_re_new;
    iter += 1;
  }
  img[y * width_pixel + x] = (iter == max_iter);
}`
const port = 3000
const widthPixels = 128
const heightPixels = 64
const buildkernel = Polyglot.eval('grcuda', 'buildkernel')
const DeviceArray = Polyglot.eval('grcuda', 'DeviceArray')
const kernel = buildkernel(kernelSrc, 'mandelbrot',
  'pointer, sint32, sint32, float, float, float, float, sint32')
const blockSize = [32, 8]
const grid = [widthPixels / blockSize[0], heightPixels / blockSize[1]]
const kernelWithGrid = kernel(grid, blockSize)

app.get('/', (req, res) => {
  const img = DeviceArray('int', heightPixels, widthPixels)
  kernelWithGrid(img, widthPixels, heightPixels, 3.0, 2.0, -0.5, 0.0, 255)
  var textImg = ''
  for (var y = 0; y < heightPixels; y++) {
    for (var x = 0; x < widthPixels; x++) {
      textImg += (img[y][x] === 1) ? '*' : ' '
    }
    textImg += '\n'
  }
  res.setHeader('Content-Type', 'text/plain')
  res.send(textImg)
})

app.listen(port, () => console.log(`Mandelbrot app listening on port ${port}!`))
Listing 7: Node.js web application with Express.js that produces the Mandelbrot set as ASCII art.
The source code of the CUDA kernel is provided as a multi-line template string. It computes for every grid point within the rectangle (-2, -1) to (1, 1) whether it belongs to the Mandelbrot set using the escape time algorithm. Each CUDA kernel is responsible for one grid point. If the point is determined to be in the set (precisely most likely to be in the set), the threads writes 1 into the img array for this point, otherwise 0.
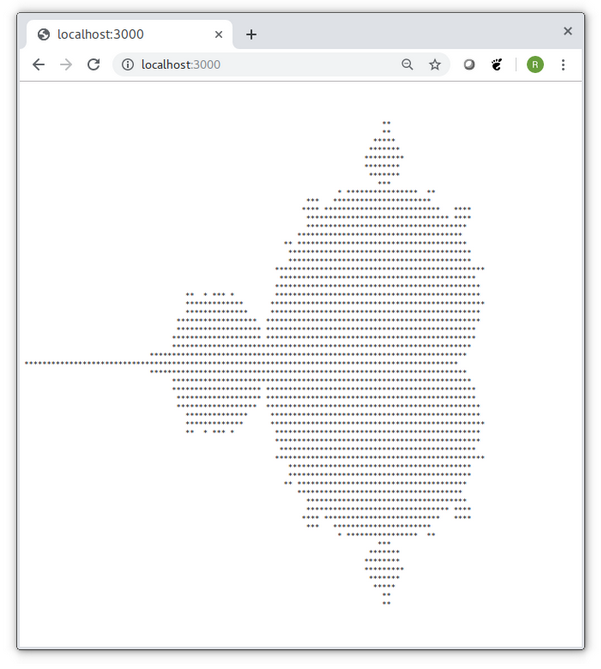
We build the kernel during startup of the application and set the launch grid that consists of 4×8 blocks of 32×8 threads (kernelWithGrid). For every requests, we allocate a device array and launch the kernel. Afterwards, we create the resulting ASCII art graphics from the device array and return it to the browser. Figure 4 shows the resulting Mandelbrot image in a browser window. The application returns the same image for every request; however, one can easily extend the application such that it accepts zoom parameters as part of the web request.
Getting Started with grCUDA
In this blog, I showed that using CUDA from within script languages (Python, JavaScript and R) is not difficult with grCUDA. grCUDA provides a uniform binding to all GraalVM languages for data exchange and code execution. Existing precompiled GPU code can be used as well as CUDA kernels that are dynamically compiled from language strings. One example illustrated how to use an accelerated machine learning algorithm from RAPIDS cuML in R, for which an R binding currently does not exist.
All code of the examples in this blog is available on GitHub: https://github.com/NVIDIA-developer-blog/code-samples/tree/master/posts/grcuda.
So how can you get started with grCUDA in your own applications you run on GraalVM?
- Make sure that you have the CUDA Toolkit 10 or 10.1 installed on your Linux system with GPU with Maxwell architecture or later. If you want to use RAPIDS cuML your GPU must be of the Pascal generation or later.
- Download and install GraalVM, the community edition is sufficient
- Install grCUDA as described in the README.
- For running the RAPIDS cuML example above, follow the instructions in the README in the GitHub repository for this blog.
Next Steps
grCUDA is a collaborative effort between Oracle Labs and NVIDIA, open-sourced under a BSD-3-Clause license. grCUDA is under active development. The next features we are planning to add are (1) grCUDA-managed arrays that can be partitioned between device and host or replicated for fast simultaneous read-only access, (2) asynchronous execution of operations, (3) automatic transformations of host-language objects to a CUDA-friendly representation during data transfers.
We would like to learn about your use cases. So please feel free to open an issue on GitHub if you miss a feature or, better yet, get involved and open a pull request with your code.
For additional information, you can also watch our talk about grCUDA, “Simplifying NVIDIA GPU Access: A Polyglot Binding for GPUs with GraalVM“.
References
[Ester et al. 1996] Martin Ester, Hans-Peter Kriegel, Jörg Sander, Xiaowei Xu: A density-based algorithm for discovering clusters a density-based algorithm for discovering clusters in large spatial databases with noise, KDD 1994
[Brooks and Matelski 1978] Robert Brooks, J. Peter Matelski: The dynamics of 2-generator subgroups of PSL(2,C). Stony Brook Conference 1978