A media server provides multimedia all-in-one features, such as video capture, processing, streaming, recording, and, in some cases, the ability to trigger actions under certain events, for example, automatically taking a snapshot.
For you to make the best out of a media server, it must be scalable, modular, and easy to integrate with other processes. One typical example is a GUI to control the media server through interprocess communication.
In this post, we show you how to build a simple real-time multi-camera media server for AI processing on the NVIDIA Jetson platform. We demonstrate how you can develop a scalable and robust prototype to capture from several different video sources by using GStreamer Daemon (GstD), GstInterpipe, and the NVIDIA DeepStream SDK.
Besides achieving real-time deep learning inference, the server is completely dynamic from the point of view that it is possible to change the properties and states of the several video streams being processed during run time.
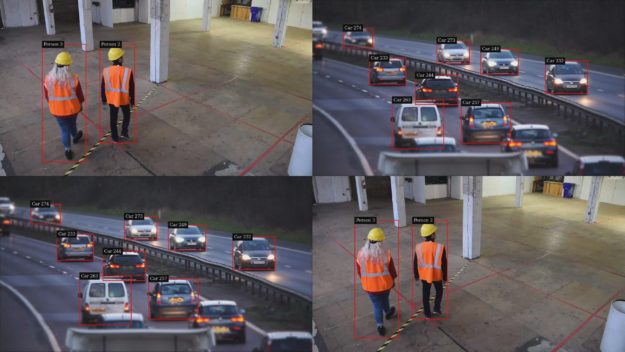
A valuable add-on is the capability of triggering actions such as taking snapshots or recording a video as a response to a specific event. Figure 1 shows a sample snapshot of a video stream with the resulting bounding boxes after some AI processing performed by the NVIDIA DeepStream software module. The sample media server described later uses two cameras, however, the two video streams are replicated to demonstrate that several video streams can be added.
By the end of this post, you’ll know about a set of GStreamer-based tools and how to scale them to your specific multimedia and AI needs. To follow this tutorial, you should have a basic knowledge of GStreamer and DeepStream frameworks.
Why a media server?
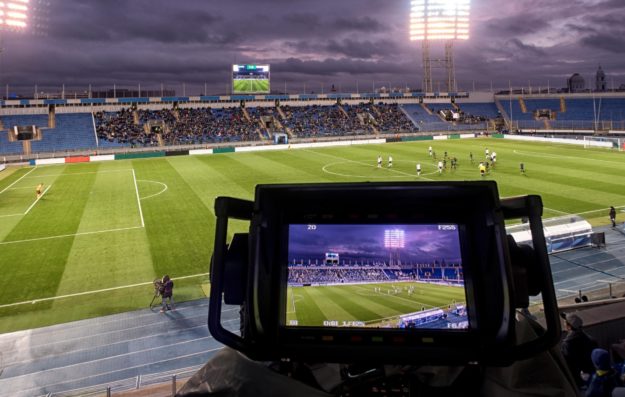
Using DeepStream in a media server offers quick time-to-market solutions for intelligent media products. Surveillance and sports streaming (shown in Figure 2) are two examples of use cases where a media server enhanced with AI capabilities can be used to analyze the captured video and extract useful information. When abnormal behavior is detected, the server can trigger events such as recording or snapshots.
AI media server modules
Figure 3 shows the division of the media server into four modules:
- Video capture
- Video processing and AI
- Video encoding
- Additional features such as recording, streaming, and snapshots.

If you implement the media server with GStreamer, you end up with a pipeline like the following code example:
v4l2src device=/dev/video1 ! video/x-raw,width=640,height=480 ! videoconvert ! video/x-raw,format=I420,width=640,height=480 ! queue ! tee name=camera0 \
nvarguscamerasrc ! nvvidconv ! video/x-raw,format=I420,width=640,height=480 ! queue ! tee name=camera1 \
camera0. ! video/x-raw,format=I420,width=640,height=480 ! nvvideoconvert ! video/x-raw(memory:NVMM),format=NV12,width=640,height=480 ! nvstreammux0.sink_0 \
camera0. ! video/x-raw,format=I420,width=640,height=480 ! nvvideoconvert ! video/x-raw(memory:NVMM),format=NV12,width=640,height=480 ! nvstreammux0.sink_1 \
camera1. ! video/x-raw,format=I420,width=640,height=480 ! nvvideoconvert ! video/x-raw(memory:NVMM),format=NV12,width=640,height=480 ! nvstreammux0.sink_2 \
camera1. ! video/x-raw,format=I420,width=640,height=480 ! nvvideoconvert ! video/x-raw(memory:NVMM),format=NV12,width=640,height=480 ! nvstreammux0.sink_3 \
nvstreammux name=nvstreammux0 batch-size=4 batched-push-timeout=40000 width=640 height=480 ! queue ! nvinfer batch-size=4 config-file-path=deepstream-models/config_infer_primary_4_cameras.txt ! queue ! nvtracker ll-lib-file=deepstream-models/libnvds_mot_klt.so enable-batch-process=true ! queue ! nvmultistreamtiler width=640 height=480 rows=2 columns=2 ! nvvideoconvert ! nvdsosd ! queue ! tee name=deep \
deep. ! nvvideoconvert ! nvv4l2h264enc insert-sps-pps=true iframeinterval=10 ! tee name=h264 \
deep. ! nvvideoconvert ! nvv4l2h265enc insert-sps-pps=true iframeinterval=10 ! tee name=h265 \
deep. ! nvvideoconvert ! nvv4l2vp9enc ! tee name=vp9 \
deep. ! nvvideoconvert ! video/x-raw,width=640,height=480 ! nvjpegenc ! tee name=jpeg \
h264. ! h264parse ! matroskamux ! filesink name=file location=test-h264-0.mkv \
h265. ! h265parse ! matroskamux ! filesink name=file location=test-h265-0.mkv \
vp9. ! matroskamux ! filesink name=file location=test-vp9-0.mkv \
jpeg. ! filesink name=file location=test-snapshot0.jpg
Besides being hard to read, this code is not straightforward for controlling the module connections and the pipeline state dynamically. Also, this approach is not scalable and could lead to code replication, not to mention the time-consuming learning curve that you have to go through to implement a simple prototype. Here’s how to overcome these issues:
- Module interconnection
- Module control
Module interconnection
A better implementation would have multiple, smaller pipelines instead of a single, extremely large one. The challenge is how to interconnect these pipelines.
RidgeRun‘s GstInterpipe is an open-source plugin that solves this problem. The GstInterpipe plugin provides two elements, interpipesrc and interpipesink. Figure 4 shows how they allow communication between two or more pipelines. The buffers pushed through interpipesink reach all interpipesrc elements whose listen-to property is set to the interpipesink name.

Now that the interconnection problem is solved, how do you control the modules?
Module control
One desirable feature of a media server would be to be able to have some level of control over the state and properties of the different streams being processed.
RidgeRun’s GstD is an open source project, a multithreaded Linux daemon that handles the GStreamer framework. GstD provides a gst-launch–like, command-line interface called gst-client, along with C and Python bindings. It simplifies dynamic pipeline administration and accelerates prototyping and development time.
Figure 5 shows how a media server implemented with GstD can be easily controlled by other processes through inter-process communication (IPC).

Building an AI media server in 30 minutes
With all of this in place, now you are ready to put everything together in a real-life implementation using the tools described here. You can build a sample media server created for a Jetson TX2 board in Python using DeepStream, GStreamer-based tools (GstD, GstInterpipe), and hardware accelerated plugins.
Prerequisites
To run the AI media server, you need a Jetson TX2 board with Jetpack 4.3 installed. In addition, the demo assumes that the board has two cameras connected, one on MIPI CSI and one on USB.
Follow the wiki pages to install GStreamer Daemon and GstInterpipe. After you have these open source projects installed, you can follow the instructions in the Running the Demo wiki page.
Video capture
In this module, the application usually makes use of one or more cameras or capture hardware devices that provide video input to the media server. For each use case, consider the interfaces and the hardware manufacturers to choose the right solution.
There are various interfaces available to capture video that are compatible with the Jetson boards. Among the options are MIPI CSI, USB, SLVS, GMSL, and FPD-Link. There are multiple manufacturers that provide cameras for the Jetson platform boards, such as Sony, OmniVision, and OnSemi.
Some applications require the use of many cameras. In such cases, special hardware and software is required. One example is D3 Engineering’s daughter board (Figure 6) that attaches to the Jetson AGX Xavier to get up to 16 FPD-Link III working cameras using RidgeRun‘s camera drivers. For more information, see the demo, RidgeRun D3 NVIDIA Partner Showcase Jetson Xavier Multi-Camera AI Demo.

In this media server example, you use two cameras: a MIPI CSI and an USB camera. Here’s a look at the capture pipeline for the USB camera:
client.pipeline_create('camera0', 'v4l2src device=/dev/video0 ! \ video/x-raw,format=YUY2,width=1280,height=720 ! \
interpipesink name=camera0 forward-events=true forward-eos=true sync=false')
The client object is the GstD client instance that you use to control the media server pipelines.
Use the pipeline_create command with the pipeline name and description as arguments. This camera0 pipeline uses the v4l2src element to capture from the USB camera, with the device property set to /dev/video0 in this case. This property must be set according to the video devices arrangement in each board. Make the USB camera capture available through an interpipesink instance called camera0.
Now, consider the camera1 pipeline used to capture from the CSI MIPI camera:
client.pipeline_create('camera1', 'nvarguscamerasrc ! nvvidconv ! video/x-raw,format=I420,width=1280,height=720 ! queue ! interpipesink name=camera1 forward-events=true forward-eos=true sync=false')
To capture from this sensor, use the nvarguscamerasrc element, the NVIDIA video capture proprietary element that uses libargus underneath. The CSI MIPI camera video stream is made available through the interpipesink instance called camera1.
Video processing and AI
The video processing block is composed of two functional units. One oversees adapting and modifying the properties of a captured video buffer (video processing) and the other one of turning raw streaming data into actionable insights (AI processing).
Video processing
Often, the raw camera video stream requires some format changes to be used by other modules. These changes could be related to the framerate, resolution, colorspace, or the memory type used to allocate the buffers.
To perform these operations, you can take advantage of NVIDIA’s hardware accelerated GStreamer elements. For instance, consider the camera0_rgba_nvmm and the camera1_rgba_nvmm pipelines, each of them listening to their respective cameras. The nvvideoconvert element is used to perform color space and memory conversion and memory simultaneously:
client.pipeline_create('camera0_rgba_nvmm', 'interpipesrc listen-to=camera0 ! video/x-raw,format=YUY2,width=1280,height=720 ! videoconvert ! video/x-raw,format=NV12,width=1280,height=720 ! nvvideoconvert ! video/x-raw(memory:NVMM),format=RGBA,width=1280,height=720 ! queue ! interpipesink name=camera0_rgba_nvmm forward-events=true forward-eos=true sync=false caps=video/x-raw(memory:NVMM),format=RGBA,width=1280,height=720,pixel-aspect-ratio=1/1,interlace-mode=progressive,framerate=30/1')
The processed video streams are made available by the interpipesink instances named camera0_rgba_nvmm and camera1_rgba_nvmm.
AI processing
The AI processing module relies completely on the set of GStreamer-based tools available in the DeepStream SDK. These provide a level of actionable insight that refers to the analysis of raw data (video buffers from cameras in the case of a media server) and subsequent processing on a GPU. Some functionality that can be accessed through DeepStream includes the following:
- Stream aggregation and batching
- TensorRT-based inferencing for detection, classification, and segmentation
- Object tracking reference implementation
- On-screen display API for highlighting objects and text overlay
Referring to the media server example, the interpipesrc elements listen to camera processed video streams and into four inputs of the nvstreammux element running the batching mechanism. Though you use only two cameras in this example media server, you duplicate the inputs to the nvstreammux to demonstrate that more cameras can be used.
The output of the mux element goes into the nvinfer instance and the rest of the available DeepStream elements to finally end up in the interpipesink instance that feeds the next stages of the media server with video frames containing inference information.
client.pipeline_create('deepstream', '\
interpipesrc listen-to=camera0_rgba_nvmm ! nvstreammux0.sink_0 \
interpipesrc listen-to=camera0_rgba_nvmm ! nvstreammux0.sink_1 \
interpipesrc listen-to=camera1_rgba_nvmm ! nvstreammux0.sink_2 \
interpipesrc listen-to=camera1_rgba_nvmm ! nvstreammux0.sink_3 \
nvstreammux name=nvstreammux0 batch-size=4 batched-push-timeout=40000 width=1280 height=720 ! queue ! nvinfer batch-size=4 config-file-path=../deepstream-models/config_infer_primary_4_cameras.txt ! queue ! \
nvtracker ll-lib-file=../deepstream-models/libnvds_mot_klt.so enable-batch-process=true ! queue ! nvmultistreamtiler width=1280 height=720 rows=2 columns=2 ! nvvideoconvert ! nvdsosd ! queue ! \
interpipesink name=deep forward-events=true forward-eos=true sync=false')
Video encoding
At this point, you have a stream of video buffers with (or without) AI information. For further modules such as recording, streaming, or taking a snapshot, you need data compression to avoid unmanageable file size issues, network overload, and several other issues. These problems are especially critical when working with embedded systems where the available hardware resources are limited and power consumption is a key competitive factor.
Encoding and decoding is a resource-intensive operation. This can cause processing bottlenecks when a significant stream of data is received. This limitation can be addressed by using hardware-based encoders and decoders (codecs). NVIDIA provides hardware codecs that accelerate encoding and decoding on specialized hardware unloading the CPU and GPU units for other tasks.
The media server that you are building describes two different video encoding formats (H.264, and VP9) options and one image encoding (JPEG) option.
The following code example shows the implementation of such encoding pipelines for H.264, VP9, and JPEG:
client.pipeline_create('h264', 'interpipesrc name=h264_src format=time listen-to=deep ! video/x-raw(memory:NVMM),format=RGBA,width=1280,height=720 ! nvvideoconvert ! nvv4l2h264enc ! interpipesink name=h264_sink forward-events=true forward-eos=true sync=false async=false enable-last-sample=false drop=true')

client.pipeline_create('vp9', 'interpipesrc name=vp9_src format=time listen-to=deep ! nvvideoconvert ! nvv4l2vp9enc max-perf=true ! interpipesink name=vp9_sink forward-events=true forward-eos=true sync=false async=false enable-last-sample=false drop=true')

client.pipeline_create('jpeg', 'interpipesrc name=src format=time listen-to=deep ! nvvideoconvert ! video/x-raw,format=I420,width=1280,height=720 ! nvjpegenc ! interpipesink name=jpeg forward-events=true forward-eos=true sync=false async=false enable-last-sample=false drop=true')
The pipelines described earlier process the output of the DeepStream module. They convert the buffers to a color space suitable for the encoder through nvvideoconvert and compress the data using the nvv4l2h264enc, nvv4l2vp9enc, and nvjpegenc (hardware-accelerated) elements. Finally, they pipe the encoded buffers through the interpipesink instance to be used by the following media server module.
In the vp9 pipeline, the nvv4l2vp9enc element has the property max-perf set to true. This enables the high-performance mode of the encoder and is useful when working with high resolution and frame rate. However, enabling this property leads to an increase in power consumption, which needs to be considered on mobile systems.
Additional features
This last stage can be referred to as the end-product module. It is possible to generate a video recording, initiate a video stream over the network, or simply generate a snapshot of one of the video streams from the cameras. All the options include the previous AI processing done in the DeepStream module.
Again, each of the pipelines have a listen-to property set to each of the corresponding encoded streams. Both of the video recording pipelines make use of a Matroska container to generate the resulting file.
H264 recording
client.pipeline_create('record_h264', 'interpipesrc format=time allow-renegotiation=false listen-to=h264_sink ! h264parse ! matroskamux ! filesink name=filesink_record_h264')
In the case of the H.264 pipeline, the h264parse element is required to adapt the output of the encoding block to something that matroskamux accepts.
VP9 recording
client.pipeline_create('record_vp9', 'interpipesrc format=time listen-to=vp9_sink ! matroskamux ! filesink name=filesink_record_vp9')
Similarly, VP9 also is packed into a Matroska container. On the other hand, no parser is needed.
Snapshot
client.pipeline_create('snapshot', 'interpipesrc format=time listen-to=jpeg num-buffers=1 ! filesink name=filesink_snapshot')
The snapshot pipeline makes use of the num-buffers property to accept only the first buffer that goes through the interpipesrc instance when the snapshot data path has been enabled. After the first buffer is captured, an end-of-stream (EOS event is sent automatically to avoid overwriting the desired buffer with more recent ones.
Network streaming
The actual selection of the streaming protocol (UDP, TCP, RTSP, and WebRTC) depends on the use case scenario requirements and parameters like latency, quality, security, and cost, among others.
WebRTC and RTSP are among the most-often used streaming solutions Both protocols are supported by GStreamer. To speed up the development, RidgeRun offers products such as GstWebRTC and GstRtspSink plugins. GstWebRTC is used to convert pipelines into WebRTC compliant endpoints, while GstRtspSink accelerates prototyping and facilitates integration.
AI media server dynamics
In previous sections, we showed some details of the AI media server implementation. Now, we explore how to control these modules and take advantage of GstInterpipes to change connections.
To play pipelines, use the command pipeline_play with the pipeline name as an argument. For instance, to start capture from the two cameras and start the video processing and DeepStream pipelines in the media server, use the following code example:
client.pipeline_play('camera0')
client.pipeline_play('camera1')
client.pipeline_play('camera0_rgba_nvmm')
client.pipeline_play('camera1_rgba_nvmm')
client.pipeline_play('deepstream')
Recording
To start recording, you first need to set the location to which the file is written. For this, use the element_set command to set the location property of the filesink element as follows:
client.element_set('record_vp9', 'filesink', 'location', 'test_record_vp9_0.mkv')
The location can be set to an absolute path or as in the earlier example to a relative path. In the cases where the location is set to a relative path, the file is written to the directory where GtsD was started.
Now you can play the encoding and recording pipelines to start the recording process. For example, the following commands start recording for vp9:
client.pipeline_play('vp9')
client.pipeline_play('record_vp9')
To stop recording, send an EOS event to the encoder pipeline to allow the encoder to finalize properly, wait until the pipeline has finished processing any buffered data and then stop the encoding and recording pipelines:
client.event_eos('vp9')
client.bus_filter('vp9', 'eos')
client.bus_read('vp9')

client.pipeline_stop('vp9')
client.pipeline_stop('record_vp9')
At this point, you should be able to inspect the file named test_record_vp9_0.mkv. Because the recording pipelines were connected to the output of the DeepStream pipeline, you would expect to find a video with four synced video inputs and with some overlay added by the DeepStream insights, such as in Figure 7.
In some cases it would be useful to change the encoder video feed. This would be useful, for example, if you want to record one of the regular video streams from a camera output (no object detection) instead of the DeepStream output. GstInterpipes allow you to perform this dynamic change.
Use the element_set command to change the listen-to property of the encoding pipeline to the name of the interpipesink that provides the video stream to record. For instance, to record camera1 output only, connect to the video processing pipeline interpipesink for that camera, as follows:
client.element_set('vp9', 'vp9_src', 'listen-to', 'camera0_rgba_nvmm')
Then, follow the same steps of setting the desired file name and playing the encoding and recording pipelines to start the process:
client.element_set('record_vp9', 'filesink', 'location', 'test_record_vp9_1.mkv')

client.pipeline_play('vp9')
client.pipeline_play('record_vp9')
To stop the recording process, send an EOS event to the encoding pipeline and stop both the encoding and the recording pipelines, as demonstrated previously. When inspecting the file, you expect to find a video containing the video feed from only one camera, as in Figure 8.
Snapshots
Taking a snapshot is similar to the recording previously described. To take a snapshot, you must set the location to which it is written. Then the encoding and snapshot pipelines can be started.
client.element_set('snapshot', 'filesink', 'location', 'test_snapshot_0.jpeg')

client.pipeline_play('jpeg')
client.pipeline_play('snapshot')
As the snapshot pipeline interpipesrc was configured to allow only one frame to pass, you don’t have to worry about the snapshot being overwritten with more recent images. You can stop the encoding and snapshot pipelines and then inspect the result. You would expect to find a snapshot with the DeepStream insights overlay (Figure 9).

Similar to the recording connection change, the snapshot source can also be changed. For example, this would allow you to take a snapshot of a single camera capture. You only need to change the JPEG pipeline interpipesrc listen-to property:
client.element_set('jpeg', 'jpeg_src', 'listen-to', 'camera0_rgba_nvmm')
Then, you can start the snapshot pipelines as in the previous example. You would expect the snapshot to contain a single camera capture, as in Figure 10.

Complex scenarios
The flexibility of GtsD allows the media server to trigger actions based on events detected by the AI module. For instance, the detection of a person in a dangerous zone can trigger a signal in the media server (Figure 11). A custom application could be listening to these kinds of events and use this information to trigger actions in the media server, such as taking a snapshot, or even execute further actions outside of the media server domain.

There is a world of possibilities and scenarios for an AI media server. You can free your imagination and design a completely autonomous system using the media server capabilities and AI power.
Summary
Now you have learned to create a media server solution that can capture video from multiple cameras, apply some basic level of image recognition through AI processing and generate a file (either a video or photo) without the hassle derived from the Gstreamer and Glib learning curve. During the development process, you learned about tools (GstD, GstInterPipe) to bring flexibility and dynamism to your design allowing you to have run time control of the several data processing branches in the media server.
- Detailed instructions available at How to build a multi-camera Media Server for AI processing on Jetson.
- Our website: www.ridgerun.com
- Check out our products: https://shop.ridgerun.com
- Contact us: Support