According to surveys, the average person produces 1.2 trillion images that are captured by either a phone or a digital camera. The storage of such images, especially in high-resolution raw format, uses lots of memory.
JPEG refers to the Joint Photographic Experts Group, which celebrated its 25th birthday in 2017. The JPEG standard specifies the codec, which defines how an image is compressed into a bitstream of bytes and is decompressed back to an image.
The main purpose of the JPEG codec is to minimize the file size of photographic image files. JPEG is a lossy compression format, which means that it doesn’t store full pixel data from an original image. One of JPEG’s advantages is that it allows you to fine-tune the amount of compression used. This results in good image quality when used correctly while also resulting in the smallest reasonable file size.
The key components of JPEG compression are as follows:
- Color space conversion allows you to separate luminance (Y) and chrominance (Cb, Cr) components. Downsampling of Cb and Cr allows you to reduce file size with almost unnoticeable losses of quality as human perception is less sensitive to these image components. This is not part of the core standard but is defined as part of the JFIF format.
- Block-based discrete cosine transform (DCT) allows for the compaction of data at lower frequencies.
- Quantization allows rounding coefficients for high-frequency details. Losing these details is usually okay as the human eye usually cannot easily distinguish high-frequency content.
- Progressive encoding allows you to preview a low-quality version of the whole image after the partial decoding of its bitstream.
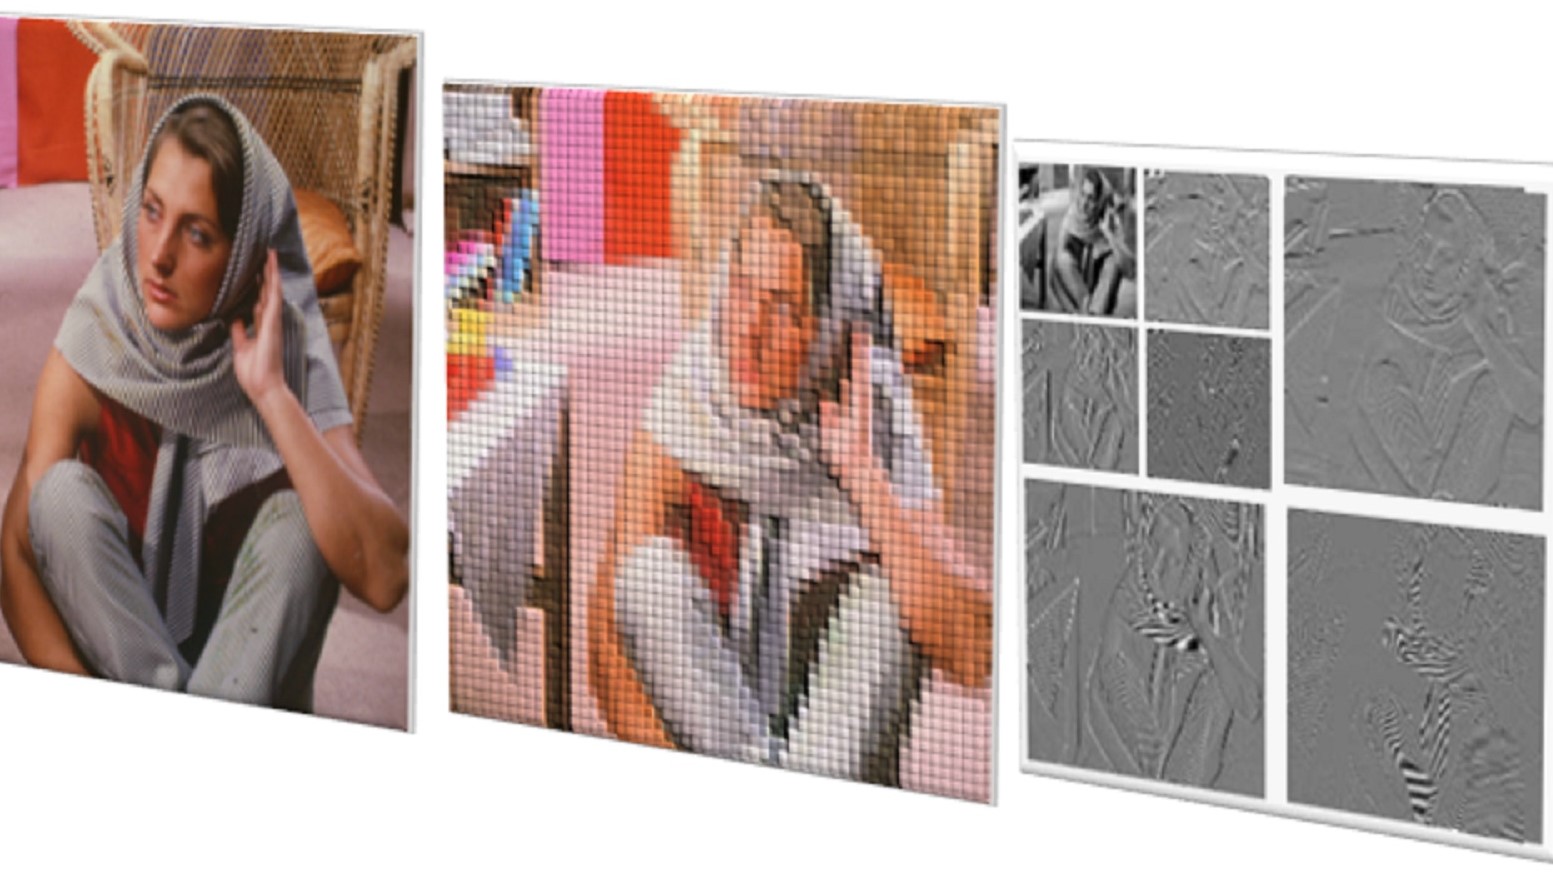
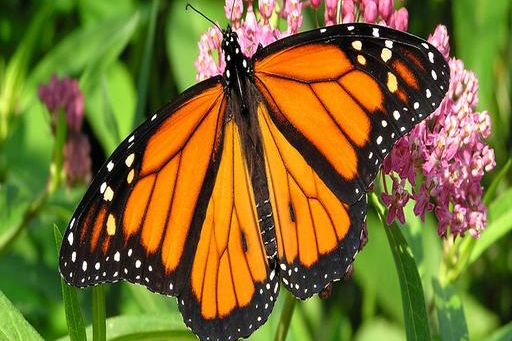
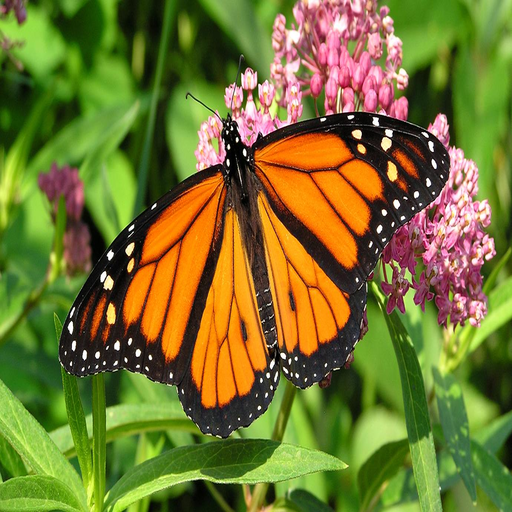
The following photos (Figure 1) demonstrate the image quality losses with JPEG compression. The original butterfly image is in BMP format (512×512, 24-bit, 769 kB, no compression) and the same image is then shown in JPEG format with quality compression coefficient 50%, subsampling 4:2:0, 24-bit, image size 33 KB.

How JPEG works
Figure 2 shows one of the JPEG encoder’s common configurations.
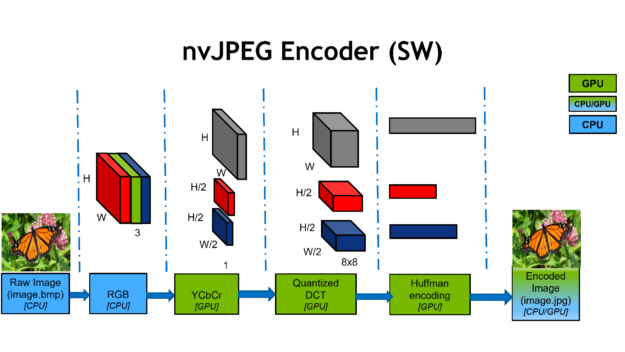
First, JPEG encoding starts with an RGB color image.
The second step involves the color conversion to YCbCr color space Y representing luminance (brightness) and the Cb and Cr channels representing the chroma (red and blue projections). The Cb and Cr channels are then downsampled by a predetermined factor, usually two or three. This downsampling gives you the first stage of compression.
At the next stage, each channel is split into 8×8 blocks and computes the DCT, a transform in frequency space similar to a Fourier transform. The DCT itself is lossless and reversible, transforming an 8×8 spatial block into 64 channels.
The DCT coefficients are then quantized, a process which is lossy and comprises the second compression stage. Quantization is controlled by the JPEG quality parameter, with lower quality settings corresponding to more severe compression and resulting in smaller files.
Quantization thresholds are specific to each spatial frequency and have been carefully designed. Less compression is applied to low frequencies than to high frequencies, as the human eye is more sensitive to subtle errors over broad areas than changes in magnitude of high-frequency signals.
The final stage is where the quantized DCT coefficients are compressed losslessly with Huffman encoding and stored in a JPEG file, like the image.jpg shown in Figure 2.
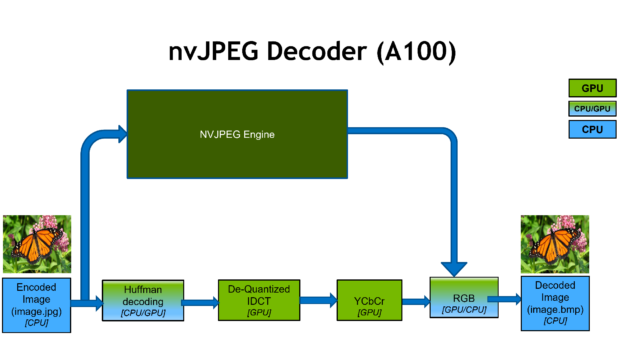
Figure 3 shows the JPEG decoding process on NVIDIA GPUs.
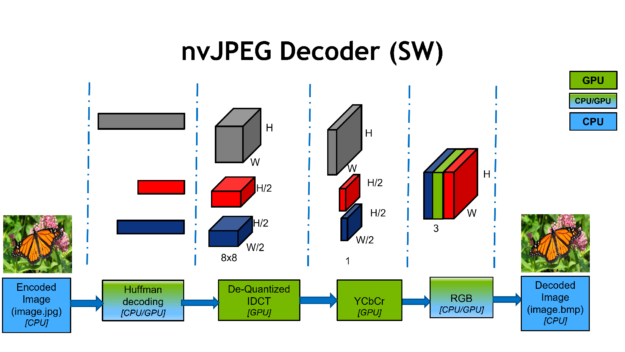
The JPEG decoding process starts with compressed JPEG bitstreams and extracts header information.
Then, Huffman decoding deals with serial processes as the DCT coefficients are decoded one at a time from the bitstream.
The next step handles the de-quantization and inverse DCT into 8×8 blocks.
Upsampling steps handle the YCbCr conversion and produce the decoded RGB image.
NVIDIA has accelerated the JPEG codec with the nvJPEG library built on CUDA technology. We developed a complete parallel implementation of the JPEG algorithm. Typical GPU-accelerated parts of the JPEG encoder and decoder workflow are shown in Figure 2 and 3.
New JPEG hardware decoder
Recently, we introduced the NVIDIA A100 GPU, which has a dedicated hardware JPEG decoder. Previously, there was no such hardware unit on datacenter GPUs, and JPEG decoding was a pure software CUDA solution that used both CPU and GPU.
Now, the hardware decoder runs simultaneously with the rest of the GPU, which can be doing various computational tasks such as image classification, object detection, and image segmentation. This provides a substantial throughput increase in more than one way, with 4-8x JPEG decode speedup compared to the NVIDIA Tesla V100.
It is exposed through the nvJPEG library, which is part of the CUDA toolkit.
nvJPEG library overview
nvJPEG is a GPU-accelerated library for JPEG codec. Together with NVIDIA DALI, a data augmentation and image loading library, it can accelerate deep learning training on image classification models by accelerating the decode and augmentation of data. The A100 includes a 5-core hardware JPEG decode engine. nvJPEG takes advantage of the hardware backend for batched processing of JPEG images.
By selecting the hardware decoder with the nvjpegCreateEx init function, nvJPEG provides acceleration of baseline JPEG decode, and various color conversion formats (for example, YUV 420, 422, 444). As shown in Figure 4, this results in up to 20x faster image decoding compared to CPU-only processing. Users of DALI can directly benefit from this hardware acceleration because nvJPEG is abstracted.
The nvJPEG library supports the following operations:
- nvJPEG Encoding
- nvJPEG Transcoding
- nvJPEG Decoding (includes HW (A100) support)
The library supports the following JPEG options:
- Baseline and progressive JPEG encoding and decoding, baseline decoding for A100 only
- 8 bits per pixel
- Huffman bitstream decoding
- Up to four channel JPEG bitstreams
- 8- and 16-bit quantization tables
- The following chroma subsampling for the three color channels Y, Cb, Cr (Y, U, V):
- 4:4:4
- 4:2:2
- 4:2:0
- 4:4:0
- 4:1:1
- 4:1:0
The library has the following features:
- Hybrid decoding using both the CPU and the GPU.
- Input to the library is in the host memory, and the output is in the GPU memory.
- Single image and batched image decoding.
- User-provided memory manager for the device and pinned host memory allocations.
Performance numbers
For the performance graphs in this section, we used the following test setup and GPU/CPU hardware:
- NVIDIA V100 GPU: CPU – E5-2698 v4@2GHz 3.6GHz Turbo (Broadwell) HT On GPU – Tesla V100-SXM2-16GB(GV100) 116160 MiB 180 SM GPU Video Clock 1312 Batch 128 and Single Thread
- NVIDIA A100 GPU CPU – Platinum 8168@2GHz 3.7GHz Turbo (Skylake) HT On GPU – A100-SXM4-40GB(GA100) 140557 MiB 1108 SM GPU Video Clock 1095 Batch 128 and Single Thread
- CPU: CPU – Platinum 8168@2GHz 3.7GHz Turbo (Skylake) HT On TurboJPEG decode for CPU testing
- Image dataset: 2K FHD = 1920 x 1080 4K UHD = 3840 x 2160 CUDA Toolkit 11.0 CUDA driver r450.24
The next two charts show the decoding speedup as a result of the hardware JPEG decoder.
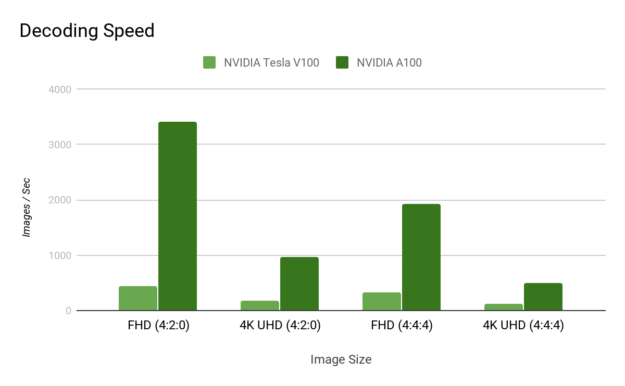
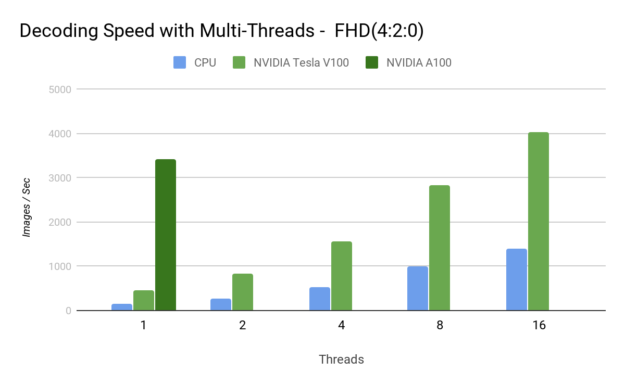
By offloading the decoding to hardware, you are freeing up valuable CPU cycles that can be put to better use.
Figure 7 shows the encoding speedup.
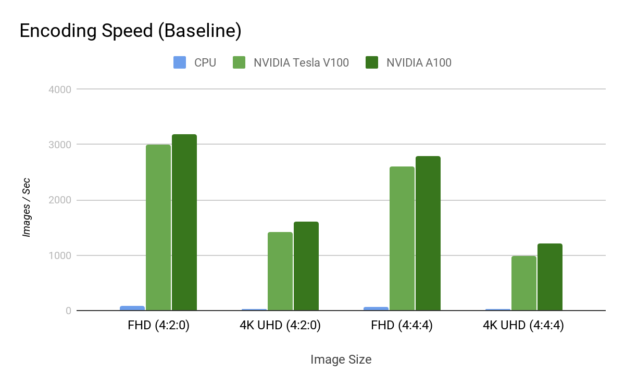
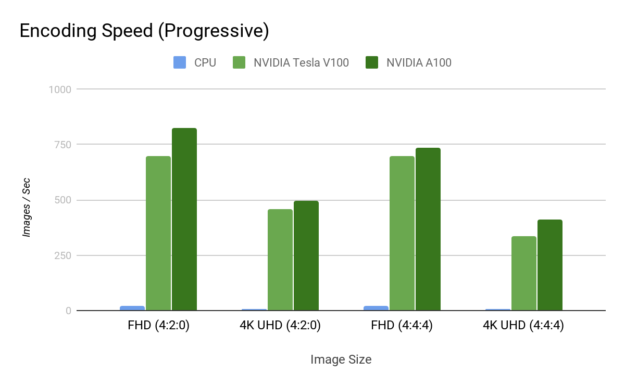
Image decoding example
Here’s an image decoding example using nvJPEG library. This example shows the use of the hardware decoder on the A100 GPU and backend fallback for other NVIDIA GPUs.
//
// The following code example shows how to use the nvJPEG library for JPEG image decoding.
//
// Libraries used
// nvJPEG decoding
int main()
{
...
// create nvJPEG decoder and decoder state
nvjpegDevAllocator_t dev_allocator = {&dev_malloc, &dev_free};
nvjpegPinnedAllocator_t pinned_allocator ={&host_malloc, &host_free};
// Selecting A100 Hardware decoder
nvjpegStatus_t status = nvjpegCreateEx(NVJPEG_BACKEND_HARDWARE,
&dev_allocator,
&pinned_allocator,
NVJPEG_FLAGS_DEFAULT,
¶ms.nvjpeg_handle);
params.hw_decode_available = true;
if( status == NVJPEG_STATUS_ARCH_MISMATCH) {
std::cout<<"Hardware Decoder not supported. Falling back to default backend"<<std::endl;
// GPU SW decoder selected
nvjpegCreateEx(NVJPEG_BACKEND_DEFAULT, &dev_allocator,
&pinned_allocator, NVJPEG_FLAGS_DEFAULT,
¶ms.nvjpeg_handle);
params.hw_decode_available = false;
}
// create JPEG decoder state
nvjpegJpegStateCreate(params.nvjpeg_handle, ¶ms.nvjpeg_state)
// extract bitstream metadata to figure out whether a bitstream can be decoded
nvjpegJpegStreamParseHeader(params.nvjpeg_handle, (const unsigned char *)img_data[i].data(), img_len[i], params.jpeg_streams[0]);
// decode Batch images
nvjpegDecodeBatched(params.nvjpeg_handle, params.nvjpeg_state,
batched_bitstreams.data(),
batched_bitstreams_size.data(),
batched_output.data(), params.stream)
...
}
$ git clone https://github.com/NVIDIA/CUDALibrarySamples.git
$ cd nvJPEG/nvJPEG-Decoder/
$ mkdir build
$ cd build
$ cmake ..
$ make
// Running nvJPEG decoder
$ ./nvjpegDecoder -i ../input_images/ -o ~/tmp
Decoding images in directory: ../input_images/, total 12, batchsize 1
Processing: ../input_images/cat_baseline.jpg
Image is 3 channels.
Channel #0 size: 64 x 64
Channel #1 size: 64 x 64
Channel #2 size: 64 x 64
YUV 4:4:4 chroma subsampling
Done writing decoded image to file:/tmp/cat_baseline.bmp
Processing: ../input_images/img8.jpg
Image is 3 channels.
Channel #0 size: 480 x 640
Channel #1 size: 240 x 320
Channel #2 size: 240 x 320
YUV 4:2:0 chroma subsampling
Done writing decoded image to file:/tmp/img8.bmp
Processing: ../input_images/img5.jpg
Image is 3 channels.
Channel #0 size: 640 x 480
Channel #1 size: 320 x 240
Channel #2 size: 320 x 240
YUV 4:2:0 chroma subsampling
Done writing decoded image to file:/tmp/img5.bmp
Processing: ../input_images/img7.jpg
Image is 3 channels.
Channel #0 size: 480 x 640
Channel #1 size: 240 x 320
Channel #2 size: 240 x 320
YUV 4:2:0 chroma subsampling
Done writing decoded image to file:/tmp/img7.bmp
Processing: ../input_images/img2.jpg
Image is 3 channels.
Channel #0 size: 480 x 640
Channel #1 size: 240 x 320
Channel #2 size: 240 x 320
YUV 4:2:0 chroma subsampling
Done writing decoded image to file: /tmp/img2.bmp
Processing: ../input_images/img4.jpg
Image is 3 channels.
Channel #0 size: 640 x 426
Channel #1 size: 320 x 213
Channel #2 size: 320 x 213
YUV 4:2:0 chroma subsampling
Done writing decoded image to file:/tmp/img4.bmp
Processing: ../input_images/cat.jpg
Image is 3 channels.
Channel #0 size: 64 x 64
Channel #1 size: 64 x 64
Channel #2 size: 64 x 64
YUV 4:4:4 chroma subsampling
Done writing decoded image to file:/tmp/cat.bmp
Processing: ../input_images/cat_grayscale.jpg
Image is 1 channels.
Channel #0 size: 64 x 64
Grayscale JPEG
Done writing decoded image to file:/tmp/cat_grayscale.bmp
Processing: ../input_images/img1.jpg
Image is 3 channels.
Channel #0 size: 480 x 640
Channel #1 size: 240 x 320
Channel #2 size: 240 x 320
YUV 4:2:0 chroma subsampling
Done writing decoded image to file: /tmp/img1.bmp
Processing: ../input_images/img3.jpg
Image is 3 channels.
Channel #0 size: 640 x 426
Channel #1 size: 320 x 213
Channel #2 size: 320 x 213
YUV 4:2:0 chroma subsampling
Done writing decoded image to file:/tmp/img3.bmp
Processing: ../input_images/img9.jpg
Image is 3 channels.
Channel #0 size: 640 x 480
Channel #1 size: 320 x 240
Channel #2 size: 320 x 240
YUV 4:2:0 chroma subsampling
Done writing decoded image to file:/tmp/img9.bmp
Processing: ../input_images/img6.jpg
Image is 3 channels.
Channel #0 size: 640 x 480
Channel #1 size: 320 x 240
Channel #2 size: 320 x 240
YUV 4:2:0 chroma subsampling
Done writing decoded image to file:/tmp/img6.bmp
Total decoding time: 14.8286
Avg decoding time per image: 1.23571
Avg images per sec: 0.809248
Avg decoding time per batch: 1.23571Image resizing example
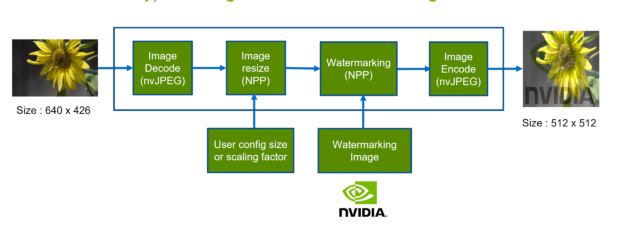
This image resizing and watermarking example generates a scaled version of images as the client requested. Figure 8 shows the image resizing and watermarking typical workflow.
The following code example shows how to resize images and watermark them with a logo image.
//
// The following code example shows how to resize images and watermark them with a logo image.
//
// Libraries used
// nvJPEG decoding, NPP Resize, NPP watermarking, nvJPEG encoding

int main()
{
    ...
    // nvJPEG decoder
    nReturnCode = nvjpegDecode(nvjpeg_handle, nvjpeg_decoder_state, dpImage, nSize, oformat, &imgDesc, NULL);
    // NPP image resize
    st = nppiResize_8u_C3R_Ctx(imgDesc.channel[0], imgDesc.pitch[0], srcSize,
         srcRoi, imgResize.channel[0], imgResize.pitch[0], dstSize, dstRoi,
         NPPI_INTER_LANCZOS, nppStreamCtx);

    st = nppiResize_8u_C3R_Ctx(imgDescW.channel[0], imgDescW.pitch[0], srcSizeW,
         srcRoiW,imgResizeW.channel[0], imgResizeW.pitch[0], dstSize, dstRoi,
         NPPI_INTER_LANCZOS, nppStreamCtx);

    // Alpha Blending watermarking
    st = nppiAlphaCompC_8u_C3R_Ctx(imgResize.channel[0], imgResize.pitch[0],
         255, imgResizeW.channel[0], imgResizeW.pitch[0], ALPHA_BLEND,
         imgResize.channel[0], imgResize.pitch[0], dstSize, NPPI_OP_ALPHA_PLUS,
         nppStreamCtx);

    // nvJPEG encoding
    nvjpegEncodeImage(nvjpeg_handle, nvjpeg_encoder_state, nvjpeg_encode_params,
         &imgResize, iformat, dstSize.width, dstSize.height,NULL));

    ...
}

$ git clone https://github.com/NVIDIA/CUDALibrarySamples.git
$ cd nvJPEG/Image-Resize-WaterMark/
$ mkdir build
$ cd build
$ cmake ..
$ make

// Running Image resizer and watermarking
$ ./imageResizeWatermark -i ../input_images/ -o resize_images -q 85 -rw 512 -rh 512
Summary
Download the latest version of prebuilt DALI binaries with NVIDIA Ampere architecture support. For a detailed list of new features and enhancements, see the nvJPEG Library documentation and the latest release notes.
To learn more about how DALI uses nvJPEG for accelerating a deep learning data pipeline, see Loading Data Fast with DALI and the New Hardware JPEG Decoder in NVIDIA A100 GPUs.