Data collected on a vast scale has fundamentally changed the way organizations do business, driving demand for teams to provide meaningful data science, machine learning, and deep learning-based business insights quickly. Data science leaders, plus the Dev Ops and IT teams supporting them, constantly look for ways to make their teams productive while optimizing their costs and minimizing deployment time.
NVIDIA and our partners have engaged with thousands of organizations across stages of data science maturity. These engagements reveal a common set of ingredients for success in data science:
- Jupyter notebook/JupyterLab – the de facto interface(s) for data science
- A set of data science tools that accelerate the time to meaningful results
- Shared hardware resources to optimize hardware utilization but also allow users to flex on-demand
- Access from any device (and ideally anywhere) – Laptop or Desktop, PC or workstation, Windows, MacOS or Linux and in the office or at the coffee shop (creativity happens anywhere!)

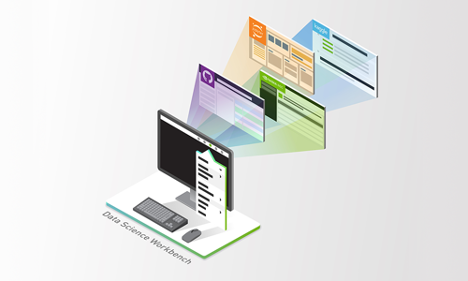
The DS Cluster – A Multi-Tenant Data Science Workstation
The NVIDIA solutions architect team evaluated many options to bring our customers’ vision to fruition.
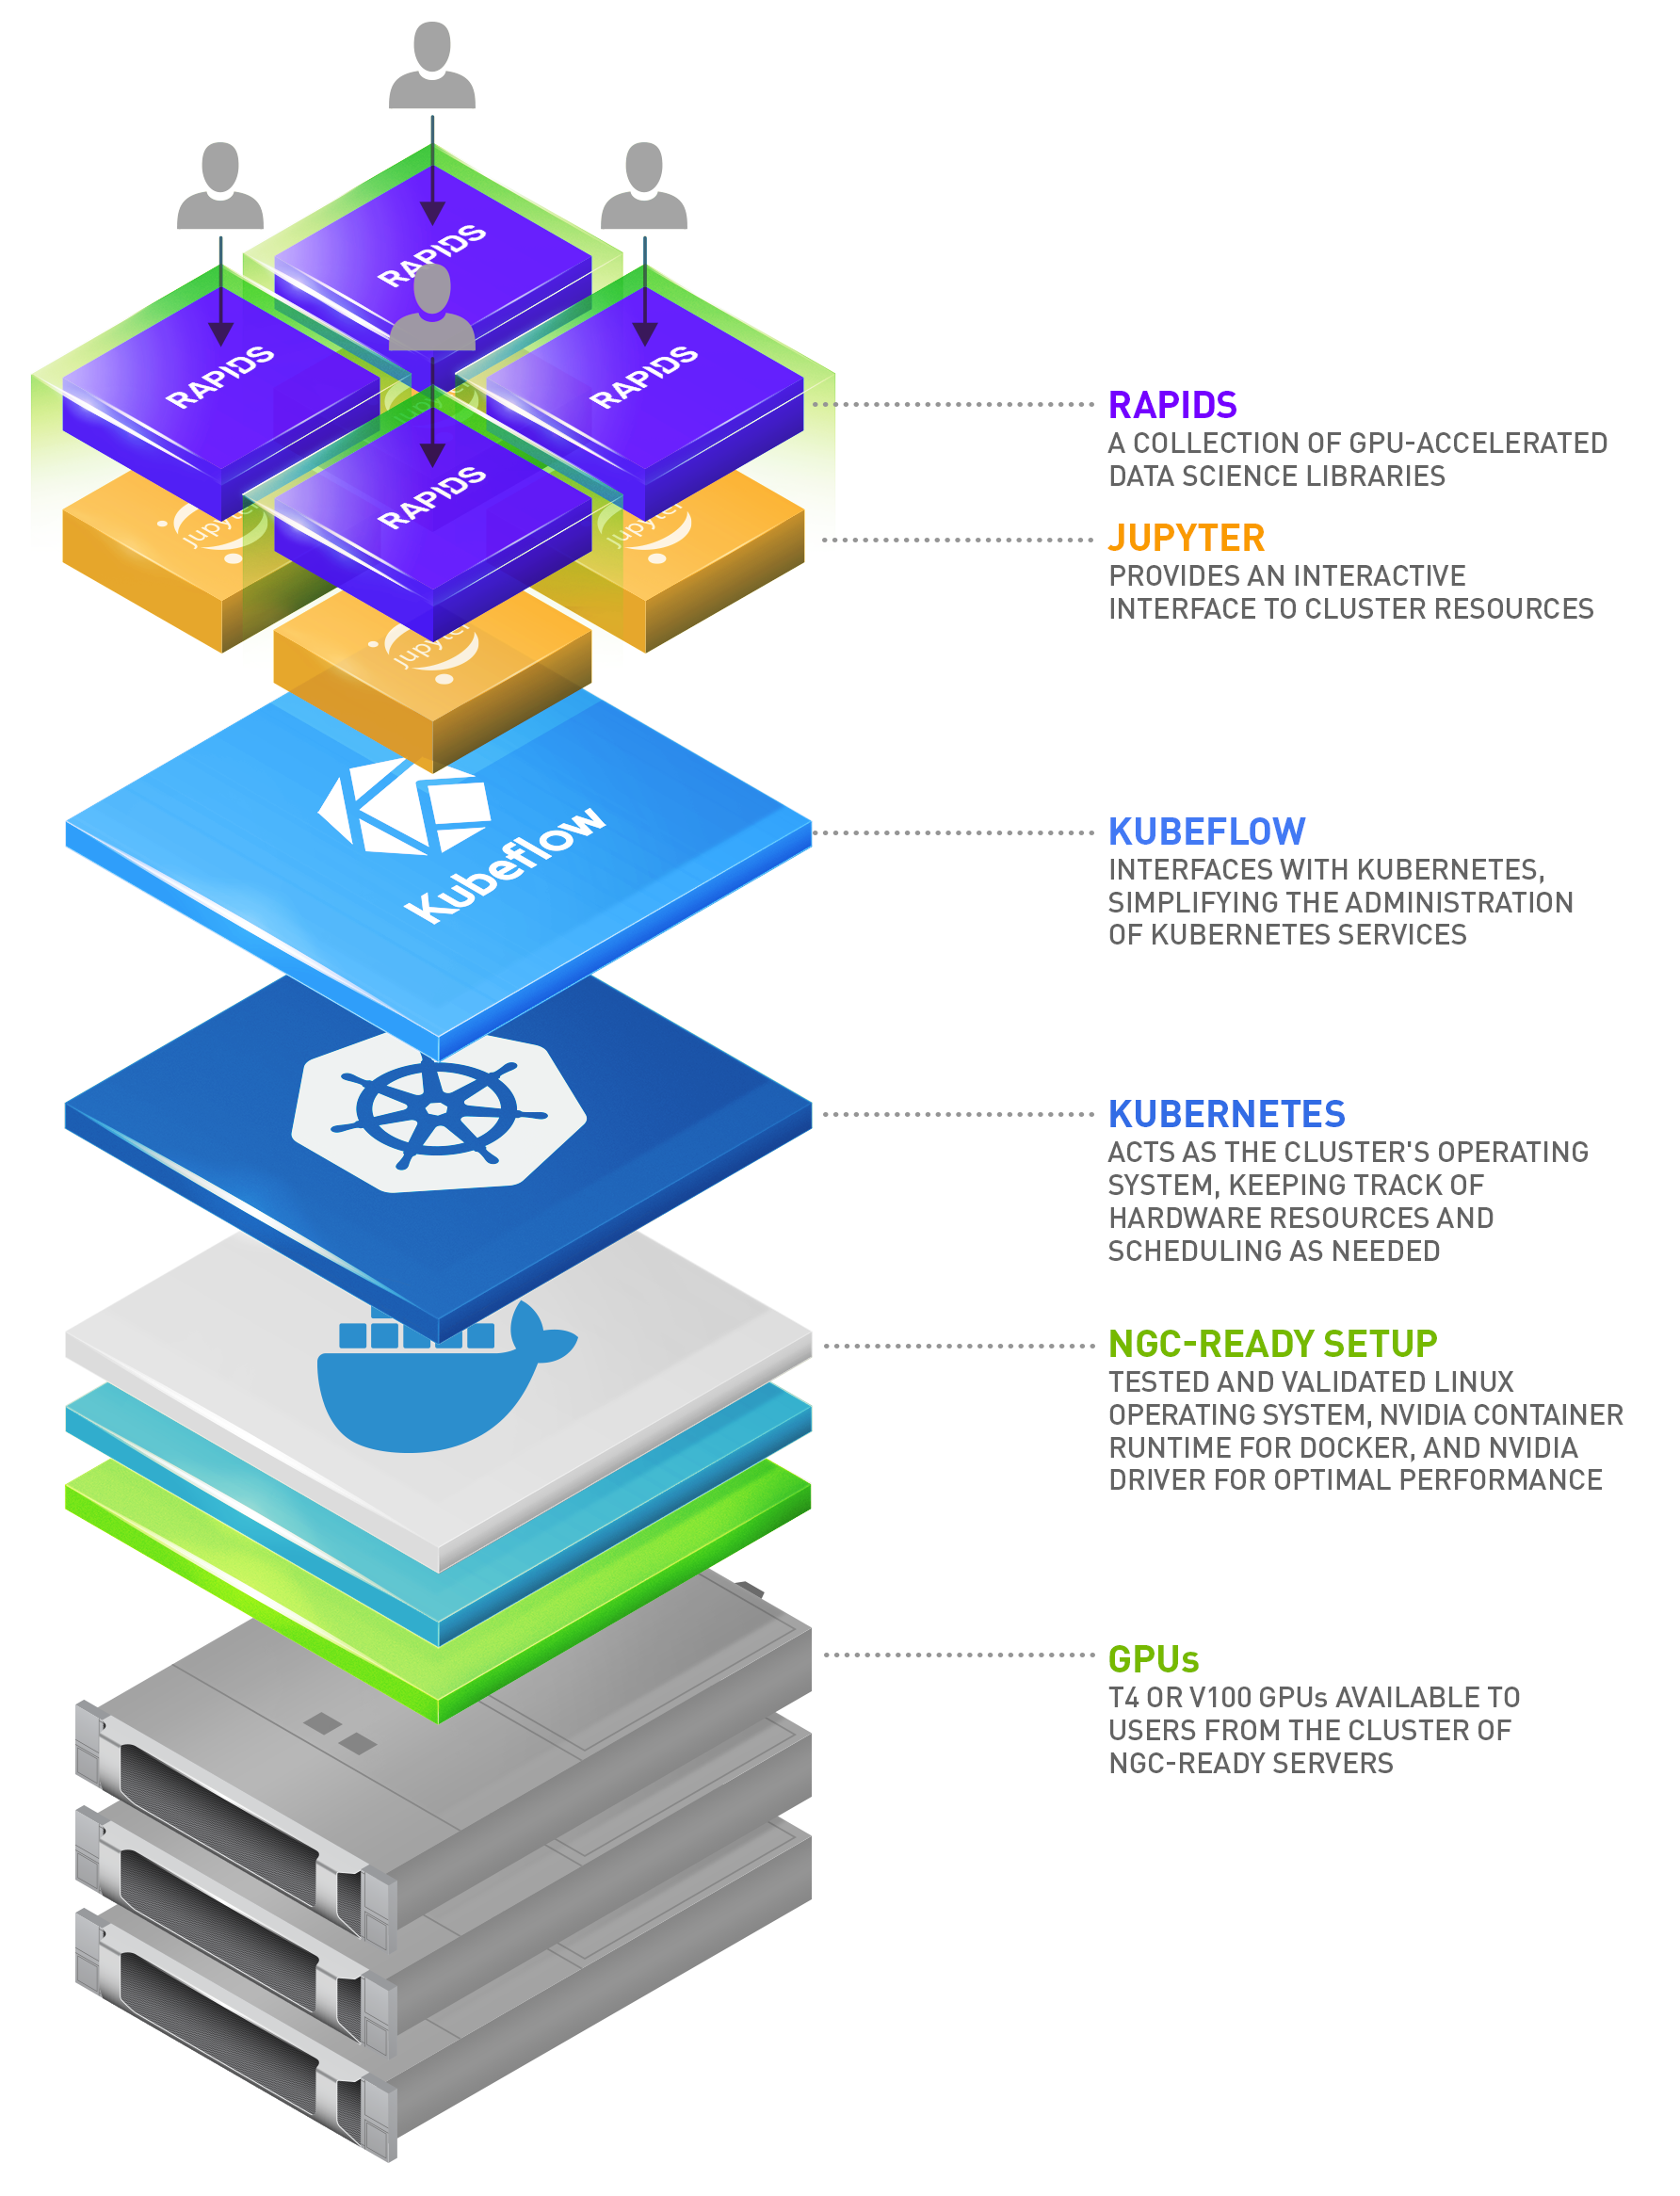
NVIDIA-powered data science clusters (DS clusters) enable teams of data scientists with Jupyter Notebooks containing everything they need to tackle complex data science problems from anywhere. These clusters combine the world’s most advanced NVIDIA GPUs with a tested data science software container available from NVIDIA.
Users simply need an internet browser and a network connection to the cluster. This gives them access to one or more GPUs via a Jupyter notebook loaded with the top data science libraries, putting a remote data science workstation from any device at their fingertips.

Leveraging Kubernetes enables administrators to make available shared resources dedicating resources to a particular user. Administrators pool these resources and make them available on-demand as users request them. This ensures efficient, effective use of compute resources. Since this is a cluster and not a dedicated system, users also have the ability to scale and request more resources than normally available with a fixed resource. A Kubernetes base opens the door to easily add additional service layers over time as a secondary benefit. Expect to hear more in future posts.
The NVIDIA RAPIDS suite of open source data science software libraries, built on CUDA-X AI, gives you the freedom to execute end-to-end data science and analytics pipelines entirely on GPUs, accelerating the time to results.
Deployment
Deploying the DS cluster requires knowledge of Linux and Ansible. However, much of the difficult work has been built into scripts that are part of the DeepOps toolkit. Expect the process to take half- to a full-day after procuring, racking, and networking hardware.
Step 1 – Hardware
The stars of the DS cluster are three NGC-Ready servers, as shown in figure 1. These systems have undergone a rigorous validation program to ensure they meet the performance requirements of NGC containers. With 4 NVIDIA T4 GPUs in each NGC-Ready server, up-to 12 data scientists can be simultaneously supported.
These systems will be the compute nodes in the cluster, sometimes called worker nodes. In this architecture, they also act as the Kubernetes management/master nodes. While double-duty isn’t standard for all environments, this lowers the bar to entry and is an ideal starting point. As teams grow and high availability becomes important, the master services are generally moved to dedicated hardware.
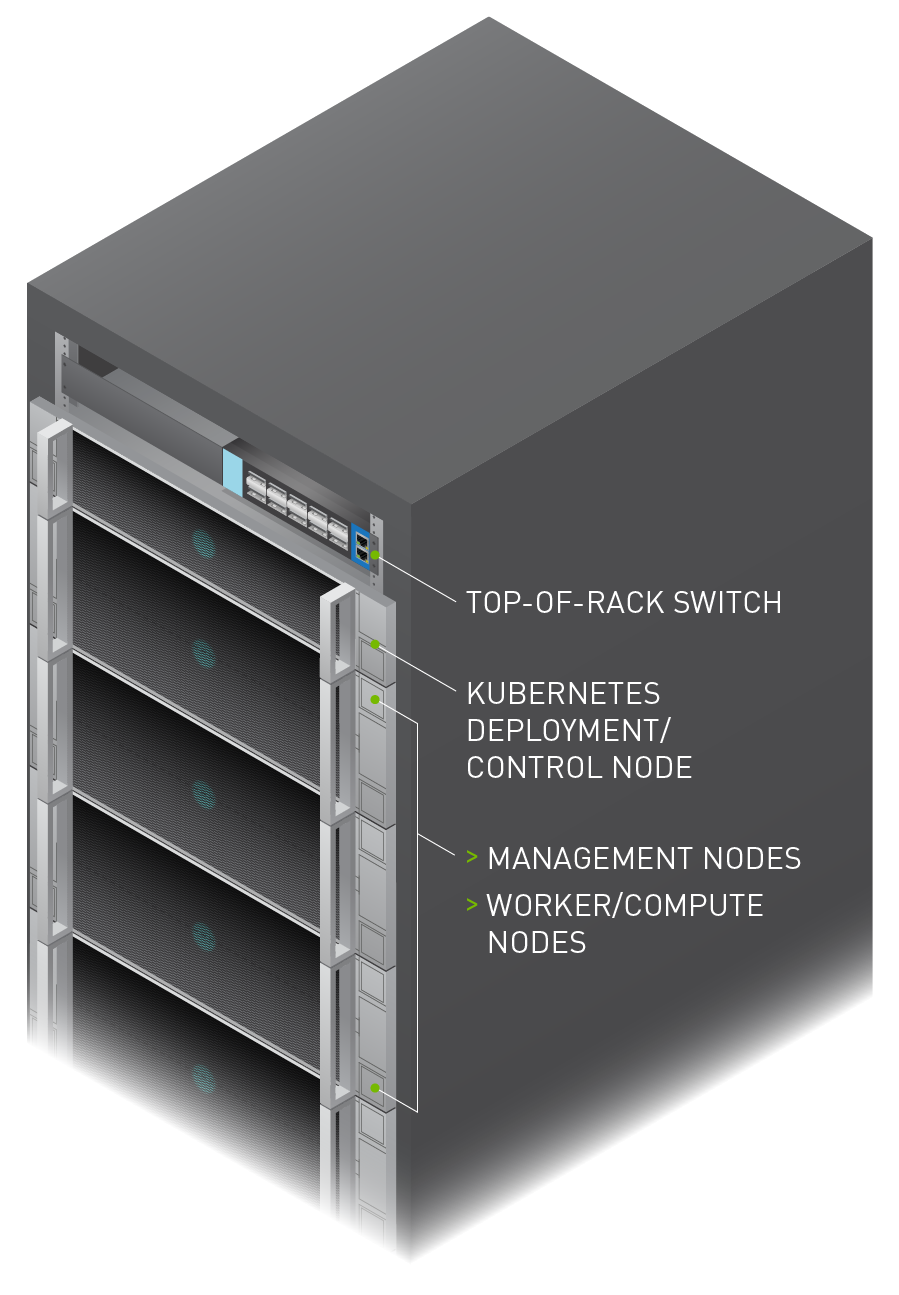
Next, you’ll require a top-of-rack (TOR) switch to connect the systems to each other and to the external network. Since NGC-Ready systems have two NICs and one management interface, the TOR needs a minimum of nine ports. An existing TOR can be used but separation is beneficial from an administration perspective. Regardless, ensure that the TOR you use supports the desired NIC speed.
Finally, you’ll need a system to act as the control node. This system can be a relatively spartan x86 CPU-only system with a single CPU, 32GB RAM, one NIC, and an SSD.
Systems should be racked and networked to ensure they are on the same VLAN/subnet.
Step 2 – Provisioning/control node
You must first install Ubuntu 18.04 on the control node. Be sure to enable SSH and record the user and password used during install. After that’s done, download the DeepOps git repo and run:
./scripts/setup.sh
This installs Ansible and other dependencies.
Lastly, install Maas.io. This will be used to deploy operating systems to the NGC-Ready Systems.
Step 3 – Operating systems
Use Maas.io to deploy Ubuntu 18.04 (NGC-Ready Compatible) on each of the NGC-Ready systems.
Step 4 – Kubernetes and NGC-Ready System Setup
First, create an Ansible inventory where each of the NGC-Ready systems act as both a master/management node and a compute/worker node.
Second, run the following command:
ansible-playbook -l k8s-cluster playbooks/k8s-cluster.yml.
This playbook accomplishes two things: first, it installs the rest of the latest NGC-Ready system setup on each system, ensuring that they are compatible with and optimized for NGC containers and second, it deploys Kubernetes across the NGC-Ready systems via Kubespray. Some additional parameters may be required based on security policies. See the full DeepOps Kubernetes deployment guide for details.
Step 5 – Services
To provide persistent storage, deploy Rook using:
./scripts/k8s_deploy_rook.sh
This provides persistent storage.
Deploy Kubeflow using:
./scripts/k8s_deploy_kubeflow.sh
This provides a convenient GUI for users to launch Jupyter notebooks, execute pipelines, and leverage other data science tools that we’ll explore in future blogs.
Note that Kubeflow requires containers to be configured with a launch command to work properly. This has already been implemented in the DeepOps deployment script for Kubeflow, allowing any NGC container to be compatible.
User experience
As noted earlier, the user experience starts with any internet browser and a network connection to the DS cluster.
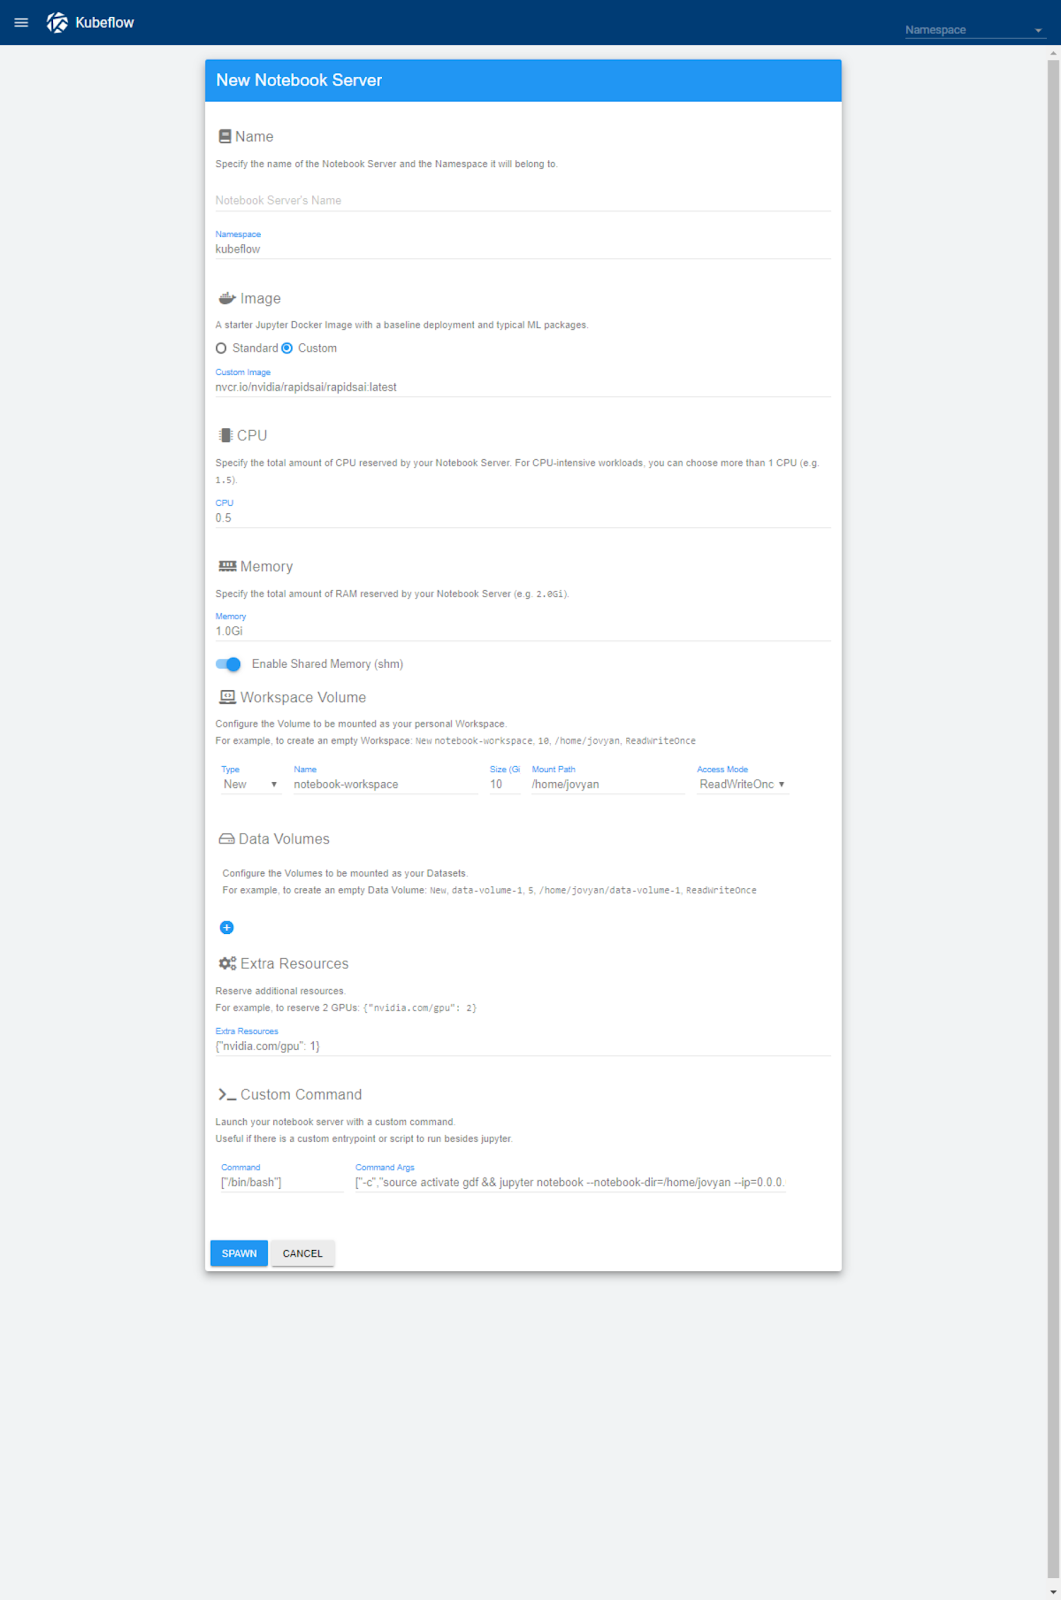
After browsing to the Kubeflow notebook URL, users see an interface to create their notebook, shown in figure 5. They enter a name for their notebook, the resources required, including the number of GPUs they need in the extra resources section ({"nvidia.com/gpu": 1}), and the RAPIDS image (nvcr.io/nvidia/rapidsai/rapidsai:cuda9.2-runtime-ubuntu16.04 for the latest version tested for this post). Finally, they’ll update the custom command to use bin/bash and:
["-c","source activate gdf && jupyter notebook --notebook-dir=/home/jovyan --ip=0.0.0.0 --no-browser --allow-root --port=8888 --NotebookApp.token='' --NotebookApp.password='' --NotebookApp.allow_origin='*' --NotebookApp.base_url=${NB_PREFIX}"]
(This is an update to the default command specifically for the NVIDIA RAPIDS container.)
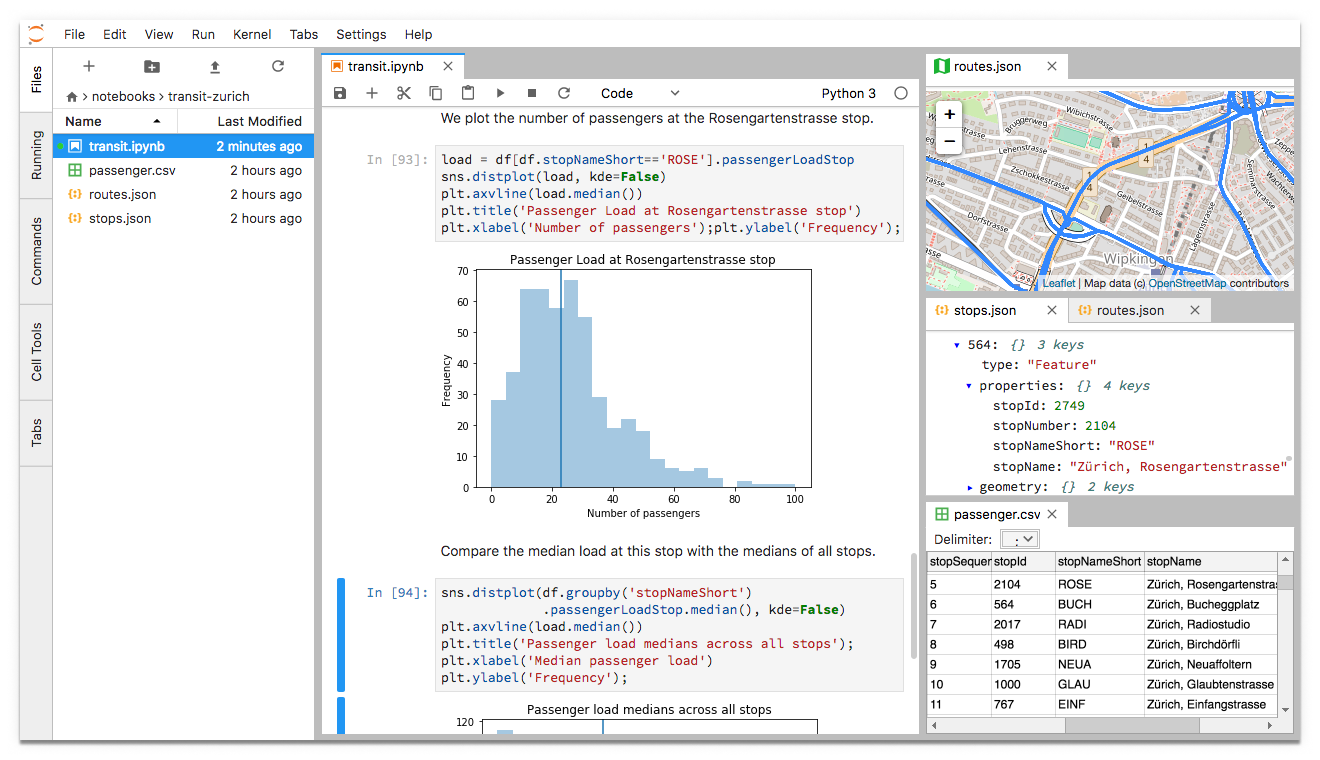
After a few seconds, the notebook shows up in the list of available notebooks. The user clicks connect, which then connects them to their Jupyter notebook with the RAPIDS libraries loaded, as shown in figure 6.
Next steps
Whether you’re an enterprise, small business, start-up or educational institution, the DS cluster is a great way to get started with your data science infrastructure. To learn more, please subscribe to our data science newsletter.
We’re also showing the DS cluster in our booth at HPE Discover. Drop by booth #232 to see a DS cluster in action and to learn more about how NVIDIA can help you get one running in your environment.