![]() [Note, this post was originally published September 19, 2013. It was updated on September 19, 2017.]
[Note, this post was originally published September 19, 2013. It was updated on September 19, 2017.]
Python is a high-productivity dynamic programming language that is widely used in science, engineering, and data analytics applications. There are a number of factors influencing the popularity of python, including its clean and expressive syntax and standard data structures, comprehensive “batteries included” standard library, excellent documentation, broad ecosystem of libraries and tools, availability of professional support, and large and open community. Perhaps most important, though, is the high productivity that a dynamically typed, interpreted language like Python enables. Python is nimble and flexible, making it a great language for quick prototyping, but also for building complete systems.
But Python’s greatest strength can also be its greatest weakness: its flexibility and typeless, high-level syntax can result in poor performance for data- and computation-intensive programs. For this reason, Python programmers concerned about efficiency often rewrite their innermost loops in C and call the compiled C functions from Python. There are a number of projects aimed at making this optimization easier, such as Cython, but they often require learning a new syntax. Ideally, Python programmers would like to make their existing Python code faster without using another programming language, and, naturally, many would like to use accelerators to get even higher performance from their code.
Numba: High Productivity for High-Performance Computing
In this post I’ll introduce you to Numba, a Python compiler from Anaconda that can compile Python code for execution on CUDA-capable GPUs or multicore CPUs. Since Python is not normally a compiled language, you might wonder why you would want a Python compiler. The answer is of course that running native, compiled code is many times faster than running dynamic, interpreted code. Numba works by allowing you to specify type signatures for Python functions, which enables compilation at run time (this is “Just-in-Time”, or JIT compilation). Numba’s ability to dynamically compile code means that you don’t give up the flexibility of Python. This is a huge step toward providing the ideal combination of high productivity programming and high-performance computing.
With Numba, it is now possible to write standard Python functions and run them on a CUDA-capable GPU. Numba is designed for array-oriented computing tasks, much like the widely used NumPy library. The data parallelism in array-oriented computing tasks is a natural fit for accelerators like GPUs. Numba understands NumPy array types, and uses them to generate efficient compiled code for execution on GPUs or multicore CPUs. The programming effort required can be as simple as adding a function decorator to instruct Numba to compile for the GPU. For example, the @vectorize decorator in the following code generates a compiled, vectorized version of the scalar function Add at run time so that it can be used to process arrays of data in parallel on the GPU.
import numpy as np
from numba import vectorize

@vectorize(['float32(float32, float32)'], target='cuda')
def Add(a, b):
  return a + b

# Initialize arrays
N = 100000
A = np.ones(N, dtype=np.float32)
B = np.ones(A.shape, dtype=A.dtype)
C = np.empty_like(A, dtype=A.dtype)

# Add arrays on GPU
C = Add(A, B)
To compile and run the same function on the CPU, we simply change the target to ‘cpu’, which yields performance at the level of compiled, vectorized C code on the CPU. This flexibility helps you produce more reusable code, and lets you develop on machines without GPUs.
GPU-Accelerated Libraries for Python
One of the strengths of the CUDA parallel computing platform is its breadth of available GPU-accelerated libraries. Another project by the Numba team, called pyculib, provides a Python interface to the CUDA cuBLAS (dense linear algebra), cuFFT (Fast Fourier Transform), and cuRAND (random number generation) libraries. Many applications will be able to get significant speedup just from using these libraries, without writing any GPU-specific code. For example the following code generates a million uniformly distributed random numbers on the GPU using the “XORWOW” pseudorandom number generator.
import numpy as np
from pyculib import rand as curand

prng = curand.PRNG(rndtype=curand.PRNG.XORWOW)
rand = np.empty(100000)
prng.uniform(rand)
print rand[:10]
Massive Parallelism with CUDA Python
Anaconda (formerly Continuum Analytics) recognized that achieving large speedups on some computations requires a more expressive programming interface with more detailed control over parallelism than libraries and automatic loop vectorization can provide. Therefore, Numba has another important set of features that make up what is unofficially known as “CUDA Python”. Numba exposes the CUDA programming model, just like in CUDA C/C++, but using pure python syntax, so that programmers can create custom, tuned parallel kernels without leaving the comforts and advantages of Python behind. Numba’s CUDA JIT (available via decorator or function call) compiles CUDA Python functions at run time, specializing them for the types you use, and its CUDA Python API provides explicit control over data transfers and CUDA streams, among other features. 
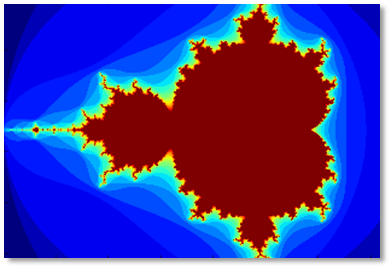
The following code example demonstrates this with a simple Mandelbrot set kernel. Notice the mandel_kernel function uses the cuda.threadIdx, cuda.blockIdx, cuda.blockDim, and cuda.gridDim structures provided by Numba to compute the global X and Y pixel indices for the current thread. As in other CUDA languages, we launch the kernel by inserting an “execution configuration” (CUDA-speak for the number of threads and blocks of threads to use to run the kernel) in brackets, between the function name and the argument list: mandel_kernel[griddim, blockdim](-2.0, 1.0, -1.0, 1.0, d_image, 20). You can also see the use of the to_host and to_device API functions to copy data to and from the GPU.
You can get the full Jupyter Notebook for the Mandelbrot example on Github.
@cuda.jit(device=True)
def mandel(x, y, max_iters):
  """
  Given the real and imaginary parts of a complex number,
  determine if it is a candidate for membership in the Mandelbrot
  set given a fixed number of iterations.
  """
  c = complex(x, y)
  z = 0.0j
  for i in range(max_iters):
    z = z*z + c
    if (z.real*z.real + z.imag*z.imag) >= 4:
      return i

  return max_iters

@cuda.jit
def mandel_kernel(min_x, max_x, min_y, max_y, image, iters):
  height = image.shape[0]
  width = image.shape[1]

  pixel_size_x = (max_x - min_x) / width
  pixel_size_y = (max_y - min_y) / height

  startX = cuda.blockDim.x * cuda.blockIdx.x + cuda.threadIdx.x
  startY = cuda.blockDim.y * cuda.blockIdx.y + cuda.threadIdx.y
  gridX = cuda.gridDim.x * cuda.blockDim.x;
  gridY = cuda.gridDim.y * cuda.blockDim.y;

  for x in range(startX, width, gridX):
    real = min_x + x * pixel_size_x
    for y in range(startY, height, gridY):
      imag = min_y + y * pixel_size_y
      image[y, x] = mandel(real, imag, iters)

gimage = np.zeros((1024, 1536), dtype = np.uint8)
blockdim = (32, 8)
griddim = (32,16)

start = timer()
d_image = cuda.to_device(gimage)
mandel_kernel[griddim, blockdim](-2.0, 1.0, -1.0, 1.0, d_image, 20)
d_image.to_host()
dt = timer() - start

print "Mandelbrot created on GPU in %f s" % dt

imshow(gimage)
On a server with an NVIDIA Tesla P100 GPU and an Intel Xeon E5-2698 v3 CPU, this CUDA Python Mandelbrot code runs nearly 1700 times faster than the pure Python version. 1700x may seem an unrealistic speedup, but keep in mind that we are comparing compiled, parallel, GPU-accelerated Python code to interpreted, single-threaded Python code on the CPU.
Get Started with Numba Today
Numba provides Python developers with an easy entry into GPU-accelerated computing and a path for using increasingly sophisticated CUDA code with a minimum of new syntax and jargon. You can start with simple function decorators to automatically compile your functions, or use the powerful CUDA libraries exposed by pyculib. As you advance your understanding of parallel programming concepts and when you need expressive and flexible control of parallel threads, CUDA is available without requiring you to jump in on the first day.
Numba is a BSD-licensed, open source project which itself relies heavily on the capabilities of the LLVM compiler. The GPU backend of Numba utilizes the LLVM-based NVIDIA Compiler SDK. The pyculib wrappers around the CUDA libraries are also open source and BSD-licensed.
To get started with Numba, the first step is to download and install the Anaconda Python distribution, a “completely free enterprise-ready Python distribution for large-scale data processing, predictive analytics, and scientific computing” that includes many popular packages (Numpy, Scipy, Matplotlib, iPython, etc) and “conda”, a powerful package manager. Once you have Anaconda installed, install the required CUDA packages by typing conda install numba cudatoolkit pyculib. Then check out the Numba tutorial for CUDA on the ContinuumIO github repository. I also recommend that you check out the Numba posts on Anaconda’s blog.


