Object detection remains the primary driver for applications such as autonomous driving and intelligent video analytics. Object detection applications require substantial training using vast datasets to achieve high levels of accuracy. NVIDIA GPUs excel at the parallel compute performance required to train large networks in order to generate datasets for object detection inference. This post covers what you need to get up to speed using NVIDIA GPUs to run high performance object detection pipelines quickly and efficiently.
Our python application takes frames from a live video stream and performs object detection on GPUs. We use a pre-trained Single Shot Detection (SSD) model with Inception V2, apply TensorRT’s optimizations, generate a runtime for our GPU, and then perform inference on the video feed to get labels and bounding boxes. The application then annotates the original frames with these bounding boxes and class labels. The resulting video feed has bounding box predictions from our object detection network overlaid on it. The same approach can be extended to other tasks such as classification and segmentation.
While knowledge of GPUs and NVIDIA software is not necessary, you should be familiar with object detection and python programming to follow along. Some of the software tools used include Docker containers from NVIDIA GPU Cloud (NGC) to set up our environment, OpenCV to run the feed from the camera, and, TensorRT to speed up our inference. While you will benefit from simply reading this post, you need a CUDA capable GPU and a webcam connected to your machine to run the example. You can test for a working GPU with the command nvidia-smi. You may find this list of CUDA GPUs helpful.
By the end of this post, you will understand the components needed to setup an end-to-end object detection inference pipeline, how to apply different optimizations on GPUs, and how to perform inference in FP16 and INT8 precision on your pipelines. We use a Single Shot Detection network with InceptionV2 as the backbone in this example. For reference, all the code (and a detailed README on how to install everything) can be found on the NVIDIA GitHub repo.
Run the Sample!
We use docker containers to set up the environment and package it for distribution. We can recall numerous occasions where using containers made it very easy to recover from conflicts and crashes in no time, so be sure you have Docker and NVIDIA Docker on your machine before trying out this example.
Navigate to the main object-detection-webcam folder and run this section below to build the container and run the application:
./setup_environment.sh
python SSD_Model/detect_objects_webcam.py
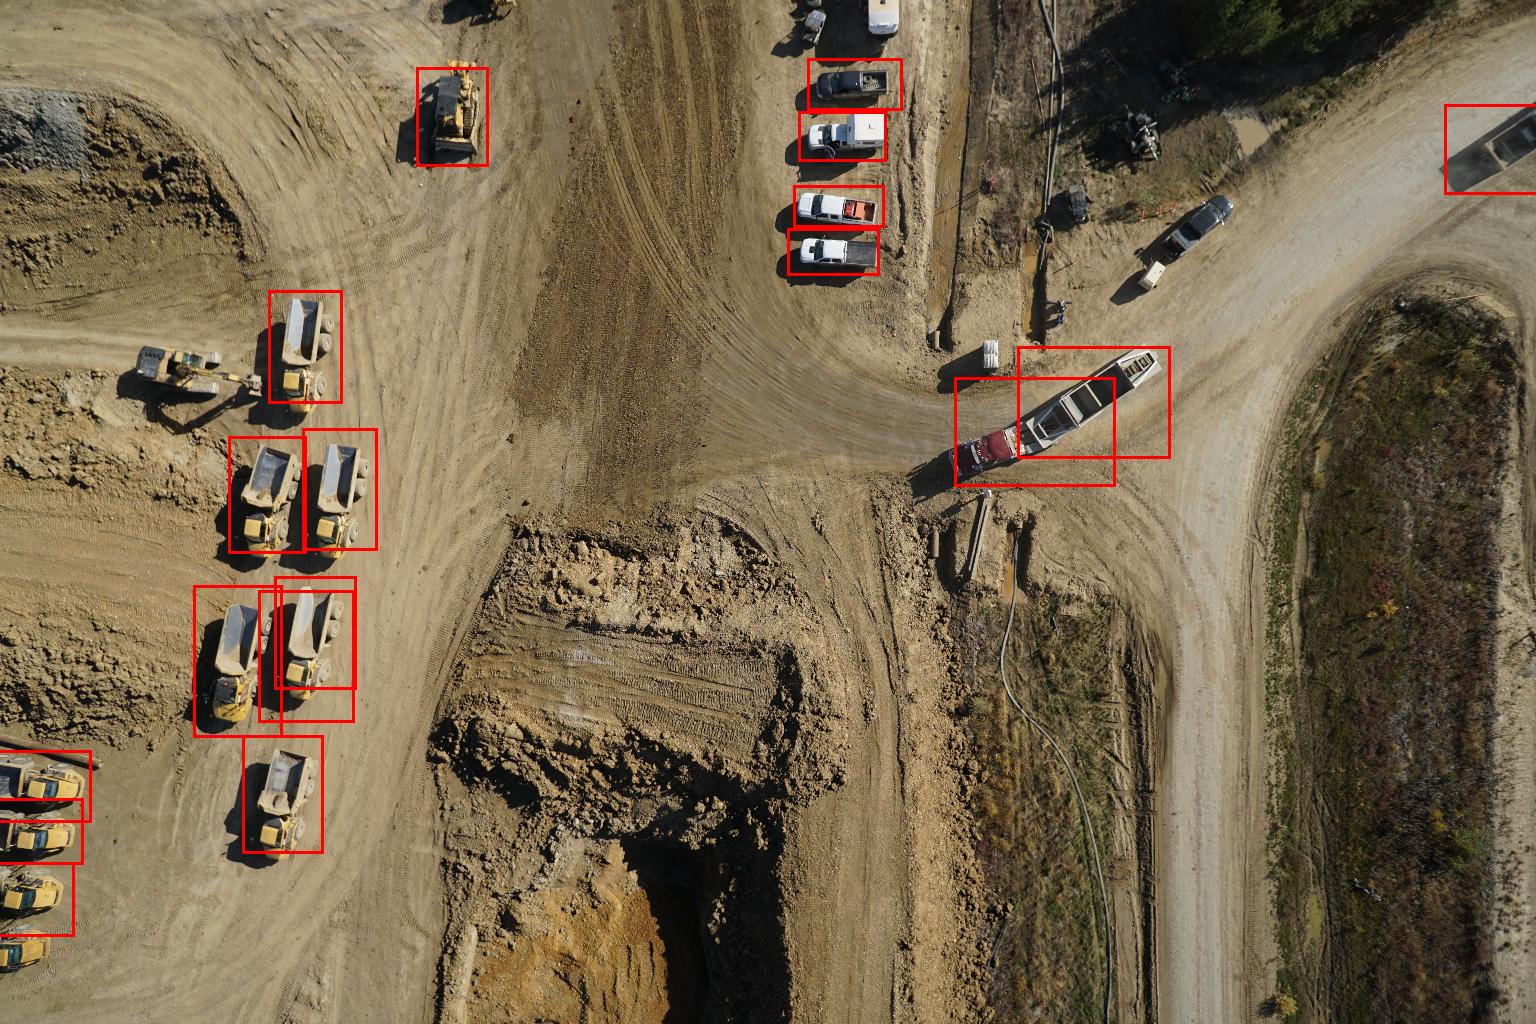
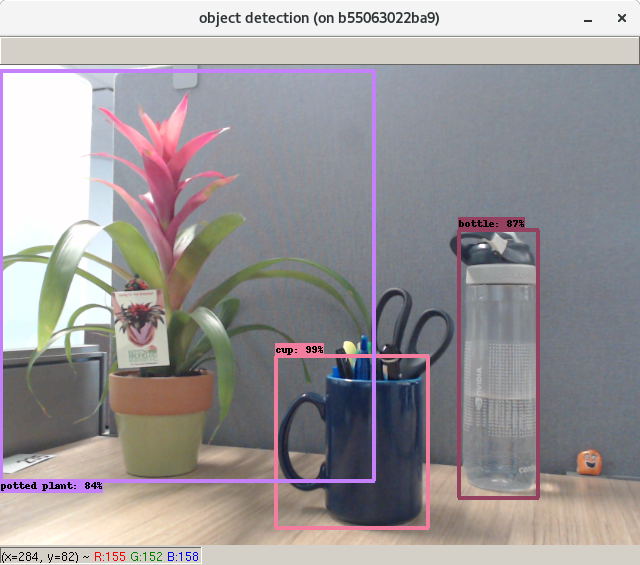
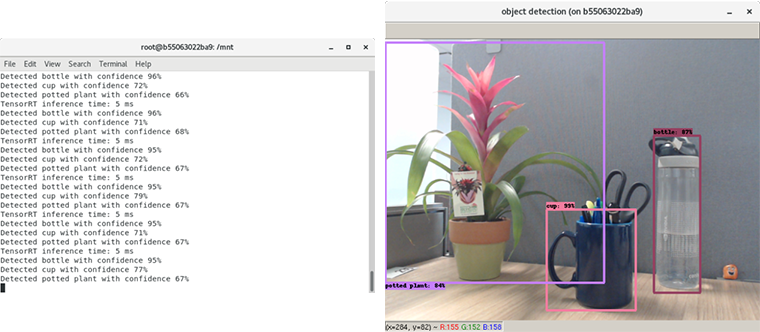
This should bring up a window showing the video feed from your webcam with bounding boxes and labels overlaid as in figure 1.
Setup with NGC and TensorRT open source software
Let’s review the setup, all the code for setup is available in setup_environment.sh. There are 4 key steps:
- Setting environment variables for Docker to see webcam
- Downloading the VOC dataset to use for INT8 calibration (which we will see later in the blog)
- Building a Dockerfile containing all the libraries we need to run the code
- Starting that Dockerfile so we can the application in the correct environment
Since we are using Docker containers to manage our environment, we need to give our container access to all the hardware in the host machine. Most of this is handled automatically by Docker, except the webcam which we add manually. We need to set permissions for Docker to access X11, which is used to open the GUI for webcam feed. Do this using environment variables and by setting permissions that are passed into the container during the docker run command.
xhost +local:docker
XSOCK=/tmp/.X11-unix
XAUTH=/tmp/.docker.xauth
xauth nlist $DISPLAY | sed -e 's/^..../ffff/' |
xauth -f $XAUTH nmerge -
Next, we download the PASCAL VOC dataset for INT8 calibration, which we cover in later sections. This dataset contains images of common household items and everyday objects.
wget http://host.robots.ox.ac.uk/pascal/VOC/voc2007/VOCtest_06-Nov-2007.tar
tar -xf VOCtest_06-Nov-2007.tar
Then we build a Dockerfile which has our entire development environment. The Dockerfile installs following components:
- TensorRT and required libraries
- TensorRT open source software, replace plugins and parsers in TensorRT installation
- Other dependencies for our application
The TensorRT container from NVIDIA NGC makes installing TensorRT very simple. The container contains required libraries such as CUDA, cuDNN, and NCCL. NGC is a repository of pre-built containers that are updated monthly and tested across platforms and cloud service providers. See what’s in the TensorRT container in the release notes. Since we need to combine multiple other libraries and packages in addition to TensorRT, we will create a custom Dockerfile with the TensorRT container as base image.
We use the newest versions of TensorRT plugins and parsers in our example since they’re open source. Plugins provide a way to use custom layers in models within TensorRT and are already included in the TensorRT container. The SSD model, for example, uses the flattenConcat plugin from the plugin repository. Strictly speaking, we did not need to use the open source versions of plugins in this example; using the versions shipped in the TensorRT container would have worked as well. It’s handy to know, enabling you to extend and customize these components to support custom layers in your models.
To get open source plugins, we clone the TensorRT github repo, build the components using cmake, and replace existing versions of these components in the TensorRT container with new versions. TensorRT applications will search for the TensorRT core library, parsers, and plugins under this path.
Finally, we can install the other dependencies that we need for our application, which is mainly just OpenCV and its rendering libraries. OpenCV is a computer vision library which we use to interact with our webcam.
Use the docker build command to build all components in the Dockerfile:
docker build -t object_detection_webcam . # don’t forget the period at the end
Start the container to open your new development environment as shown below. In this command, we set the runtime to nvidia tolet Docker know that our host machine has GPUs, then we mount the GitHub repo into the Docker container to access the code within, and finally forward information about how to interact with the webcam through the subsequent mounting and environment variables. For more information on the flags we used, check out the Docker documentation.
docker run --runtime=nvidia -it -v `pwd`/:/mnt --device=/dev/video0 -e DISPLAY=$DISPLAY -v $XSOCK:$XSOCK -v $XAUTH:$XAUTH -e XAUTHORITY=$XAUTH object_detection_webcam
Once the container starts, you can run your application using python detect_objects_webcam.py.
Optimize Model, Build Engine for Inference
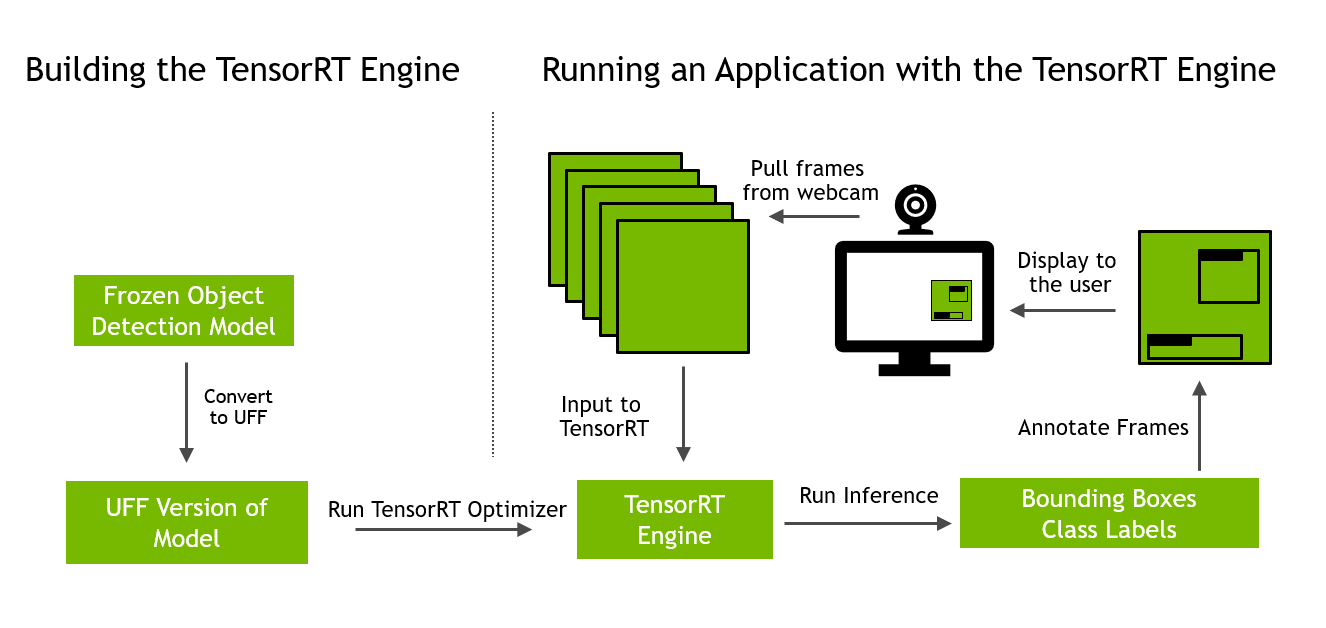
The pseudo code for the detect_objects_webcam.py application is as follows and also shown in figure 2:
# Download the frozen object detection model from TensorFlow Model Zoo
# Convert the frozen model (.pb file) to Universal Framework Format (UFF)
# Build the TensorRT engine from the UFF version of the model
# While True:
	# Read in a frame from the webcam
# Run inference on that frame using our TensorRT engine
# Overlay the bounding boxes and class labels
# Display that frame back to the user
This first step is to download the frozen SSD object detection model from the TensorFlow model zoo. This is done in prepare_ssd_model in model.py:
221 def prepare_ssd_model(model_name="ssd_inception_v2_coco_2017_11_17", silent=False):
222    """Downloads pretrained object detection model and converts it to UFF.
223
224    The model is downloaded from Tensorflow object detection model zoo.
225    Currently only ssd_inception_v2_coco_2017_11_17 model is supported
226    due to model_to_uff() using logic specific to that network when converting.
227
228    Args:
229        model_name (str): chosen object detection model
230        silent (bool): if True, writes progress messages to stdout
231    """
232    if model_name != "ssd_inception_v2_coco_2017_11_17":
233        raise NotImplementedError(
234            "Model {} is not supported yet".format(model_name))
235    download_model(model_name, silent)
236    ssd_pb_path = PATHS.get_model_pb_path(model_name)
237    ssd_uff_path = PATHS.get_model_uff_path(model_name)
238    model_to_uff(ssd_pb_path, ssd_uff_path, silent)
The next step is to optimize this model for inference and generate a runtime that executes on your GPU. We use TensorRT, a deep learning optimizer and runtime engine for this. TensorRT generates runtimes from this application for every NVIDIA GPU. You need the application to deliver the lowest latency possible to perform inference in real-time. Let’s see how to do that with TensorRT.
Convert the frozen TensorFlow graph to Universal Framework Format (UFF) using the utility available in model.py. You now import the UFF model into TensorRT using the parser, apply optimizations, and generate a runtime engine. Optimizations are applied under the hood during the build process and you don’t need to do anything to apply them. For example, TensorRT may fuse multiple layers such as convolution, ReLU and Bias into a single layer. This is called layer fusion. Another optimization is tensor fusion or layer aggregation, in which layers that share the same input fuse into a single kernel and then their results are de-concatenated.
To build a runtime engine you need to specify 4 parameters:
- Path to UFF file for our model
- Precision for inference engine (FP32, FP16, or INT8)
- Calibration dataset (only needed if you’re running in INT8)
- Batch size used during inference
See code for building the engine in engine.py. The function that builds the engine is called build_engine.
Inference in lower precision (FP16 and INT8) increases throughput and offers lower latency. Using FP16 precision provides several times faster performance on Tensor Cores than FP32 with effectively no drop in model accuracy. Inference in INT8 can lead to further performance gains with less than a 1% drop in model accuracy. TensorRT chooses the kernels from FP32 and any precision that you allow. When you enable FP16 precision, TensorRT chooses kernels from both FP16 and FP32 precision. To use FP16 and INT8 precision, enable both to get the highest performance possible.
Calibration is used to determine the dynamic ranges of tensors in the graph so you can use the restricted range of INT8 precision effectively. More on that later.
The last parameter, batch size, is used to select the best kernels for the inference workload. You can use an engine for a smaller batch size than specified during its creation. However, the performance might not be ideal. I typically generate a few engines for the most common batch sizes that I expect and switch between them. In this example, we will be grabbing one frame at a time from the webcam, making the batch size one.
It’s also important to note that TensorRT automatically detects any specialized hardware that you have on your GPU. So if your GPU has Tensor Cores, it will automatically detect that and run your FP16 kernels on those Tensor Cores.
Let’s take a look at engine.py to see how all of those parameters work.
69 def build_engine(uff_model_path, trt_logger, trt_engine_datatype=trt.DataType.FLOAT, calib_dataset=None, batch_size=1, silent=False):
70    with trt.Builder(trt_logger) as builder, builder.create_network() as network, trt.UffParser() as parser:
71        builder.max_workspace_size = 2 << 30
72        builder.max_batch_size = batch_size
73        if trt_engine_datatype == trt.DataType.HALF:
74            builder.fp16_mode = True
75        elif trt_engine_datatype == trt.DataType.INT8:
76            builder.fp16_mode = True
77            builder.int8_mode = True
78            builder.int8_calibrator = calibrator.SSDEntropyCalibrator(data_dir=calib_dataset, cache_file='INT8CacheFile')
79
80        parser.register_input(ModelData.INPUT_NAME, ModelData.INPUT_SHAPE)
81        parser.register_output("MarkOutput_0")
82        parser.parse(uff_model_path, network)
83
84        if not silent:
85            print("Building TensorRT engine. This may take few minutes.")
86
87        return builder.build_cuda_engine(network)
The build_engine function creates an object for the builder, parser, and network. The parser imports the SSD model in UFF format and places the converted graph in the network object. While we use the UFF parser to import the converted TensorFlow model, TensorRT also includes parsers for Caffe and ONNX. Both can also be found in the TensorRT open source repo. Using the ONNX format of this model simply means calling ONNXParser instead; the rest of the code would be the same.
Line 71 specifies the memory that TensorRT should use to apply optimizations. This is just scratch space and you should provide the largest size that your system allows; I provide 2 GB. Conditional code follows to set parameters based on the precision for inference. For this first run, let’s use the default FP32 precision.
The next few lines specify the name and shape of input nodes and output nodes for the parser. The parser.parse actually executes the parser on our UFF file using the parameters we have specified above. Finally, builder.build_cuda_engine applies optimizations to the network, and generates the engine object.
The script engine.py has two additional key functions: save_engine and load_engine. Once you have generated an engine you can save it to disk for future use, a process called serialization. Serialization generates a plan file that you can subsequently load from disk, generally much faster than rebuilding the engine from scratch. That’s the role of these load and save functions. If you do change the parameters used to build the engine, the model used, or the GPU, you need to regenerate the engine as TensorRT would choose different kernels for building the engine.
You can download plan files for several combinations of pre-trained models, parameters and precisions from NGC models. If I am using a standard model, the first thing I generally check is if there is plan file available on NGC to use directly in my application.
Run Inference With TensorRT Engine
We can now use the TensorRT engine to perform object detection. Oure example takes one frame from the webcam at a time and passes it to the TensorRT engine in inference.py—more specifically in the function infer_webcam.
166    def infer_webcam(self, arr):
167        """Infers model on given image.
168
169        Args:
170            arr (numpy array): image to run object detection model on
171        """
172
173       # Load image into CPU and do any pre-processing
174        img = self._load_img_webcam(arr)
175
176        # Copy it into appropriate place into memory
177        # (self.inputs was returned earlier by allocate_buffers())
178        np.copyto(self.inputs[0].host, img.ravel())
179
180        # When inferring on single image, we measure inference
181        # time to output it to the user
182        inference_start_time = time.time()
183
184        # Fetch output from the model
185        [detection_out, keepCount_out] = do_inference(
186            self.context, bindings=self.bindings, inputs=self.inputs,
187            outputs=self.outputs, stream=self.stream)
188
189        # Output inference time
190        print("TensorRT inference time: {} ms".format(
191            int(round((time.time() - inference_start_time) * 1000))))
192
193        # And return results
194        return detection_out, keepCount_out
This function first loads the image from the webcam (line 174), and then performs a few pre-processing steps in the function load_img_webcam. Our example shifts the order of the axes from HWC to CHW, normalizes the image so all the values fall between -1 and +1, and then flattens the array. You can also add any other preprocessing operations you need for your pipeline in this function.
A timer starts in line 182 to measure the time it takes for our TensorRT engine to perform inference. This is useful to understand the latency of the whole inference pipeline.
We call do_inference to perform inference. This function sends our data to the TensorRT engine for inference and returns two parameters: detection_out and keepCount_out. The detection_out function contains all the information about the bounding box coordinates, confidence, and class labels for each detection. The keepCount_out routine keeps track of the total number of detections the network found.
Putting It All Together
So far we have looked at how to import a pre-trained model from TensorFlow model zoo, convert it to UFF format, apply optimizations and generate a TensorRT engine, and use the engine to perform inference on a single image from the webcam.
Let’s see how all these components come together in detect_objects_webcam.py:
141 def main():
142
143    # Parse command line arguments
144    args = parse_commandline_arguments()
145
146    # Fetch .uff model path, convert from .pb
147    # if needed, using prepare_ssd_model
148    ssd_model_uff_path = PATHS.get_model_uff_path(MODEL_NAME)
149    if not os.path.exists(ssd_model_uff_path):
150        model_utils.prepare_ssd_model(MODEL_NAME)
151
152    # Set up all TensorRT data structures needed for inference
153    trt_inference_wrapper = inference_utils.TRTInference(
154        args.trt_engine_path, ssd_model_uff_path,
155        trt_engine_datatype=args.trt_engine_datatype,
156        calib_dataset = args.calib_dataset,
157        batch_size=args.max_batch_size)
158
159    print("TRT ENGINE PATH", args.trt_engine_path)
160
161    if args.camera == True:
162        print('Running webcam:', args.camera)
163        # Define the video stream
164        cap = cv2.VideoCapture(0)  # Change only if you have more than one webcams
165
166        # Loop for running inference on frames from the webcam
167        while True:
168            # Read frame from camera (and expand its dimensions to fit)
169            ret, image_np = cap.read()
170
171            # Actually run inference
172            detection_out, keep_count_out = trt_inference_wrapper.infer_webcam(image_np)
173
174            # Overlay the bounding boxes on the image
175            # let analyze_prediction() draw them based on model output
176            img_pil = Image.fromarray(image_np)
177            prediction_fields = len(TRT_PREDICTION_LAYOUT)
178            for det in range(int(keep_count_out[0])):
179                analyze_prediction(detection_out, det * prediction_fields, img_pil)
180            final_img = np.asarray(img_pil)
181
182            # Display output
183            cv2.imshow('object detection', final_img)
184
185            if cv2.waitKey(25) & 0xFF == ord('q'):
186                cv2.destroyAllWindows()
187                break
After parsing command line arguments, prepare_ssd_model uses model.py to convert from frozen TensorFlow graph to UFF format. Then we initialize a TensorRT Inference object in line 153 that uses build_engine in engine.py as discussed above to actually build the TensorRT engine. If no engine file has already been saved at our args.trt_engine_path then we need to build one from scratch. The same goes for the UFF version of our model. We will run in default FP32 precision which eliminates the need to provide a calibration dataset. Lastly, since we run live inference on just one webcam feed, we keep our batch size = 1.
Now let’s integrate this into the application that operates the webcam. If the camera flag is turned on (default), the app will start a video stream using OpenCV (line 164) and enter the main loop in line 167. This loop constantly pulls in new frames from the webcam, as shown in line 169, then performs inference on that frame as shown in line 172.
Finally we overlay the bounding box results onto the original frame (lines 176 – 180) and display them back to the user using imshow.
And that’s our whole pipeline!
Inference in INT8 Precision With TensorRT
The app performs inference several times faster using TensorRT on GPUs compared to in-framework inference. However, you can make it several times faster yet. We have so far used single precision (FP32) for inference where every number is represented using 32 bits. In FP32, activation values can lie within a range of +/- 3.4×1038 and require 32 bits to store each number. Larger numbers require significantly more storage for execution and also result in lower performance. Most models perform with nearly identical accuracy when switched to use lower precision FP16. Using models and techniques provided by NVIDIA enable you to get the highest performance possible using INT8 precision for inference. However, notice the significantly lower dynamic range that can be represented with INT8 precision in table 1.
| Precision | Dynamic Range | Minimum Positive Value |
| FP32 | -3.4×1038 ~ +3.4×1038 | 1.4×10-45 |
| FP16 | -65,504 ~ +65,504 | 5.96×10⁻⁸ |
| INT8 | -128 ~ +127 | 1 |
Using INT8 precision to obtain accuracy similar to FP32 inference means performing an additional step called calibration. During calibration, you run inference on training data similar to your final dataset and collect ranges for the activation values. TensorRT then calculates a scaling factor to distribute the range of INT8 values over this range of activation values for each node. Figure 3 shows that if the activation range for a node lies between -6 and +6, you want the 256 values that can be represented with INT8 to cover only this range.

Use the command below to re-build a TensorRT engine to use INT8 for precision in your application, perform calibration, and run inference. The whole process might take a few minutes:
python detect_objects_webcam -p 8
You should see the same result with higher performance than that achieved with FP32 precision earlier.
Let’s look at how to do this in the build_engine in engine.py. The conditional block enables different builder modes based on the precision enabled for inference. TensorRT always chooses FP32 kernels by default. Enabling FP16 mode means it also tries kernels running in FP16 precision; the same goes for INT8.
However, just because you allow lower precision kernels doesn’t mean that those will always outperform higher precision kernels in performance. For example, even though we set our precision mode to INT8, some FP16 or FP32 kernels may still exist that end up running faster. TensorRT chooses the best optimizations automatically.
TensorRT detects the presence of specialized hardware, such as Tensor Cores, and will use FP16 kernels on them to get the highest performance possible. The ability of TensorRT to choose the best kernels automatically is called kernel autotuning. This makes it possible to use TensorRT across a wide variety of applications while delivering high performance.
69 def build_engine(uff_model_path, trt_logger, trt_engine_datatype=trt.DataType.FLOAT, calib_dataset=None, batch_size=1, silent=False):
70    with trt.Builder(trt_logger) as builder, builder.create_network() as network, trt.UffParser() as parser:
71        builder.max_workspace_size = 2 << 30
72        builder.max_batch_size = batch_size
73        if trt_engine_datatype == trt.DataType.HALF:
74            builder.fp16_mode = True
75        elif trt_engine_datatype == trt.DataType.INT8:
76            builder.fp16_mode = True
77            builder.int8_mode = True
78            builder.int8_calibrator = calibrator.SSDEntropyCalibrator(data_dir=calib_dataset, cache_file='INT8CacheFile')
Notice that the INT8 conditional block uses a function SSDEntropyCalibrator. This class runs calibration data through your model during calibration in batches. Thus, all you simply need to implement the function called get_batch in calibrator.py to fetch the next batch of data from your calibration dataset. See code for SSDEntropyCalibrator in calibrator.py below.
14 class SSDEntropyCalibrator(trt.IInt8EntropyCalibrator2):
15    def __init__(self, data_dir, cache_file):
16        # Whenever you specify a custom constructor for a TensorRT class,
17        # you MUST call the constructor of the parent explicitly.
18        trt.IInt8EntropyCalibrator2.__init__(self)
19
20        self.num_calib_imgs = 100 # the number of images from the dataset to use for calibration
21        self.batch_size = 10
22        self.batch_shape = (self.batch_size, IMG_CH, IMG_H, IMG_W)
23        self.cache_file = cache_file
24
25        calib_imgs = [os.path.join(data_dir, f) for f in os.listdir(data_dir)]
26        self.calib_imgs = np.random.choice(calib_imgs, self.num_calib_imgs)
27        self.counter = 0 # for keeping track of how many files we have read
28
29        self.device_input = cuda.mem_alloc(trt.volume(self.batch_shape) * trt.float32.itemsize)
This function takes a directory of images as input to calibrate and a location to store the cache file. This cache file contains all the scaling factors you need for your network activations. If you save the activation values, you only need to run calibration once for a particular configuration and can just load this cache table for any subsequent runs.
And that’s all you need to do to perform INT8 calibration with TensorRT!
Next Steps
You now have a basic understanding of how to set up and run an object detection application on GPUs quickly. We’ve covered a lot of ground including setup, deploying in INT8 precision, using the newly open sourced plugins and parsers in TensorRT, connecting to a webcam, and overlaying results. If you run into issues with using this app, be sure to check the issues in this sample’s GitHub repo for similar issues and solutions.
If you want to further pursue using GPUs for object detection and other AI-related tasks, please check out related Developer Blog articles on Creating an Object Detection Pipeline for GPUs and How to Speed Up Inference with TensorRT. We also offer a webinar on How to Perform Inference for Common Applications, which uses the same code base covered in this post. You can also find additional resources for TensorRT at the TensorRT open source repo and TensorRT samples page, which includes the SSD samples just covered. The NVIDIA TensorRT Developer Forum offers a community of TensorRT users exchanging information on best practices.
Finally, if you’d like to join the free NVIDIA Developer Program to gain access to additional technical resources and the ability to file bug reports, sign up at our Developer Programs page. You’ll join the large and growing community of NVIDIA developers creating new and novel applications for GPUs. If you have cool ideas for other GPU-accelerated apps or questions about this article, please leave a comment.
References
[Liu et al. 2016] Liu, Wei, et al. “SSD: Single shot multibox detector.” European Conference on Computer Vision. Springer, Cham, 2016.
[Szegedy et al. 2016] Szegedy, Christian, et al. “Rethinking the inception architecture for computer vision.” Proceedings of the IEEE conference on computer vision and pattern recognition. 2016.
[Lin et al. 2014] Lin, Tsung-Yi, et al. “Microsoft COCO: Common objects in context.” European conference on computer vision. Springer, Cham, 2014.