 Keras is a powerful deep learning meta-framework which sits on top of existing frameworks such as TensorFlow and Theano. Keras is highly productive for developers; it often requires 50% less code to define a model than native APIs of deep learning frameworks require (here’s an example of LeNet-5 trained on MNIST data in Keras (71 lines) and TensorFlow (156 lines)). This productivity has made it very popular as a university and MOOC teaching tool, and as a rapid prototyping platform for applied researchers and developers.
Unfortunately, Keras is quite slow in terms of single-GPU training and inference time (regardless of the backend). It is also hard to get it to work on multiple GPUs without breaking its framework-independent abstraction.
Last week, the MXNet community introduced a release candidate for MXNet v0.11.0 with support for Keras v1.2. In this post I’ll show you how to use Keras with the MXNet backend to achieve high performance and excellent multi-GPU scaling. To learn more about the MXNet v0.11.0 release candidate, check out this post on the Amazon Web Services AI blog.
Overcoming Keras Performance Limitations
The primitive operations that Keras uses to build a network graph are not always optimal relative to framework best practices. A good example of this is that achieving maximum performance with TensorFlow requires using different API calls than the ones shown in public TensorFlow examples. Keras constructs the graph for Resnet-50 more or less like the ResNet-50 implementation in the TensorFlow examples, while the highly-optimized model in TensorFlow’s performance guide is quite different. The difference in training throughput (images per second) between these two ResNet-50 implementations is about a factor of two (when training on eight Tesla P100 GPUs, such as on an NVIDIA DGX-1). This is a significant difference. Given the fact that models such as ResNet-50 train for many hours even on a DGX-1, faster time to results means much higher productivity.
Multi-GPU Scaling
Using multiple GPUs is currently not officially supported in Keras using existing Keras backends (Theano or TensorFlow), even though most deep learning frameworks have multi-GPU support, including TensorFlow, MXNet, CNTK, Theano, PyTorch, and Caffe2.
Various developers have come up with workarounds for Keras’s lack of native multi-GPU support, but none are officially supported by Keras. This raises concerns about API divergence and potential corner cases that have not been code reviewed by core Keras developers. Keras’s official blog also demonstrates that by breaking the backend-independent abstraction and exposing TensorFlow’s multi-GPU primitives, it’s possible to get Keras to scale. Unfortunately this requires the user to understand the operation of the backend and its APIs, and exposes low-level operations such as multi-GPU gradient reduction to the user.
Better Performance with Keras and MXNet
Can we do better, leveraging Keras’s high-level API, while still achieving good single-GPU performance and multi-GPU scaling? It turns out that the answer is yes, thanks to the MXNet backend for Keras, and MXNet’s efficient data pipeline. As a motivating example, I’ll show you how to build a fast and scalable ResNet-50 model in Keras.
First, make sure you have MXNet installed. You can easily install MXNet with GPU support using pip. For higher performance, though, I highly recommend building from source, because you can select C++ compiler flags and other options to optimize performance for your target architecture. This is also a preferable route if pip packages lag behind the source. This happens when a new version of CUDA is released and the build pipeline for the pip binaries hasn’t caught up with the source.
Once you have MXNet installed, it’s time to set up Keras. For this experiment, you will need Keras with MXNet support, to install Keras from a fork rather than the original repository. The MXNet Keras fork is maintained by the MXNet team, but for this example, I will use an NVIDIA fork of Keras which contains the ResNet-50 example developed for this blog post.
First, make sure you have SciPy installed, since Keras requires it. Then clone the Keras repository and install Keras.
pip install scipy
git clone https://github.com/NVIDIA/keras.git
cd keras
python setup.py install
Note that should you wish to swap out backends, you just need to install another backend, say TensorFlow, and then change the backend framework from mxnet to tensorflow in ~/.keras/keras.json.
Data Preparation
Now that you have installed Keras with MXNet backend support, you need to download the ImageNet dataset and preprocess it into the MXNet-friendly RecordIO format. Create an ImageNet account to access the dataset. Upon creating the account, you will obtain a user ID and an access key. The following download script asks for the authentication information and where to store the data.
cd examples
bash ./download_imagenet.sh
Please note that the ImageNet dataset is about 250 GB in compressed form, so this download can take a while.
Once you have downloaded and preprocessed the dataset, it’s time to create the “.lst” files containing image metadata. Assuming that MXNet is installed in /opt/mxnet and the dataset resides in /data/imagenet, you can issue the following commands
python /opt/mxnet/tools/im2rec.py --list True --recursive True train /data/imagenet/train-jpeg
python /opt/mxnet/tools/im2rec.py --list True --recursive True val /data/imagenet/val-jpeg
Now you need to create RecordIO images. The RecordIO format is able to wrap many images along with their metadata into a single large file. Since the ImageNet dataset is very large, this process takes some time. While performing the conversion, you can resize the images to a specific dimension, since the original images have non-uniform dimensions. I chose to resize to 480×480 pixels, with a target JPEG image quality of 95 (for more information about the JPEG quality factor, see here). If your machine has lots of CPU cores, you should increase the number of processing threads to the number of physical cores in the system. For example, the NVIDIA DGX-1 has two CPUs with 20 cores each, so I set the num-thread parameter to 40.
python /opt/mxnet/tools/im2rec.py --resize 480 --quality 95 --num-thread 40 train /data/imagenet/train-jpeg
python /opt/mxnet/tools/im2rec.py --resize 256 --quality 95 --num-thread 40 val /data/imagenet/val-jpeg
That’s it! Now you’re ready to train your model. The following Python script shows the source code for model training:
import keras
import numpy as np

from time import time
import sys

from keras.preprocessing.image import ImageDataGenerator, array_to_img, img_to_array, load_img

def get_python_pipeline_data(path='cat.jpg', batch_size=32, img_size=[480, 480], reps=100):

    start = time()

    for rep in range(reps):
        batch = np.zeros((batch_size, img_size[0], img_size[1], 3))
        for i in range(batch_size):
            img = load_img(path)
            batch[i, :, :, :] = img

    duration = time() - start
    im_sec = 1.0 / (duration / (reps * batch_size))
    print("%.2f" % im_sec)

def get_keras_pipeline_data(path='cat.jpg', batch_size=32, image_size=480, nclass=1000):

    datagen = ImageDataGenerator(
            rotation_range=0,
            width_shift_range=0.0,
            height_shift_range=0.0,
            shear_range=0.0,
            zoom_range=0.0,
            horizontal_flip=True,
            fill_mode='nearest')

    img = load_img(path)
    features = img_to_array(img)
    features = features.reshape((1,) + features.shape)
    labels=np.random.randint(low=0, high=nclass-1, size=1)

    start = time()
    ctr = 0
    for batch in datagen.flow(features, labels, batch_size=batch_size,
        save_to_dir=None, save_prefix=None, save_format=None):
        ctr += 1
        if ctr > 20:
            break
    duration = time() - start
    im_sec = 1.0 / ((time() - start) / (ctr * batch_size))
    print("%.2f" % im_sec)

def main():

    print("Raw Python image pipeline:")
    get_python_pipeline_data()
    print("Keras image pipeline:")
    get_keras_pipeline_data()

if __name__ == '__main__':
    main()
You will note that the get_data() function relies on an MXNet image iterator. To use TensorFlow’s serialization format (TFRecord), which stores images and associated metadata in Protobuf format, you have to change this function to instead deserialize TFRecord files. It’s possible to use TensorFlow’s image I/O and MXNet’s execution backend as well, since ultimately Keras expects the inputs to be in NumPy array format, so the image pipeline and deep learning backends can be mixed and matched.
The Importance of an Efficient Data Pipeline
As I discussed in the last section, you can swap out the image pipelines from different deep learning frameworks, while keeping the graph execution framework (e.g. MXNet) fixed. You could even skip the framework’s image pipeline altogether, and instead use Pillow, OpenCV or other tools that read raw JPEGs and metadata text files to make the image pipeline backend-independent. Unfortunately, this is typically very slow compared to the frameworks’ own pipelines, even for one GPU. There are multiple reasons for this:
- The image processing routines are implemented in C++ (e.g. for Python’s OpenCV wrapper), but the library control is in Python. Jumping back and forth between native code and the Python interpreter adds to the overhead.
- The functions exposed in Python process one image at a time, requiring loops to batch up images. These are Python loops, and as many benchmarks show, Python code is often more than 10x slower than C++ code.
- The Python interpreter has a global interpreter lock (GIL), preventing multiple Python threads from executing at once. Workarounds that allow Python users to benefit from multi-core machines, e.g. multiprocessing, tend to be slower than a single-process, multi-threaded application, because data has to be copied between processes rather than shared by threads in a single process.
As expected, doing just image decoding via Python and Keras is very slow. Batching the images manually in Python resulted in about 257 images per second on a DGX-1. Even using Keras’s batching and augmentation wrapper (with augmentation disabled), which has some level of concurrency, only achieved 1,332 images per second. Meanwhile, MxNet’s image pipeline can decode about 3,767 480×480 pixel JPEG images per second with an intermediate level of augmentation (random cropping, left-right flipping, etc.).
As I show in this post, the 8-GPU throughput for ResNet-50 with the optimized image pipeline is 1,417 images per second, so using a Python image pipeline would have severely reduced the performance, even without augmentation. Since ResNet-50 needs augmentation in order to converge to the stated top-1 and top-5 accuracy, one can only imagine how much slower it would have been if we added augmentation to the already slow Python-based image pipeline.
A Few Words about Multi-GPU
Note the model_agnostic_compile() wrapper in our ResNet-50 script.
def backend_agnostic_compile(model, loss, optimizer, metrics, args):
  if keras.backend._backend == 'mxnet':
      gpu_list = ["gpu(%d)" % i for i in range(args.num_gpus)]
      model.compile(loss=loss,
          optimizer=optimizer,
          metrics=metrics,
          context = gpu_list)
  else:
      if args.num_gpus > 1:
          print("Warning: num_gpus > 1 but not using MxNet backend")
      model.compile(loss=loss,
          optimizer=optimizer,
          metrics=metrics)
The specification of the list of GPUs to use is specific to MXNet’s fork of Keras, and does not exist as an option when using other backends such as TensorFlow or Theano. Hence, this wrapper permits the user to benefit from multi-GPU performance using MXNet, while keeping the model fully general for other backends.
A word of caution: the data batch provided by the image pipeline is based on a global batch size that gets divided into shards if there are multiple GPUs. Therefore running the same model on a single GPU in another framework may blow up with an out of memory exception. The solution is simple: divide the global batch by the number of GPUs used previously to obtain the batch size adequate for one GPU. It’s also possible to configure a script that takes the per-GPU batch size and determines the global batch size based on the number of GPUs specified by the user. In this case, the model should not run out of memory on a single GPU, and should simply run faster on multiple GPUs.
Performance Results
Figure 1 compares the Keras model training performance using the MXNet backend to a reference model written using MXNet’s native API.
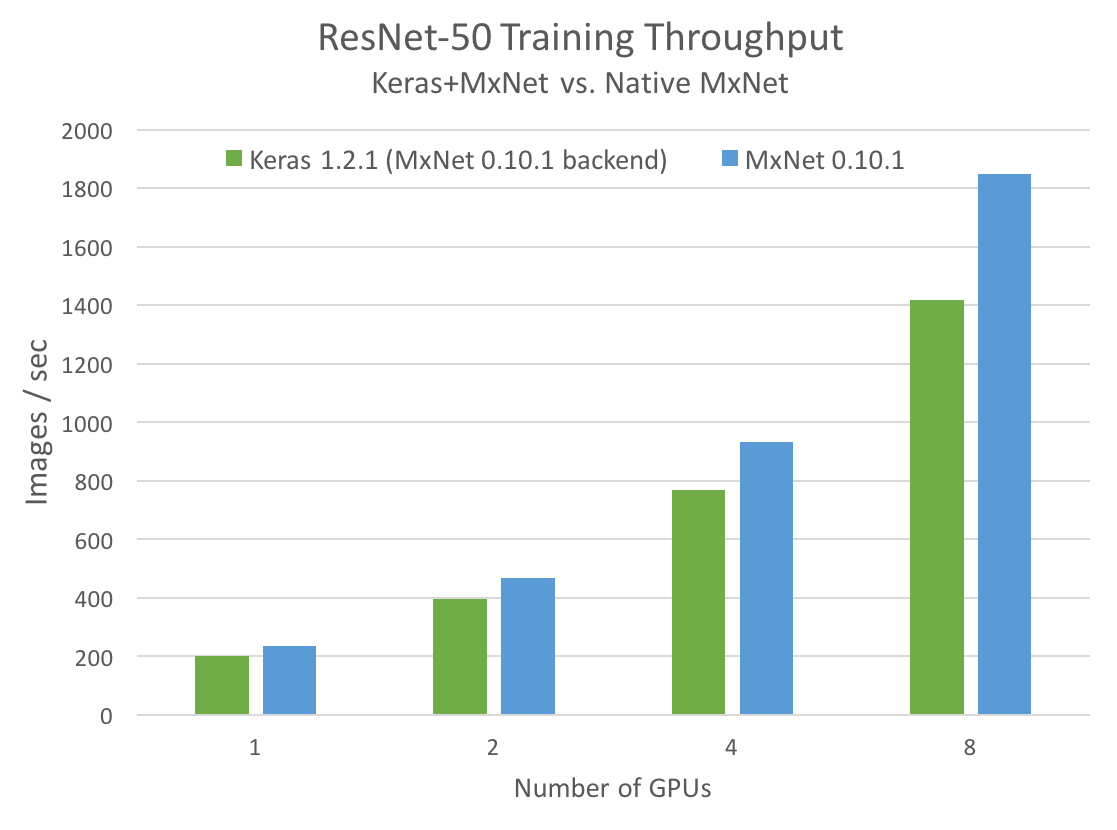
Keras performance is a bit worse than if we implemented the same model using the native MXNet API, but it’s not too far off. For a single GPU, the difference is about 15%. For 8 GPUs, it is 30%. However, for many users, the research and development productivity gain from Keras’s convenient abstractions outweighs this small slowdown. Performance with MXNet’s efficient image pipeline and fast and scalable backend is very good compared to running Keras training using a naive Python image pipeline (running Pillow or OpenCV and batching examples via the user’s script). For ResNet-50, Keras’s multi-GPU performance on an NVIDIA DGX-1 is even competitive with training this model using some other frameworks’ native APIs.
These results were obtained on an NVIDIA DGX-1 system with 8 Pascal GPUs and the following system details.
- CPUs: 2x Intel Xeon CPU E5-2698 v4 @ 2.20GHz (20 cores per socket, 40 cores total)
- GPUs: 8x Tesla P100
- Interconnect: NVLink between 4 GPUs attached to a given PCIe root complex (4 GPUs per CPU), QPI interconnect between CPUs
- 512 GB RAM
- Keras 1.2.1
- MxNet 0.10.1
- CUDA 8
- cuDNN 6
- base OS: Ubuntu 16.04 LTS
- NVIDIA Driver 384
- gcc 5.4.0
Try Keras with MXNet Today
After reading this post, I hope you can see that Keras is not only a productive way to develop deep learning models, but it can train them fast on multi-GPU machines like NVIDIA DGX-1 using the MXNet backend.
To learn more about the MXNet v0.11.0 release candidate with support for Keras v1.2, check out this post on the Amazon Web Services AI blog.