 Yesterday Facebook launched Caffe2, an open-source deep learning framework made with expression, speed, and modularity in mind. It is a major redesign of Caffe: it inherits a lot of Caffe’s design while addressing the bottlenecks observed in the use and deployment of Caffe over the years. As a result, Caffe2 opens the gate for algorithm experimentation and new products. Used internally for a variety of deep learning and augmented reality tasks, Caffe2 has been tempered in Facebook’s forge for scale and performance requirements. At the same time, it provides impressive new capabilities for mobile applications, such as advanced camera and messaging features.
In this first of a series of blog posts we will cover deep learning basics with Caffe2, demonstrating its flexibility and speed. We’ll cover why you would want to use Caffe2, what makes it different from Caffe, and then we’ll dive into an example of using Caffe2 with a pre-trained object classification model.
Code Once, Run Anywhere
Caffe2 emphasizes portability while maintaining scalability and high performance. Usually “portability” brings to mind overhead—how else would it work across so many platforms? And how does that overhead impact the ability to scale up? Well, Caffe2 has you covered! It was built from the ground up with performance, scale, and mobile deployments as the primary design goals. Caffe2’s core C++ libraries provide speed and portability, while its Python & C++ APIs make it easy for you to prototype, train, and deploy on Linux, Windows, iOS, Android, and even Raspberry Pi and NVIDIA Tegra. What about IoT, you ask? Caffe2 will work on a large range of devices. While you may not want to train a network on an IoT device, you will be able to deploy trained models on them.
Caffe2 opportunistically utilizes GPUs when they are available. Thanks to joint engineering from Facebook and NVIDIA, Caffe2 is fine-tuned to take full advantage of the NVIDIA GPU deep learning platform. Caffe2 uses the latest NVIDIA Deep Learning SDK libraries — cuDNN, cuBLAS and NCCL — to deliver high-performance, multi-GPU accelerated training and inference.
Most of the built-in functions seamlessly toggle between CPU-mode and GPU-mode depending on where they’re running. This means you get the bonus of super acceleration of your deep learning without additional programming. This gets into another exciting aspect of the framework: multi-GPU and multi-host processing. Caffe2 makes it simple to parallelize network training. Experimentation and scale are going to be so easy for you now.
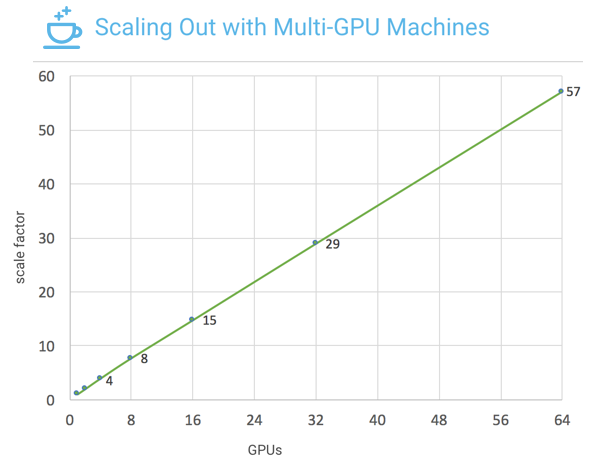
Recent benchmarks with ImageNet training used 64 of the latest NVIDIA GPUs and the ResNet-50 neural network architecture . Facebook engineers implemented Caffe2’s data_parallel_model to enable distributed neural network training on eight Facebook Big Basin AI servers with eight NVIDIA Tesla P100 GPU accelerators each, for a total of 64 GPUs. Figure 1 shows the scaling results on these systems: near-linear scaling of deep learning training with 57x throughput acceleration.
What’s New in Caffe2?
You might remember that in Caffe, everything is represented as a Net, which is composed of “layers” that define the computation in a neural network centric way. However, this creates a very rigid computation pattern, and results in many hard-coded routines, especially for training deep neural networks.
Caffe2 adopts a more modern computation graph to represent neural networks—or any other computation, including cluster communication or data compression. This computation graph uses the concept of “operators”: each operator contains the logic necessary to compute the output given the appropriate number and types of inputs and parameters. While the layers in Caffe always take tensors, which are matrices or multidimensional arrays, the operators in Caffe2 can take and produce “blobs”, which can contain arbitrary objects. This design allows a lot of things that used to be challenging in Caffe:
- Distributed training of CNNs can be represented by a single computation graph, whether training on one or multiple GPUs or multiple machines. This is crucial for Facebook-scale deep learning applications.
- Easy heterogeneous computation on specialized hardware. For example, on iOS, the Caffe2 computation graph can take an image from the CPU, convert it to Metal GPU buffer objects, and keep the computation completely on the GPU for maximum throughput.
- Better management of runtime resources, such as static memory optimization with memonger, or pre-packing trained networks for optimal performance.
- Computation with mixed precision float, float16, int8 and other quantized models.
Caffe2 includes over 400 operators to cover a wide range of functionality. You can browse the Operator Catalogue, check out Sparse Operations, and learn how to write custom operators.
Installation & Setup
One of the first things you might want to do is to check out Caffe2’s Github page, and clone or fork the project’s Github repo.
git clone https://github.com/caffe2/caffe2.git
If you haven’t already installed Caffe2, you can visit the installation instructions, try out a Docker image, or run it on your cloud provider of choice. The documentation website has instructions for each of these options. However, it is recommended that you witness the speed of GPU processing by launching a cloud instance with GPU support, or to install Caffe2 on your own hardware with an NVIDIA GPU. Here’s a quick way to launch Caffe2 with GPU support using NVIDIA Docker.
nvidia-docker run -it caffe2ai/caffe2 python -m caffe2.python.operator_test.relu_op_test
Trying out a Pre-trained Model
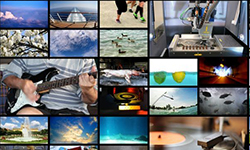
Let’s get our hands dirty and try it out! In this first tutorial I’ll show how easy it is to use Caffe2’s Model Zoo and model downloader to try out some other models on your own.
Using Caffe2’s Model Downloader
You can use the download module to acquire several pre-trained networks. You can incorporate the module into your scripts or use it on the command line.
python -m caffe2.python.models.download <model name>
For example, this command downloads the Caffe2 pre-trained model for squeezenet.
python -m caffe2.python.models.download squeezenet
For the next example of how to load a pre-trained network you will need to download squeezenet. The model downloader module has an “install” option that you can turn on with the -i switch, otherwise you’ll need to move the files around once you’ve downloaded them. Once installed you can also directly import the models into your Python script.
python -m caffe2.python.models.download -i squeezenet
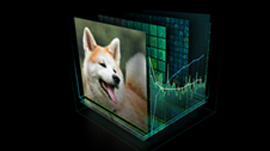
Running a Pre-trained Model: Object Classification
Let’s try out an example of object classification with Caffe2. This is straightforward once you have downloaded a pre-trained model. If you didn’t already download squeezenet, you can use the methods described earlier or you can download the init_net.pb and predict_net.pb files from S3. Place the files in the $PYTHONPATH/caffe2/python/models/squeezenet folder.
Your Python code is going to need Caffe2’s workspace to hold the model’s protobuf payloads of the model and the weights and load them into blobs, init_net and predict_net. You will use workspace.Predictor to take in the two protobufs and Caffe2 handles the rest. Caffe2 has a simple run function that takes in an image to analyze and it returns a tensor with the results.
# load up the caffe2 workspace
from caffe2.python import workspace
# choose your model here (use the downloader first)
from caffe2.python.models import squeezenet as mynet
# helper image processing functions
import caffe2.python.tutorials.helpers as helpers

# load the pre-trained model
init_net = mynet.init_net
predict_net = mynet.predict_net
# you must name it something
predict_net.name = "squeezenet_predict"
workspace.RunNetOnce(init_net)
workspace.CreateNet(predict_net)
p = workspace.Predictor(init_net.SerializeToString(), predict_net.SerializeToString())

# use whatever image you want (local files or urls)
img = “https://upload.wikimedia.org/wikipedia/commons/thumb/7/7b/Orange-Whole-%26-Split.jpg/1200px-Orange-Whole-%26-Split.jpg”
img = "https://upload.wikimedia.org/wikipedia/commons/a/ac/Pretzel.jpg"
img = "https://cdn.pixabay.com/photo/2015/02/10/21/28/flower-631765_1280.jpg"
# average mean to subtract from the image
mean = 128
# the size of images that the model was trained with
input_size = 227

# use the image helper to load the image and convert it to NCHW
img = helpers.loadToNCHW(img, mean, input_size)

# submit the image to net and get a tensor of results
results = p.run([img])
response = helpers.parseResults(results)
# and lookup our result from the list
print response
The results come back as a tensor (a multidimensional array) of probabilities. Essentially, each row is a percentage chance that the object matches something that the neural net recognizes.
Note that when the workspace’s Predictor function is called to load the pre-trained model, the next step is to call .run and pass that function an image array.
p = workspace.Predictor(init_net, predict_net)
results = p.run([img])
Image Preprocessing
For faster processing and some legacy reasons images fed to Caffe2 need to go through two transformations:
- swizzle the colors RGB to BGR, and
- encapsulate the image as an array of pixels and provide the number of images in the batch (1 in this case), channels (that’s the BGR arranged pixels), height, and width: this is called NCHW for Number, Channels, Height and Width.
These image pre-processing functions are handled by a helper module, so you can focus on the Caffe2-specific interactions. For more detailed coverage of image pre-processing, check out the IPython notebook dedicated to this topic.
Getting Results
When the model finishes processing the image array you get results in a multidimensional array of shape (1, 1, 1000, 1, 1).
results = np.asarray(results)
print "results shape: ", results.shape

results shape:  (1, 1, 1000, 1, 1)
See that 1000 in the middle of results.shape? If I had submitted more than one image in the batch then the array would be larger, but still have 1000 units there in the middle. That holds the probability for each category in the pre-trained model. So when you look at the results, it’s like saying, “Computer, what’s the probability that this is a Beryllium sphere?” Or gila monster, or any of the other 998 categories of things the model has been trained to recognize.
Here’s a slimmed down sorted extract of the top three results from that 1000-long tensor. The results were sorted by the probability of a match, 0.98222 (98%) being the highest.
[array([985.0, 0.9822268486022949], dtype=object), array([309.0, 0.011943698860704899], dtype=object), array([946.0, 0.004810151644051075], dtype=object)]
These are the top three categories sorted by probability that the object detected is a member of the category. You can use this gist based on the original labels used to group the objects to look up the result. Each time you run this example you’ll get slightly different results. Running an image of some daisies through the model gives:
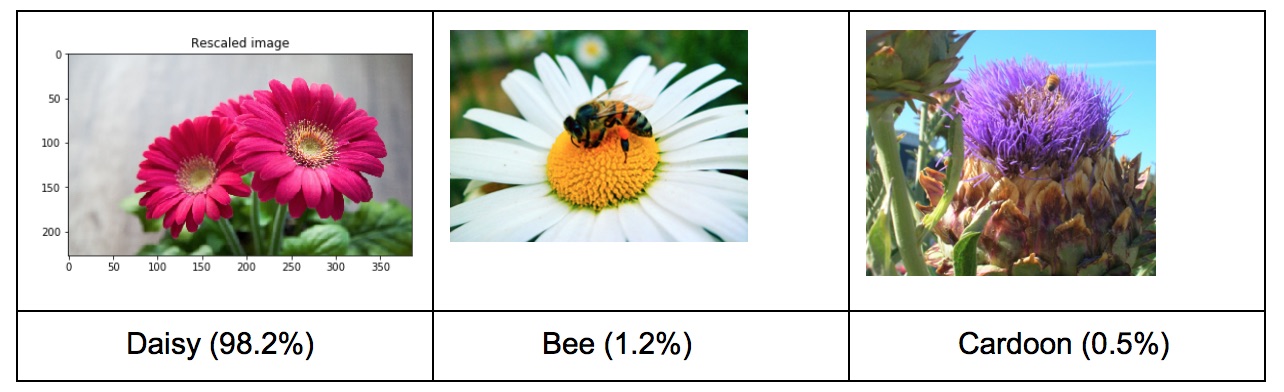
 A cardoon looks like a purple thistle flower (I had to look it up!). Given that bees are often photographed on flowers this result makes sense.
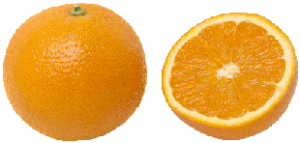
Running an image of a cut orange through the model gives: Orange (95.3%), Lemon (4.6%), Strawberry (0.006%).
Collaboration and Sharing with Caffe2
The cornerstone of Caffe2 is the community of developers, researchers, and businesses that have taken an interest in deep learning and have been using Caffe and other open source machine learning tools. We hope to advance the science of AI and promote its benefits across all facets of industry by fostering innovation and collaboration on Caffe2’s open source and Model Zoo. Members of Caffe2’s open source project can contribute directly on Caffe2’s GitHub Wiki page for the listings of all of the models.
We also invite developers, researchers or anyone that has taken an interest in creating or refining models to share them by creating an “issue” on Caffe2’s GitHub and asking for it to be added to the Zoo. The Github issues section isn’t just for developers on Caffe2. If you create Caffe2 models, improve upon pre-trained models, or even just use the pre-trained models, this area is there for your input, suggestions, and contributions to the source and the Model Zoo. There is further Caffe2 and Model Zoo collaboration info on the website.
Learn All About Caffe2 at GTC
This concludes our first Parallel Forall blog post. Stay tuned for our next post with a deeper dive on training ImageNet with Caffe2 where we’ll show some exciting new benchmarks for distributed training, tips on optimizing Caffe2 training, and details on how to use Caffe2’s data parallel model.
The GPU Technology Conference, May 8-11 in San Jose, is the largest and most important event of the year for AI and GPU developers. Use the code CMDLIPF to receive 20% off registration, and remember to check out the following Caffe2 technical talks.
- S7601 – Caffe2: a new lightweight, modular, and scalable deep learning framework, by Yangqing Jia – Research Scientist, Facebook
- S7783 – A fast, unified method for object detection, instance segmentation, and human pose estimation, by Ross Girshick – Research Scientist, Facebook
- Hands-on Caffe2 training will also be available at GTC as part of the NVIDIA Deep Learning Institute curriculum. Members of the NVIDIA DLI team will be on hand to help developers get their hands dirty with Caffe2 in a self-paced lab.
Until next time, we look forward to seeing your models in the Zoo and the awesome applications that you’re able to create with Caffe2.