Supervised training of deep neural networks is now a common method of creating AI applications. To achieve accurate AI for your application, you generally need a very large dataset especially if you create from scratch. Gathering and preparing a large dataset and labeling all the images is expensive, time-consuming, and often requires domain expertise.
To enable faster and accurate AI training, NVIDIA just released highly accurate, purpose-built, pretrained models with the NVIDIA Transfer Learning Toolkit (TLT) 2.0. You can use these custom models as the starting point to train with a smaller dataset and reduce training time significantly. These purpose-built AI models can either be used as-is, if the classes of objects match your requirements and the accuracy on your dataset is adequate, or easily adapted to similar domains or use cases.
The TLT is a Python-based AI toolkit for creating highly optimized and accurate AI apps using transfer learning and pretrained models. The TLT makes AI accessible to everyone: data scientists, researchers, new system developers, and software engineers who are just getting started with AI. Along with creating accurate AI models, the TLT is also capable of optimizing models for inference to achieve the highest throughput for deployment.
This post walks you through the workflow, from downloading the TLT Docker container and AI models from NVIDIA NGC, to training and validating with your own dataset and then exporting the trained model for deployment on the edge using NVIDIA DeepStream SDK and NVIDIA TensorRT. Alternatively, these models can be exported and converted to a TensorRT engine for deployment. We describe each of the models, four detection and two classification models.
In addition to the purpose-built models, TLT 2.0 supports training on some of the most popular object detection architectures, such as YOLOv3, FasterRCNN, SSD/DSSD, and RetinaNet, as well as popular classification networks such as ResNet, DarkNet, and MobileNet.
Purpose-built models
The purpose-built AI models are primarily built for applications in smart cities, parking management, smart buildings. They are trained on millions of images.
Both unpruned and pruned versions of these models are available on NGC. The unpruned models are used with TLT to re-train with your dataset. On the other hand, pruned models are deployment-ready, which allows you to directly deploy them on your edge device. In addition, the pruned model also contains a calibration table for INT8 precision. The pruned INT8 model provides the highest inference throughput.
Table 1 shows the network architecture and accuracy measured on this dataset.
| Model | Network architecture | Number of classes | Accuracy | Use cases |
| DashCamNet | DetectNet_v2-ResNet18 | 4 | 80% | Identify objects from a moving object like a car or robot |
| FaceDetect-IR | DetectNet_v2-ResNet18 | 1 | 96% | Detects faces in a dark environment close to the camera |
| PeopleNet | DetectNet_v2-ResNet34 | 3 | 84% | People counting, heatmap generation, social distancing |
| TrafficCamNet | DetectNet_v2-ResNet18 | 4 | 83.5% | Detect and track cars |
| VehicleMakeNet | ResNet18 | 20 | 91% | Classifying car models |
| VehicleTypeNet | ResNet18 | 6 | 96% | Classifying cars in a parking garage or tollbooth |
TrafficCamNet
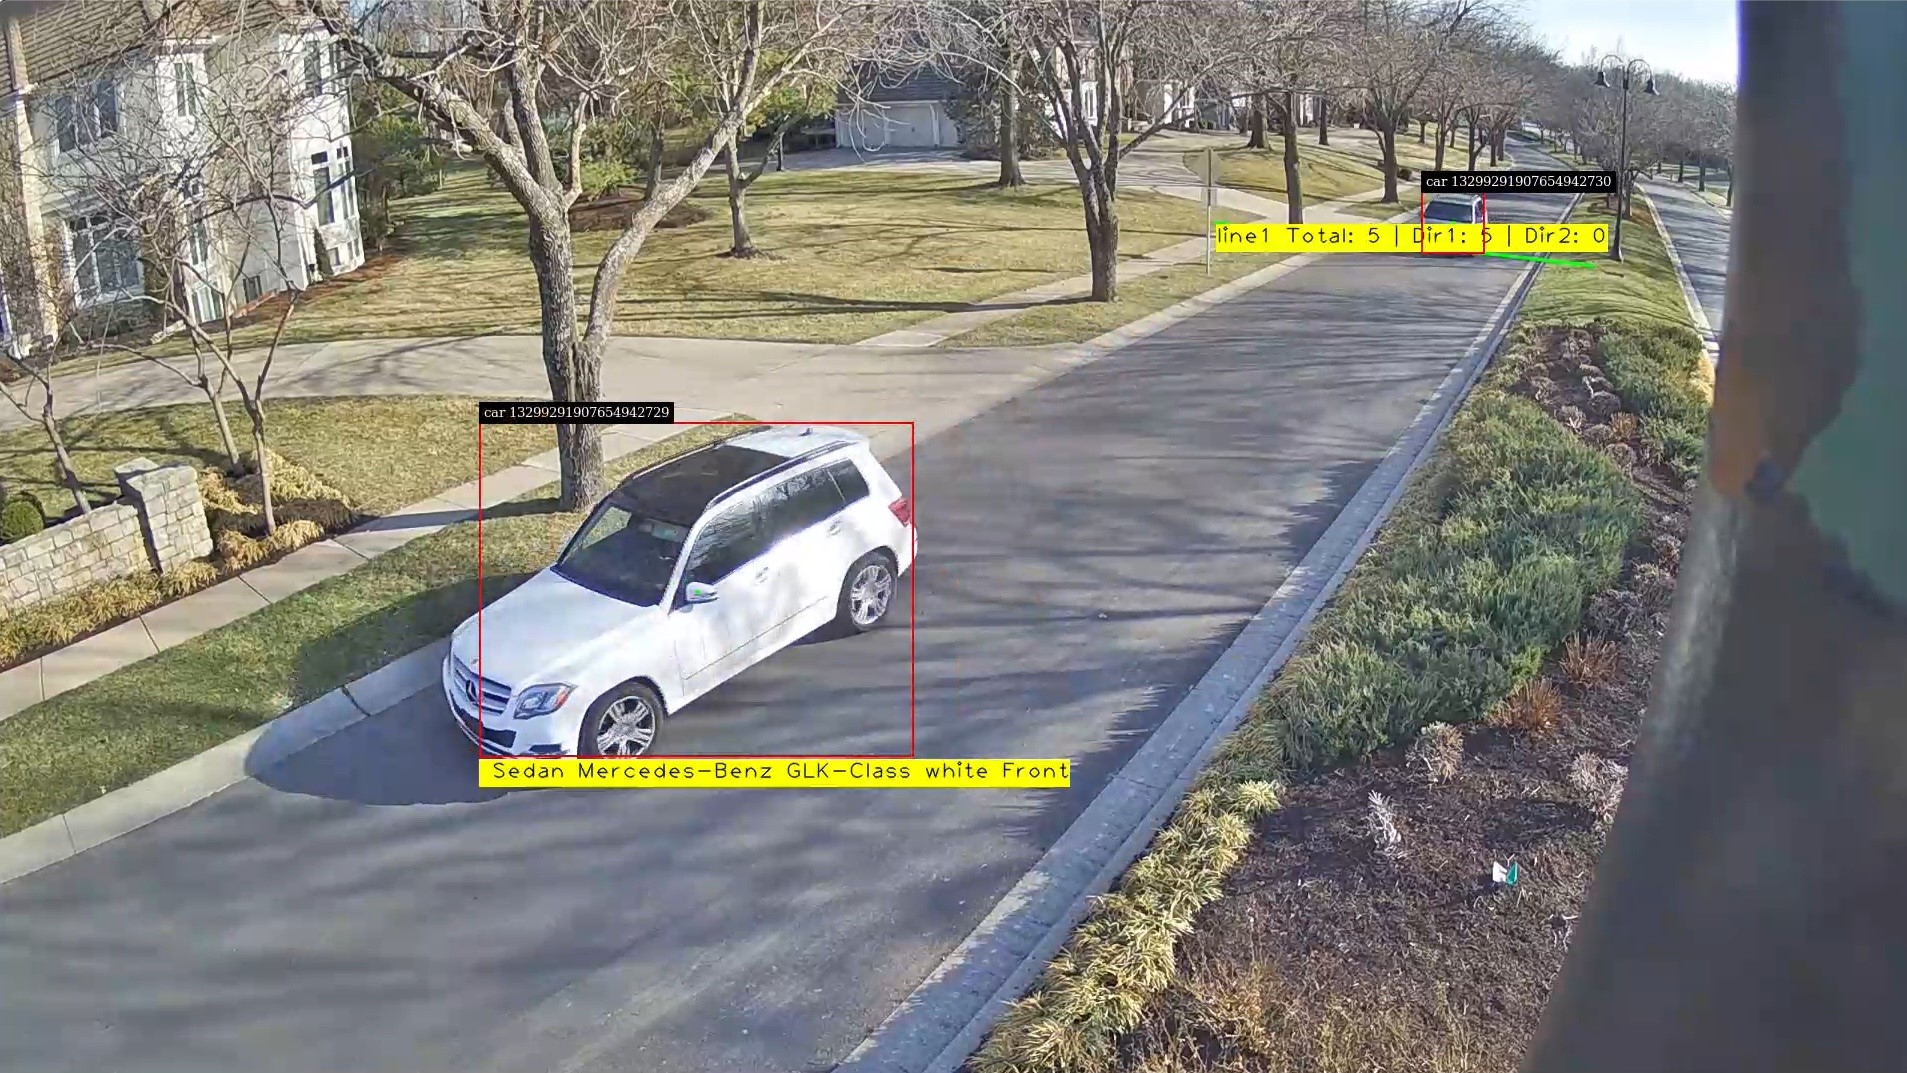
TrafficCamNet is a four-class object detection network built on the NVIDIA detectnet_v2 architecture with ResNet18 as the backbone feature extractor. It’s trained on 544×960 RGB images to detect cars, people, road signs, and two-wheelers.
The dataset contains images from real traffic intersections from cities in the US (at about a 20-ft vantage point). This model is trained to overcome the problem of separating a line of cars as they come to stop at a red traffic light or a stop sign. This model is ideal for smart-city applications, where you want to count the number of cars on the road and understand the flow of traffic.
PeopleNet
PeopleNet is a three-class object detection network built on the NVIDIA detectnet_v2 architecture with ResNet34 or ResNet18 as the backbone feature extractor. It’s trained on 544×960 RGB images to detect people, bags, and faces. Several million images of both indoor and outdoor scenes were labeled in-house to adapt to a variety of use cases, such as airports, shopping malls, and retail stores.
This dataset contains images from various vantage points. PeopleNet can be used for smart places or building applications where you need to accurately count people in a crowded environment for security or higher-level business insights.
DashCamNet
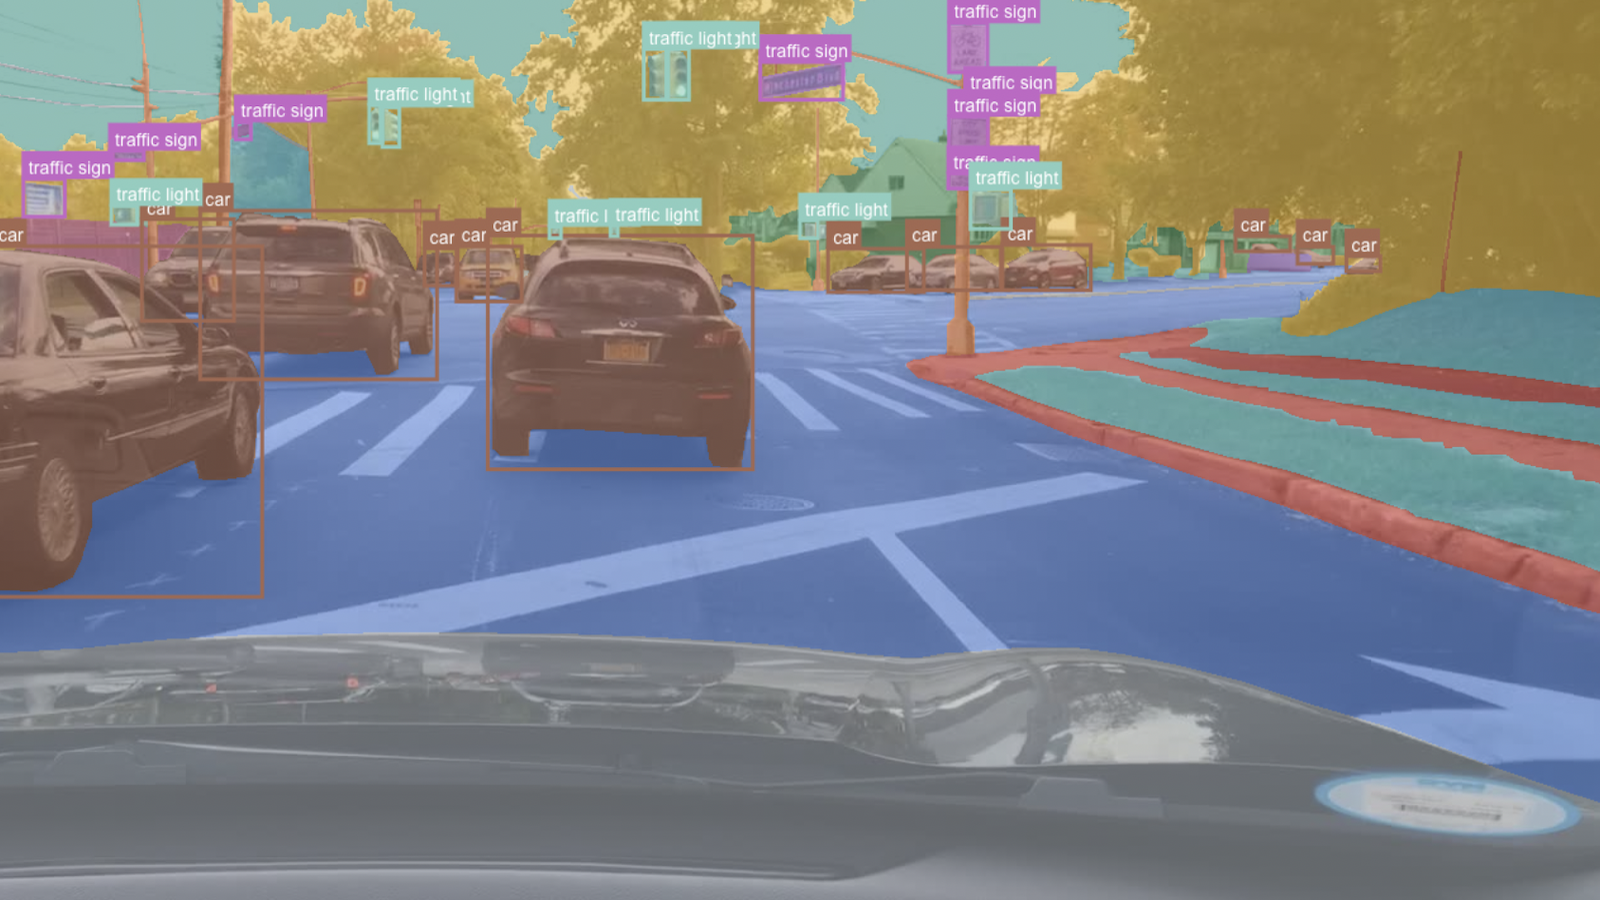
DashCamNet is a four-class object detection network built on the NVIDIA detectnet_v2 architecture with ResNet18 as the backbone feature extractor. It’s trained on 544×960 RGB images to detect cars, pedestrians, traffic signs, and two-wheelers.
The training data for this network contains real images collected, annotated, and curated in-house from different dashboard cameras in cars at about 4-5ft height in vantage point. Unlike the other models, the camera in this case is moving. The use case for this model is to identify objects from a moving object, which can be a car or a robot.
FaceDetect-IR
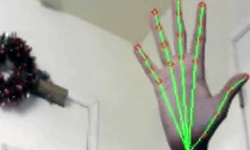
FaceDetect_IR is a single-class face detection network built on the NVIDIA detectnet_v2 architecture with ResNet18 as the backbone feature extractor. The model is trained on 384x240x3 IR (infrared) images augmented with synthetic noises.
This model is trained for use cases where the person’s face is close to the camera, such as a laptop camera during video conferencing or a camera placed inside a vehicle to observe a distracted driver. When infrared illuminators are used, this model can continue to work even when visible light conditions are considered too dark for normal color cameras.
VehicleMakeNet
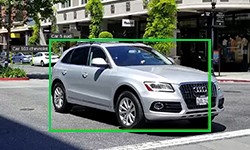
VehicleMakeNet is a classification network based on ResNet18, which aims to classify car images of size 224 x 224. This model can identify 20 popular car makes.
VehicleMakeNet is generally cascaded with DashCamNet or TrafficCamNet for smart-city applications. For example, DashCamNet or TrafficCamNet can act as a primary detector, detecting the objects of interest and for each detected car the VehicleMakeNet acts as a secondary classifier determining the make of the car. Businesses such as smart parking or gas stations can use the vehicle make insights to understand their customers.
VehicleTypeNet
VehicleTypeNet is a classification network based on ResNet18, which aims to classify cropped vehicle images of size 224 x 224 into six classes: Coupe, Large Vehicle, Sedan, SUV, Truck, and Vans. The typical use case for this model is in smart city applications such as smart garage or tollbooth, where you can charge based on size of the vehicle.
Training the PeopleNet model
To get started, first set up a NVIDIA NGC account, if you don’t have one already. Start by pulling the TLT container:
docker pull nvcr.io/nvidia/tlt-streamanalytics:v2.0_dp_py3
To see the list of available models, use the following command:
ngc registry model list nvidia/tlt_*
To download a desired model, such as PeopleNet, use the following command:
ngc registry model download-version nvidia/tlt_peoplenet:unpruned_v2.0 --dest
$model_path

The full workflow consists of the following steps:
- Preparing data
- Configuring the spec file
- Training
- Pruning
- Exporting the model
Preparing data
TLT object detectors expect data in KITTI file format. Normally, you have many image files and associated label files that provide a label for each object in each image as well as the corresponding coordinates of the four corners of their bounding boxes. This arrangement requires access to memory for these files. You need a better arrangement for faster processing.
Use TFrecords to better manage and iterate faster through the dataset. Serializing data is particularly helpful for reading data efficiently over a network. Use the following directory structure to format the raw data:
|--dataset_root
  |-- images
      |-- 000000.jpg
      |-- 000001.jpg
      |-- xxxxxx.jpg
  |-- labels
      |-- 000000.txt
      |-- 000001.txt
      |-- xxxxxx.txt
To convert the dataset to TFrecords, create a conversion config file. You need one conversion file for training and another one for model evaluation.
The following code example shows the training dataset conversion config file:
kitti_config {
  root_directory_path: "/path/to/trainval_root"
  image_dir_name: "images"
  label_dir_name: "labels"
  image_extension: ".jpg"
  partition_mode: "random"
  num_partitions: 2
  val_split: 14
  num_shards: 10 }
With kitti_config, the dataset is randomly divided into two partitions, training and validation. This is set by the partition_mode and num_partitions keys values. The val_split option specifies the percentage of data used for validation.
Similarly, to convert your test set to TFRecords, your conversion file should look like the following code example:
tlt-dataset-convert -d $conversion_spec_file_trainval -o $tfrecord_path_trainval
tlt-dataset-convert -d $conversion_spec_file_test -o $tfrecord_path_test
Despite the val_split value, you can evaluate the entire test set by using validation_data_source in the spec file, which is discussed in the next section.
kitti_config {
  root_directory_path: "/path/to/test_root"
  image_dir_name: "images"
  label_dir_name: "labels"
  image_extension: ".jpg"
  partition_mode: "random"
  num_partitions: 2
  val_split: 14
  num_shards: 10 }
image_directory_path: "/path/to/test_root"
Now convert both datasets to TFrecords:
tlt-dataset-convert -d $conversion_spec_file_trainval -o $tfrecord_path_trainval

tlt-dataset-convert -d $conversion_spec_file_test -o $tfrecord_path_test
Configure the spec file
A specification file is necessary as it compiles all the required hyperparameters for training and evaluating a model. As mentioned earlier, PeopleNet is built on top of the proprietary DetectNet_v2 architecture. The sample configuration file for DetectNet_v2 consists of the following key modules:
- dataset_config
- model_config
- training_config
- augmentation_config
- postprocessing_config
- evaluation_config
- box_rasterizer_config
- cost_function_config
Dataset config
The dataset_config module of the PeopleNet’s spec file is formatted as follows:
dataset_config {
data_sources: {
  tfrecords_path: “/path/to/trainval_tfrecords/*”
  image_directory_path: “/path/to/trainval_root”
}
image_extension: “jpg”
target_class_mapping {
  key: “person”
  value: “person”
}
target_class_mapping {
  key: “face”
  value: “face”
}
target_class_mapping {
  key: “bag”
  value: “bag”
}
 validation_fold: 0
 # For evaluation on test set
 # validation_data_source: {
 #    tfrecords_path: "/path/to/test_tfrecords/*"
 #  image_directory_path: "/path/to/test_root"
 # }
To specify validation data, use validation_fold. For test data, use validation_data_source.
Model config
Model structure and the related hyperparameters can be configured using the model_config module. Depending on the architecture that you choose, the hyperparameters for the architecture or backbone may vary.
ResNet34 is used in PeopleNet. With a frozen convolutional layer, the weights do not change in the frozen layer during loss update. This is especially helpful in transfer learning, where you can reuse the features provided by the pretrained weights and reduce training time.
model_config {
  pretrained_model_file: “/path/to/pretrained/model”
  num_layers: 34
  freeze_blocks: 0
  arch: “resnet”
  use_batch_norm: true
  objective_set {
    bbox {
      scale: 35.0
      offset: 0.5
    }
    cov {
    }
  }
  training_precision {
    backend_floatx: FLOAT32
  }
}
Training config
The training config module is self-explanatory, where common hyperparameters like batch size, learning rate, regularizer, and optimizer get specified.
It’s a good practice to start with a low regularization weight. Gradually fine tune it to narrow the gap between the training and the validation accuracy.
training_config {
batch_size_per_gpu: 24
num_epochs: 120
learning_rate {
  soft_start_annealing_schedule {
    min_learning_rate: 5e-06
    max_learning_rate: 0.0005
    soft_start: 0.1
    annealing: 0.7
  }
}
regularizer {
  type: L1
  weight: 3e-09
}
optimizer {
  adam {
    epsilon: 9.9e-09
    beta1: 0.9
    beta2: 0.999
  }
}
cost_scaling {
  initial_exponent: 20.0
  increment: 0.005
  decrement: 1.0
}
checkpoint_interval: 10
}
Augmentation config
The augmentation module provides some basic on-the-fly data preprocessing and augmentation during training. The PeopleNet training pipeline takes 544×960 RGB images with horizontal flip, basic color, and translation augmentation as input.
augmentation_config {
 preprocessing {
 output_image_width: 960
 output_image_height: 544
 crop_right: 960
 crop_bottom: 544
 min_bbox_width: 1.0
 min_bbox_height: 1.0
 }
 spatial_augmentation {
   hflip_probability: 0.5
   zoom_min: 1.0
   zoom_max: 1.0
   translate_max_x: 8.0
   translate_max_y: 8.0
 }
 color_augmentation {
   hue_rotation_max: 25.0
   saturation_shift_max: 0.20000000298
   contrast_scale_max: 0.10000000149
   contrast_center: 0.5
 }
}
Post-processing config
The post-processor module generates renderable bounding boxes from the raw detection output. This process involves retaining valid detections by thresholding objects using the confidence value in the coverage tensor and clustering the candidate bounding boxes using a clustering algorithm for each class independently. In DetectNet_v2, density-based spatial clustering of applications with noise (DBSCAN) is used.
The greater the dbscan_eps (ε) value, the more boxes are grouped together.
postprocessing_config{
 target_class_config{
   key: "person"
   value: {
     clustering_config {
       coverage_threshold: 0.005
       dbscan_eps: 0.265
       dbscan_min_samples: 0.05
       minimum_bounding_box_height: 4
     }
   }
 }
 target_class_config{
   key: "bag"
   value: {
     clustering_config {
       coverage_threshold: 0.005
       dbscan_eps: 0.15
       dbscan_min_samples: 0.05
       minimum_bounding_box_height: 4
     }
   }
 }
 target_class_config{
   key: "face"
   value: {
     clustering_config {
       coverage_threshold: 0.005
       dbscan_eps: 0.15
       dbscan_min_samples: 0.05
       minimum_bounding_box_height: 2
     }
   }
 }
}
For more information about setting up cost_function_config and box rasterizer_config as well as different hyperparameters, see the Transfer Learning Toolkit Intelligent Video Analytics Getting Started Guide.
Training
When the data preparation is complete and spec files are configured, you are ready to start training. Use the following command:
tlt-train detectnet_v2 -e $spec_file_path -r $experiment_dir_unpruned -k $KEY --gpus $N
If you use any purpose-built model as pretrained weights, make sure to set $KEY to tlt_encode.
The tlt-train command generates KEY-encrypted models and training logs in the experiment directory. It supports multi-GPU training so that you can train the model with several GPUs in parallel. Training with multiple GPUs allows networks to ingest large amounts of data and train the model in a shorter time. You can check the training progress in the log or the monitor.json file.
When the initial training is complete, the next step is to evaluate the accuracy of the model. To evaluate the PeopleNet model, that you just trained or retrained, use tlt-evaluate.
The evaluation_config module in the spec file is dedicated to configuring various thresholds for each class for evaluation. Remember to update validation_data_source in dataset_config to point to your test set.
evaluation_config {
 validation_period_during_training: 10
 first_validation_epoch: 120
 minimum_detection_ground_truth_overlap {
   key: "bag"
   value: 0.5
 }
 minimum_detection_ground_truth_overlap {
   key: "face"
   value: 0.5
 }
 minimum_detection_ground_truth_overlap {
   key: "person"
   value: 0.5
 }
 evaluation_box_config {
   key: "bag"
   value {
     minimum_height: 40
     maximum_height: 9999
     minimum_width: 4
     maximum_width: 9999
   }
 }
 evaluation_box_config {
   key: "face"
   value {
     minimum_height: 2
     maximum_height: 9999
     minimum_width: 2
     maximum_width: 9999
   }
 }
 evaluation_box_config {
   key: "person"
   value {
     minimum_height: 40
     maximum_height: 9999
     minimum_width: 4
     maximum_width: 9999
   }
 }
}
After setting the evaluation_config and dataset_config values, you are ready to evaluate the model.
tlt-evaluate detectnet_v2 -e $spec_file_path -m $peoplenet_model_path -k $KEY
All the detection frameworks use mean average precision (mAP) as a shared metric. Average precision (AP) calculation mode can be either SAMPLE or INTEGRATE.
- SAMPLE is used as VOC metrics for VOC 2009 or before, when AP is defined as the mean of precision values at a set of 11 equally spaced recall levels.
- INTEGRATE is used for VOC 2010 or after that, when AP is a direct estimate of area under curve (AUC) for precision and recall. Use INTEGRATE because it’s a much better metric for model evaluation.
The output of tlt_evaluate on the test set looks something like the following:
=========
class mAP
========
person 94.19
bag 75.93
face 94.59
Pruning
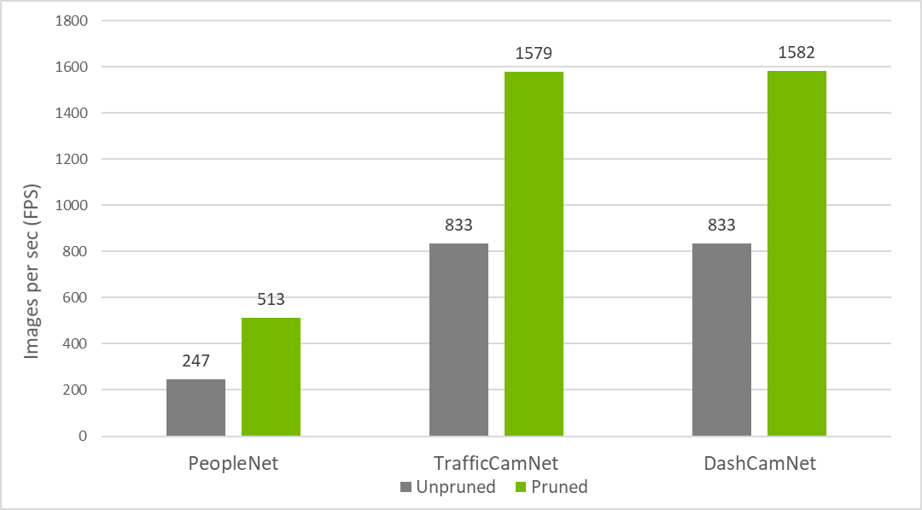
With pruning, models can be made leaner by reducing the number of parameters by an order of magnitude without compromising the overall accuracy of the model itself. This technique makes inferencing faster, increasing the inference throughput for video frames.
Pruning is a two-step process: prune the model and then re-train the model. When you initially prune the model, you lose some accuracy. However, you can regain accuracy by retraining the model with your dataset.
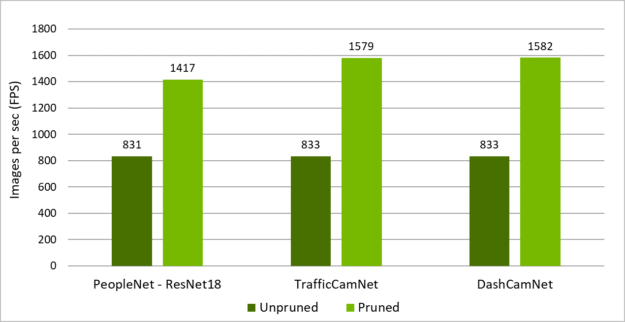
Figure 3 shows the inference throughput for PeopleNet, TrafficCamNet, and DashCamNet for both unpruned and pruned models. Using the dataset for pruning, you can increase the throughput by 2x to 3x.
Pruning is highly dependent on the architecture of the network and the dataset. Generally, the larger the dataset, more aggressively that you can prune while maintaining comparable accuracy. Smaller datasets can suffer from overfitting when you retrain after pruning.
Pruning is controlled by pruning threshold using option -pth in the tlt-prune command. The higher the pruning threshold, the more aggressively it prunes, which might reduce the overall accuracy of the model. You should experiment with this hyperparameter to find the right spot between pruning and accuracy of the model.
To prune the PeopleNet model, use the tlt-prune command:
tlt-prune -m $peoplenet_model_path -o $pruned_model_path -pth 0.005 -eq union -k $KEY
The output of tlt-prune tells you how much the original model is pruned:
[INFO] __main__: Pruning ratio (pruned model / original model): 0.1258476362418
In this example, you could prune by almost 88%. The pruned model is one-eighth the size of the original model.
After pruning, the model must be retrained to recover accuracy as some useful connections may have been removed during pruning. To fine tune the pruned model, make sure that the pretrained_model_file parameter in the spec file is set to the pruned model path before running tlt-train.
tlt-train detectnet_v2 -e $spec_file_path -r $experiment_dir_pruned -k $KEY --gpus $N
You can use tlt-evaluate to evaluate the pruned model when the finetuning is done. Here is an example result:
===========
class mAP
===========
person 95.74
bag 79.17
face 96.76
Now you have a model that is one-tenth the size while keeping comparable accuracy. When you feel confident in your model, the next step is to export it for deployment.
Exporting the model
The final step is to export your trained model for deployment. The format for deployment is .etlt or encrypted TLT. You encrypt the exported model with a key and use the key to decrypt the model during deployment.
To run inference using INT8 precision, you can also generate an INT8 calibration table In the model export step. The encrypted TLT can be directly consumed in the DeepStream SDK.
To export the PeopleNet model in INT8, use the following command:
tlt-export detectnet_v2 -m $peoplenet_model_path -o $int8_etlt_file \
-e $spec_file -k $KEY --cal_image_dir $calibration_image_dir --data_type int8
--batch_size N  --batches 10 --cal_cache_file $calibration_table
--cal_data_file $calibration_data_cache
Model deployment with the DeepStream SDK
The DeepStream SDK is a streaming analytic toolkit to build AI-based applications for video and image understanding. The DeepStream SDK can help build optimized pipelines taking streaming video data as input and outputting insights using AI. It offers turnkey integration of models trained with the TLT.
Start by downloading and installing the DeepStream 5.0 Developer Preview. In the /samples directory, find the config files to run DeepStream applications:
cd /opt/nvidia/deepstream/deepstream-5.0/samples/configs/tlt_pretrained_models
To run your AI model, use deepstream-app, an end-to-end configurable application that is built-in to the DeepStream SDK. In this app, you can configure the input source, output sinks, and AI model. The .etlt model with the encryption key can be directly consumed by this app.
You can also provide the INT8 calibration table to run the inference in INT8 precision. For inference, use TensorRT, the NVIDIA high-performance inference runtime. To infer with TensorRT, DeepStream first converts the .etlt file with the encryption key to TensorRT engine file.
After the engine file is generated, it starts the pipeline. The initial generation of the engine file can take a few minutes or longer, depending on the platform. Alternatively, you can also provide a TensorRT engine file directly to the DeepStream SDK. To convert the encrypted .etlt file to a TensorRT engine, use tlt-converter. If you run DeepStream on x86 with an NVIDIA GPU, you can use tlt-converter from the TLT container. If you are running on NVIDIA Jetson, an ARM64-based tlt-converter can be downloaded separately.
There are generally two or more config files that are required to run deepstream-app. One is the top-level config file that sets parameters for the entire pipeline, and the others are config files for the inference. For usability and simplicity, each inference engine requires a unique config file. If you cascade multiple inferences, you must have multiple config files. For this example, use the following files:
deepstream_app_source1_peoplenet.txtconfig_infer_primary_peoplenet.txtlabels_peoplenet.txt
The model name and encrypted key are specified in the config_infer_primary_peoplenet.txt file. Change the following key parameters:
[property]
tlt-encoded-model=<TLT model>
tlt-model-key=<Model Key>
labelfile-path=<Label file>
int8-calib-file=<INT8 Calibration cache>
input-dims=<Inference resolution>
num-detected-classes=<# of classes>
Now, run the application:
deepstream-app -c deepstream_app_source1_peoplenet.txt
A pop-up window should open with the sample video showing bounding boxes around pedestrians and faces.
You can also change the detection threshold per class to improve your detection or completely remove objects from being detected. For more information about these parameters, see the NVIDIA DeepStream SDK Quick Start Guide and NVIDIA DeepStream Plugin Manual.
Conclusion
In this post, you learned about six highly accurate models that have been trained with a large dataset manually labeled for ground truth. These models can be used as pretrained models to do further transfer learning, but they can also be used directly in your products. Both the unpruned model and a smaller pruned model are available from NGC.
PeopleNet was used as an example to walk you through a few simple steps for training, evaluating, pruning, retraining, and exporting the model. The resulting model can be directly consumed by the DeepStream SDK pipeline for inference applications.
This works on servers with T4 or other Tesla GPUs, as well as on Jetson edge devices such as the Nano or Xavier family of devices. You can also generate INT8 calibration files to run inference at INT8 precision. Pruning plus INT8 precision gives you the highest inference performance on your edge devices.
For more information, see the following resources:
- Transfer Learning Toolkit and pretrained models
- DeepStream SDK
- Building Intelligent Video Analytics Apps Using NVIDIA DeepStream 5.0 (Updated for GA) post
- The TLT Developer Forums or DeepStream Developer Forums for questions or feedback
- Jetson developer community projects using TLT and DeepStream