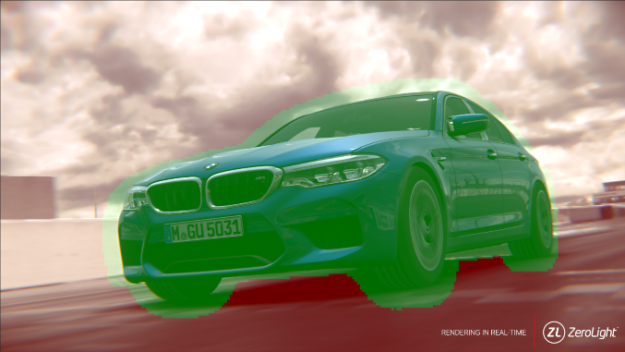
 ZeroLight’s proprietary visualisation platform is used across the automotive industry. Offering real-time product rendering, hyper-realistic visuals, our proprietary supersampling technology, and fully configurable models, our platform has enabled automotive OEMs to exceed their customers’ expectations with a range of dynamic, high-quality experiences for various outputs.
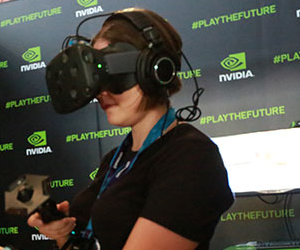
Virtual reality represents a key output for us because it offers various use-cases, ranging from brand awareness to sales. We have created many popular VR experiences including the Audi VR Experience, the Nissan LEAF VR Experience , and the BMW M Virtual Experience.
The updated BMW M Virtual Experience uses variable rate shading (VRS) and the new HTC VIVE Pro Eye HMD to deliver foveated rendering. This updated virtual experience will be available in the VR Village at GTC San Jose 2019.
Creating high-quality experiences for these premium brands requires high frame rate and low latency. We see great performance gains from core hardware improvements with every new NVIDIA GPU, such as clock speed, shader unit count, and memory bandwidth increases. However, the real jumps in performance often come from the features unlocked with new features in VRWorks, enabled by the new NVIDIA Turing hardware.
VRWorks
Implementing VRWorks is simple to do with Unity, Unreal, or any other engine. The core functions exist in the NVAPI, making it easy for you to integrate VRWorks functionality into your engine. In our case, we created a dynamically linked library (DLL) which activates VRWorks features.
ZeroLight had previously integrated VR SLI to reduce VR latency on Multi GPU VR workstations and Single Pass Stereo to reduce the CPU overhead of rendering multiple eyes on a single GPU.
Variable Rate Shading for VR
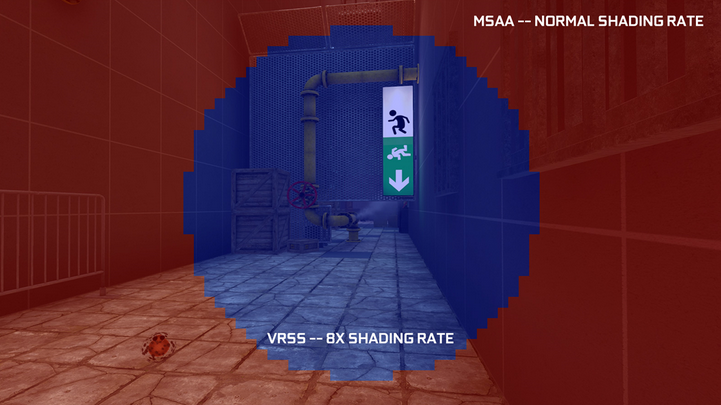
VRS is perfect for VR since the high-resolution displays and high frame rate requirements mean many VR applications become pixel bound. VRS plus an NVIDIA RTX GPU significantly reduces this overhead on any VR HMD.
We integrated two solutions into our application: lens-optimised shading and foveated rendering with eye tracking.
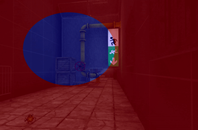
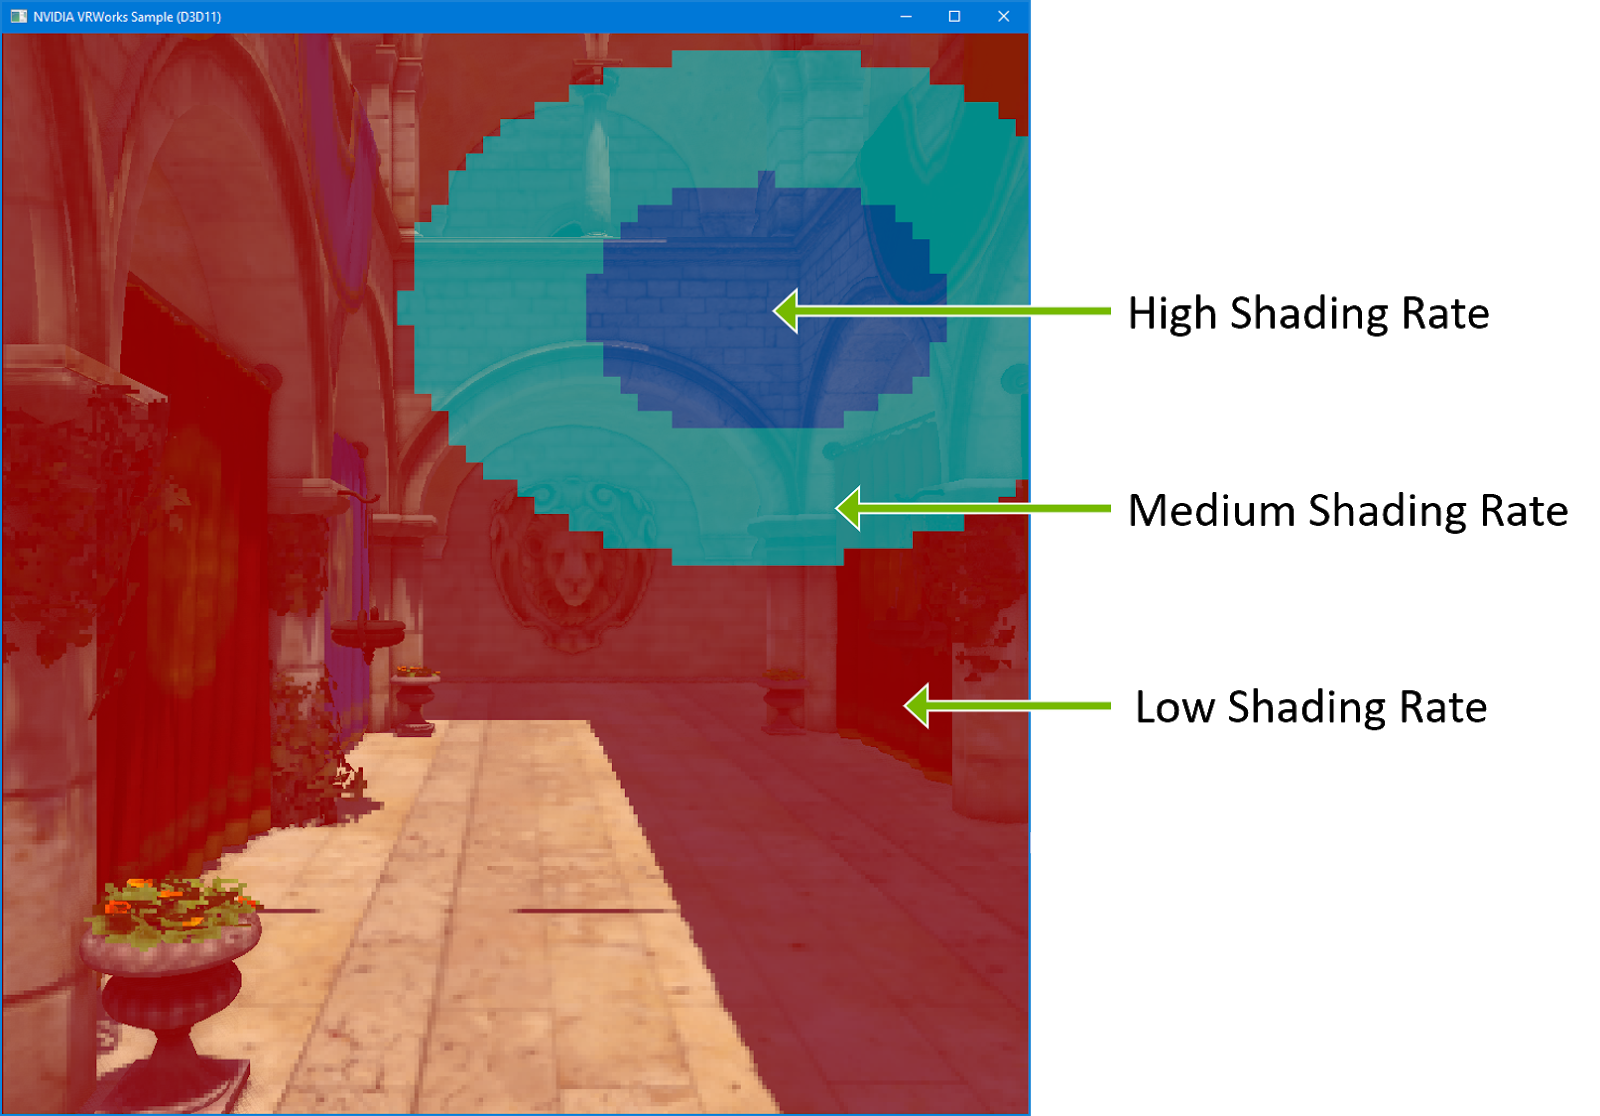
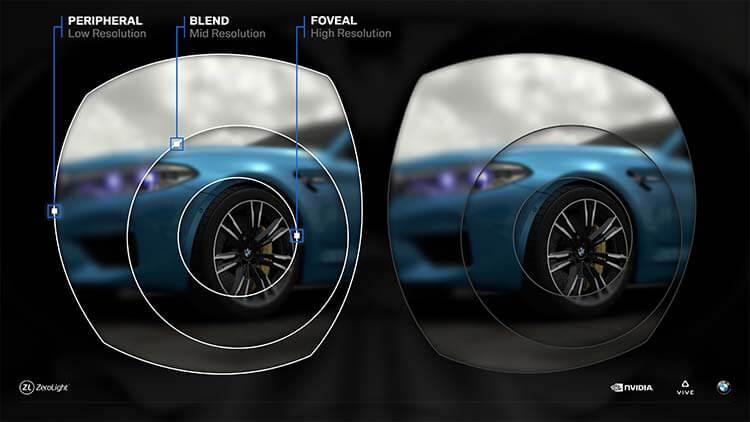
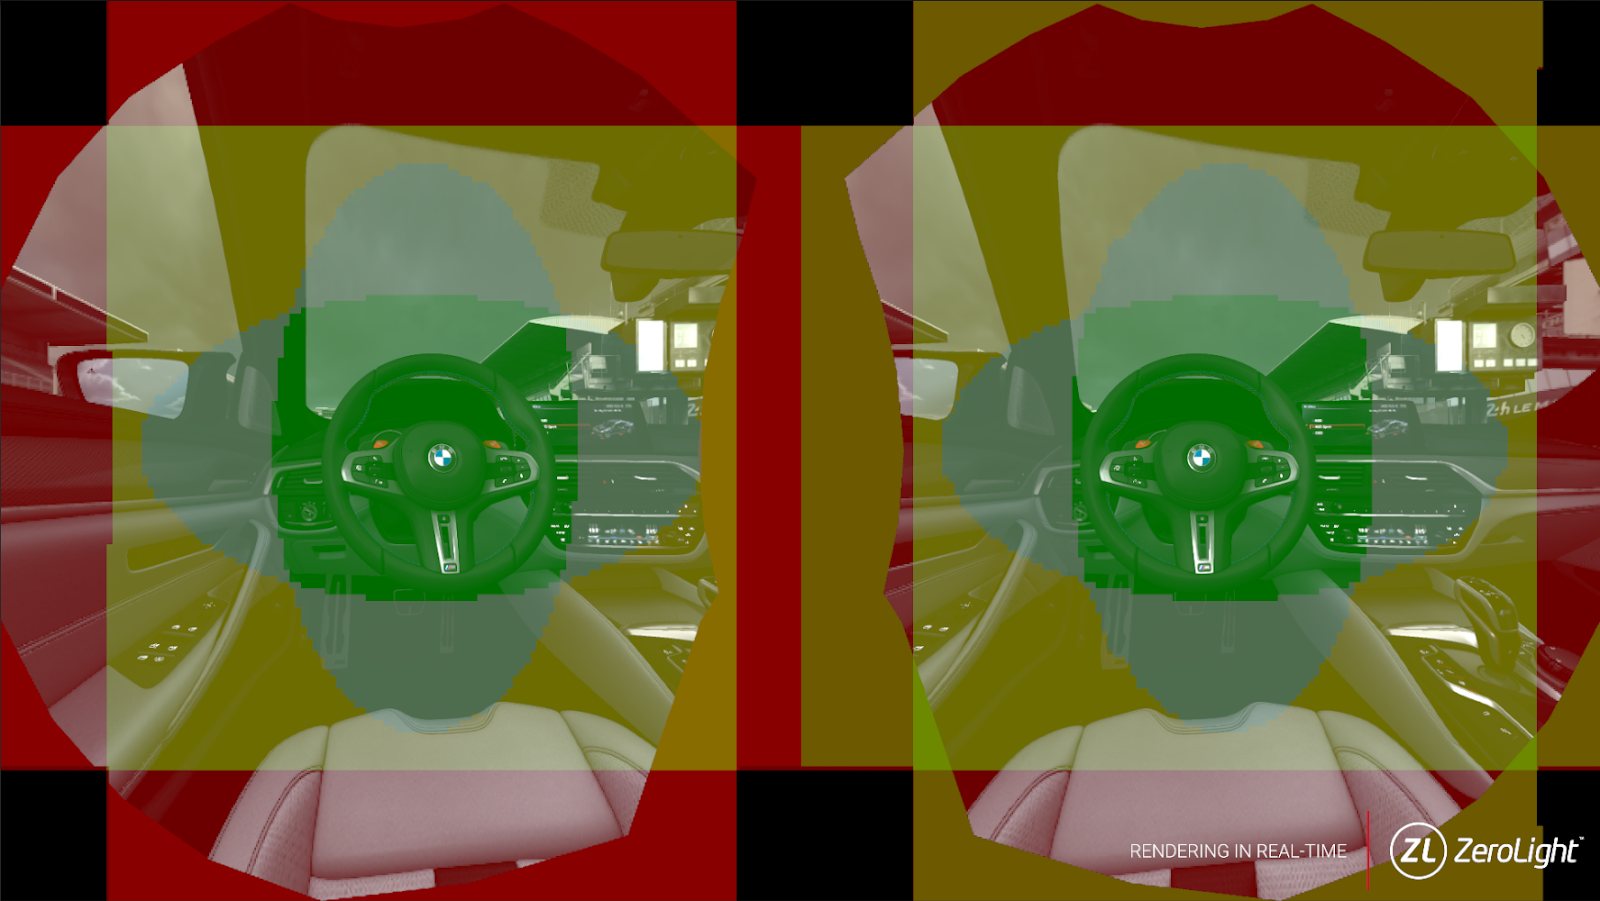
Foveated rendering requires an eye-tracking head-mounted display (HMD), such as the new HTC Vive Pro Eye. Tracking the user’s gaze enables us to dynamically update the VRS texture to increase pixel density where the user is looking, as figure 1 shows. Lens-optimised shading is similar to Lens Match Shading and Multires Shading. Because VR HMD lenses warp the pixels on the display, we use VRS to vary the render density and reduce the pixel cost without any visual change.
How to Integrate VRS
Using VRS in your application only requires a few simple calls, which all need to be part of the device thread.
- Initialize NVAPI and check to see that the GPU supports VRS
- Create a single-channel, 8-bit per pixel texture
- Render shading rate table index values to this texture and bind to the viewport
- Render the static mask for your HMD to this texture once for lens-optimised shading
- Update each frame using the vectors returned from the HMD eye tracking SDK for foveated rendering
Below is a high level overview of the main NVAPI functions required in your application. See the example included in VRWorks SDK for more details.
void Plugin_Initialize()
{
	//Initialize NVAPI
	NvAPI_Initialize();

	//Check VRS Support
	NV_D3D1x_GRAPHICS_CAPS caps = {};
	if (NvAPI_D3D1x_GetGraphicsCapabilities(d3d11NativeDevice, NV_D3D1x_GRAPHICS_CAPS_VER, &caps) == NVAPI_OK
		&& caps.bVariablePixelRateShadingSupported)
	{
		isTuringCard = true;
	}
}

//Update texture using compute shader or render
RenderFullScreenWithShader(VRSTexture)

//Pre main camera Render
void Plugin_EnableVRS(void* VRStextureResourceView)
{
	//Create look up table with shading rates and set
	vrsViewportDescription.numViewports = 2;
	NvAPI_D3D11_RSSetViewportsPixelShadingRates(deviceContext, &vrsViewportDescription);

	//Set texture to be used as index into shading rate table
	NvAPI_D3D11_RSSetShadingRateResourceView(deviceContext, VRStextureResourceView);
}


//Engine main camera render
GameEngineCamera.Render();

//Post main camera render
void Plugin_DisableVRS()
{
	//Create look up table with shading rates and set
	vrsViewportDescription.numViewports = 0;
	NvAPI_D3D11_RSSetViewportsPixelShadingRates(deviceContext, &vrsViewportDescription);
}
Results
We tested performance using a Quadro RTX 6000 GPU. Figure 2 shows VRS supersampling performance. This depends on the setting at which a particular application becomes pixel bound.
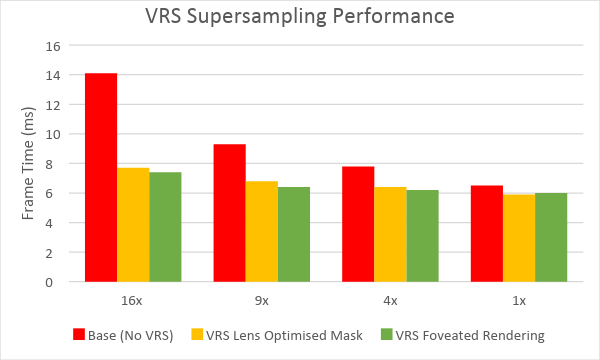
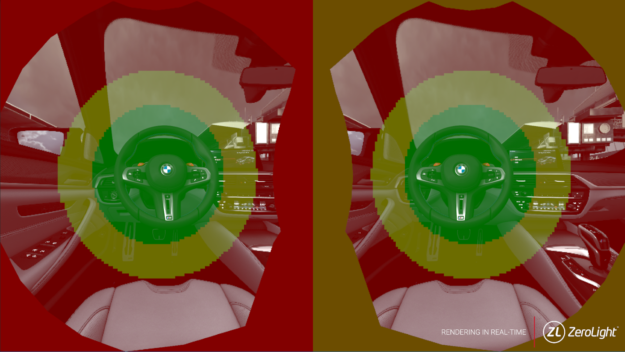
Figure 3 shows lens-optimised shading for the VIVE Pro. The lookup texture renders once and remains static. We show the rendered views with debug overlays visible.
- R = 4×4 pixel block
- Yellow = 2×2 pixel block
- Light green = 2×1 or 1×2 pixel block
- Green = 1×1 pixel block
- Black = no pixels rendered
Using VRS for lens-optimised shading gives your application an easy fill rate performance boost at no loss of quality and no requirement for new HMD hardware. The image in figure 3 above shows that 50% of the display renders at a lower pixel density. Figure 4 shows the resulting performance.
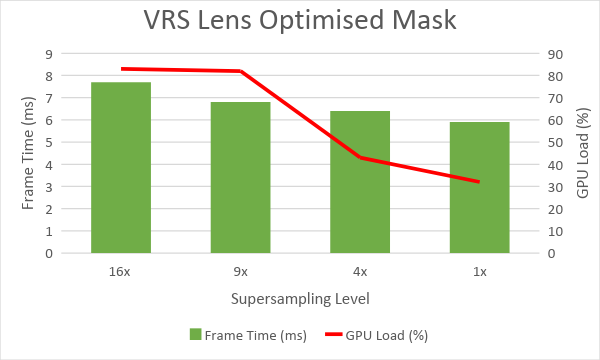
Figure 5 highlights foveated rendering with the Vive Pro Eye. The application updates the texture for each frame using the gaze vector for each eye from the HMD’s eye-tracking device. Foveated rendering allows us to increase the size of the lower pixel density area and reduce the rendering cost even further. Headsets with wide FOVs and high pixel density displays show even greater performance gains.
You can see how frame time changes using VRS foveated rendering in figure 6.

GPU load not 100%?
The GPU load on the graph shows the percentage of the GPU being used. We could achieve even higher performance gains using VRS for foveated rendering, but our application becomes bound by another resource: CPU memory bandwidth. This is due to the number of draw calls and different complex materials rendered on the BMW M5 model.
Your application may similarly become bound by other resources. The easiest way to track down these bottlenecks is to use the NVIDIA Nsight toolset to profile your application and system.
Why use Supersampling?
Antialiasing represents an important method for improving visual quality in computer graphics. This is especially true for VR due to constant small movements from the user wearing the HMD even when standing still. Antialiasing often gets underused due to the render cost required to render the extra pixels used to filter the image.
Supersampled antialiasing renders the scene at a high resolution before filtering down to the resolution of the viewable display. As a result, details look finer and the noticeable flickering in VR is substantially reduced. Supersampling also minimises the “screen door effect,” which prevents the user from being fully immersed in the experience. Meshes causing the most issues are geometries created from CAD data in which all the fine details are modelled, such as stitches, numbers, and icons. These details generate many sub-pixel triangles. We have an automated pipeline to convert this data. Given thousands of configurable models, the scope for remodelling or converting to textures is beyond the resources of most modelling shops.
The cost of having to render so many extra pixels is not feasible for most applications. However, using VRS enables us to create targeted supersampling, greatly reducing the cost to render while improving the quality in the areas of focus for the user.
The animated images in figures 7 and 8 below show how clear this quality improvement can be.
![]() VRS Also for High Resolution Displays and More
VRS Also for High Resolution Displays and More
We always look for new ways to optimise the real-time rendering output, especially when presenting at higher resolutions such as 4K or 8K displays. Using VRS and a proxy of the vehicle enables the render target to have high levels of supersampling with a reduced render cost since only the pixels containing the car render at the supersampled resolution. This helps ensure sub-pixel details like stitches and the dashboard don’t flicker as the user moves around the scene.
ZeroLight offers many other visualisation products, including our web configurator, powered by our cloud streaming solution. This product is currently live worldwide with Audi. This solution has similar functionality as the point of sale configurator in a showroom except that cloud servers handle all the render computation.
![]() Find out more
Find out more
Learn more about ZeroLight’s real-time automotive visualisation including ray tracing, and other next-generation VR features at the GTC San Jose session, S9209 – Advances in Real-Time Automotive Visualisation – Thursday, Mar 21, 2:00 PM – 02:50 PM – SJCC Room 230A (Concourse Level). ZeroLight’s integration of our own software supersampling technology with VRS showcases the flexibility of NVIDIA’s virtual reality technology.
For ZeroLight tech projects and updates, follow our tech Twitter page @TechZeroLight